Big Agnes Ripple Creek UL2+ mtnGLO
The Ripple Creek UL2+ mtnGLO has been discontinued. If you're looking for something new, check out the best three-season tents for 2024.


 Reviewed by
Ashleigh
RETAILER
BRAND REP
+4,271
 October 30, 2015 (original Oct 29, 2015)
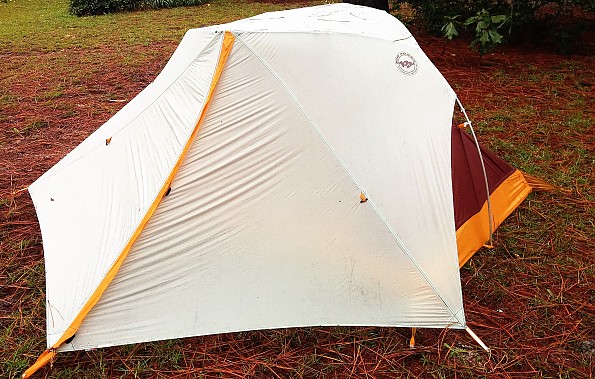
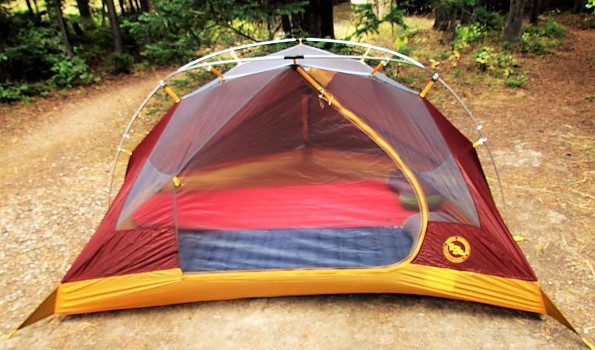
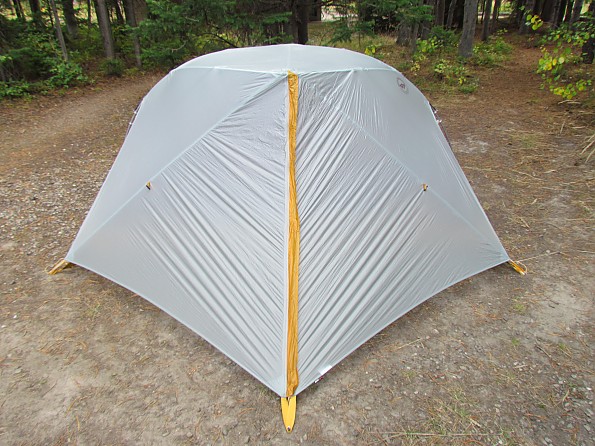
The Big Agnes Ripple Creek UL 2+mtnGLO is a uniquely designed feature-rich new tent for 2015. It sets itself apart from other tents because it has LED lights sewn into the tent ceiling, and in lieu of having a second vestibule, it has an extended floor plan to include more dry storage, maximizing the amount of usable space in the tent. The Ripple Creek also has a hybrid single/double wall design with a partial fly to effectively save both weight and pack space.
Pros
- Lightweight
- Generous interior space
- Easy to set up and take down
- Has a covered dry vestibule
Cons
- Not freestanding
- Not fast fly compatible
- Floor and stake loops are delicate
Dimensions
- 87" long floor (37 sq.ft)
- 53" wide at head and foot, total 75" wide across the middle (from door to door)
- 40" peak height
- 12 sq.ft. vestibule
- Weight: Trail weight 3lb 4oz, packed weight 3lb 10oz (plus about an ounce for the three AAA batteries)
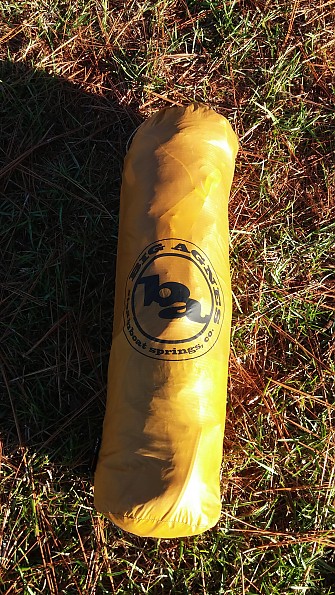
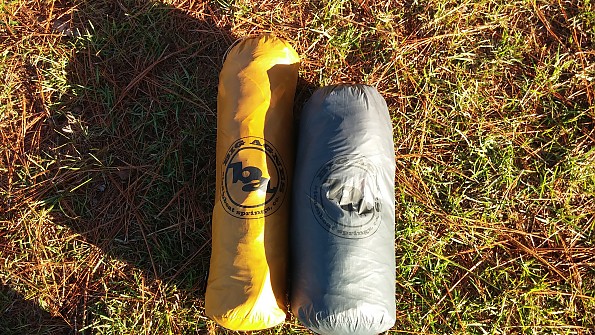
- Packed size: 5" wide by 20" long
What it comes with:
- 2 DAC Pressfit ultralight aluminum poles
- 12 lightweight and very durable J-stakes
- Tent body
- Partial fly
- Pole field repair kit
The Big Agnes Ripple Creek UL 2+ mtnGLO tent is a hybrid style tent that is designed to lighten your load and save room in your pack by incorporating a tent body that is partially mesh in the front and the top, and one large piece of waterproof ripstop nylon for the rest of the body that doesn’t need fly coverage.
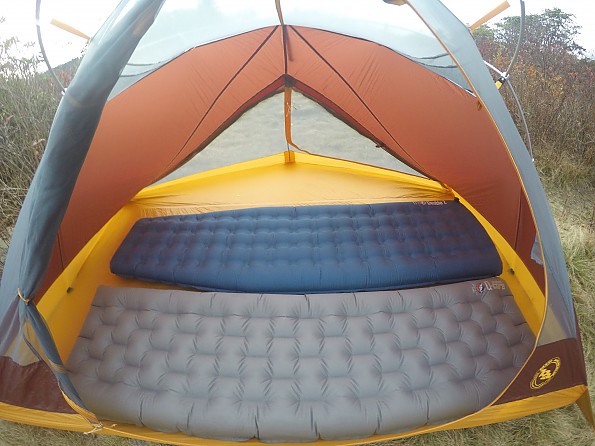
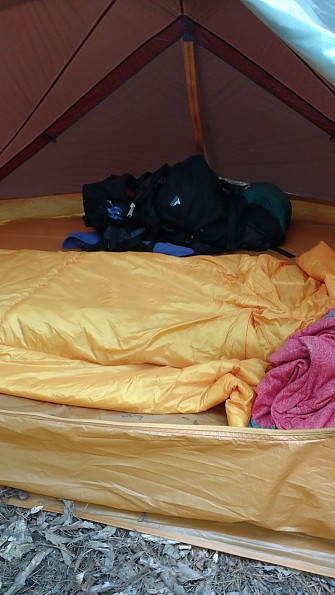
It has a ton of interior room due to the 37 square foot floor plan and the 40" dome style ceiling that extends across the tent, creating room for two people to easily sit up and move around if necessary. I loved having all of the extra room. My husband and I had to wait out weather several times in this tent and we had more than enough room to be comfortable and not feel claustrophobic.
Most sub-four pound backpacking tents that I have seen have a 29-32 square foot floor, so it is impressive that this tent is able to have so much room at such a low weight. I tested the Mountain Hardwear Optic 2.5 last year and was blown away by its interior square footage. The Ripple Creek has the same interior square footage as the Optic 2.5 but weighs almost half as much.
Most ultralight tents also do not have all the features that this one does, such as the mtnGLO lights, media pockets, two doors, and even an extended dry space. In addition to all of its features, I also have to praise its versatility because it has several different setup options. After testing this tent, I was pleasantly surprised with its weather handling capability and stability, as well.
Construction & Durability
The Ripple Creek is thoughtfully designed to save weight and pack space, yet keep you completely protected from the elements.
Tent Body
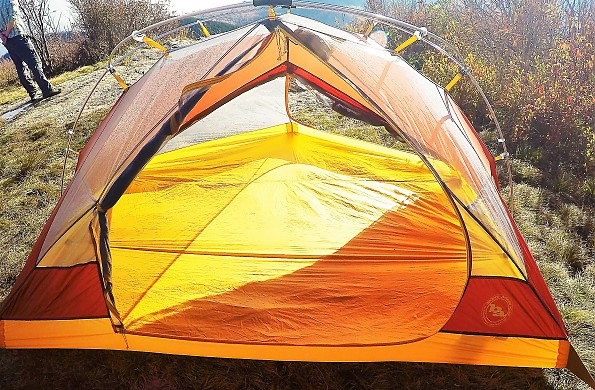
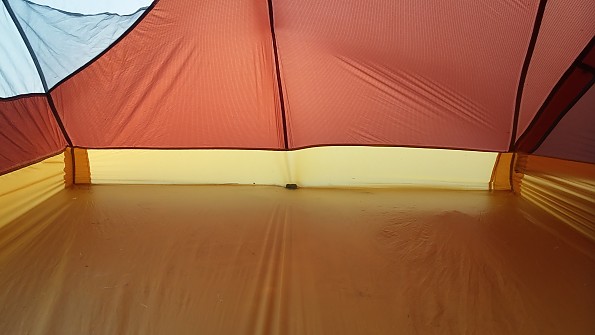
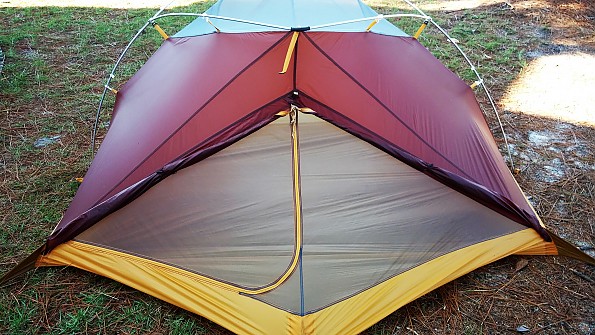
The tent body has a pentagon shaped bathtub floor that is made of silicone treated rip-stop nylon with a 1200mm waterproof polyurethane coating. I really like this feature because the bathtub floor is plenty tall enough to prevent any splashback from entering the tent.
The single wall section starts at the top of the floor and extends all the way around the back of the tent, up a large portion of the sides, and up several additional inches in the front to make sure all of what the fly doesn’t cover is protected.
I love the floor design, but I do wish that it was a little bit thicker and more durable. I did not see what denier it is. I wouldn’t say that a footprint is 100% necessary, but I would definitely recommend getting one if you purchase this tent.
As I mentioned earlier, instead of having two exterior vestibules, the Ripple Creek has an extended floor that acts like an inside dry vestibule. It is “V” shaped.
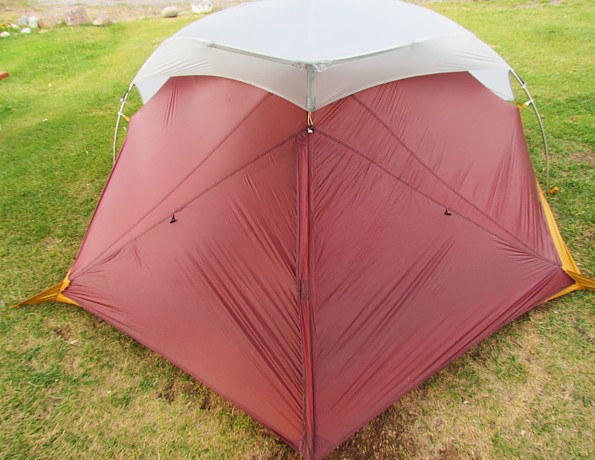
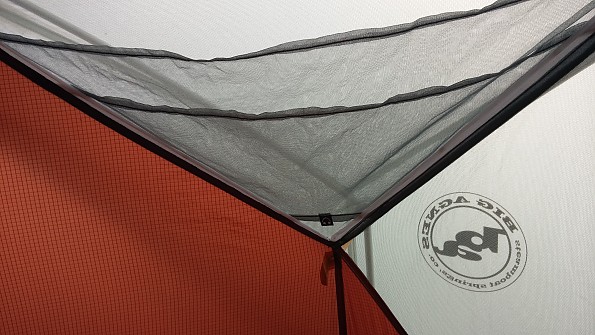
The gold bathtub floor connects to mesh and has two sides, one that is closed and one that unzips and turns into a quick access door. The mesh continues on over the top of the tent back to the front and on the top section of the sides.
Big Agnes could have made that whole back section single wall, but to aid in ventilation, they made it mesh with another piece of the waterproof tent wall that connects to the back of the tent. It has toggles on both sides of the back and one on the inside for the mesh door so that the entire back portion of the tent can be open to vent or closed and protected from the elements.

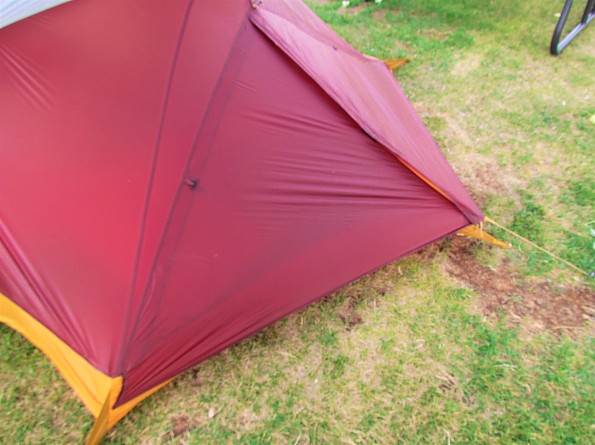
Fly
Partial flies are trending in new tent designs, but the majority of them that I know of do not provide adequate gear protection because they are cut super short in an effort to cut weight. I would not want to use one of those tents because it is important to me to have enough room to store my gear and shoes in a dry place without compromising the interior tent space. The Ripple Creek’s fly sets the bar for the way a partial fly should be designed — ultralight fabric that is waterproof and provides full coverage where it is most important.
The Ripple Creek’s ultralight partial fly is a center zip fly with a two way zipper for additional venting and a storm flap (with Velcro tabs) that covers the length of the zipper.
It makes for a very spacious front vestibule and has a generous amount of space between the tent and the fly to help make sure that there is plenty of ventilation. I do think one more velcro tab on the storm flap would be helpful for extra windy/stormy conditions because I noticed that the zipper was exposed from the flap blowing open during high winds.
If you look at the tent body, you will see that a large part of it is already covered in nylon, so the fly only covers the mesh part that needs the extra protection. This saves both weight and pack room. It attaches to the back of the top of the tent near the NR joint by a clip and loop system. The underside of the fly also has several Velcro stays that wrap around various points of the poles to additionally anchor the fly to the tent.
It connects to the side poles by an elastic band and hook. It stakes down in the front at the bottom of the zipper and on each side with guy lines. With this setup, it is very well protected from weather, but allows a breeze to come in through the sides. When I first picked up the fly, I thought “Oh wow, this is really flimsy. There is no way this thing keeps out rain.” I was wrong.
Miscellaneous Parts
J Stakes
Twelve ultralight and super durable aluminum “J stakes” are included with the Ripple Creek. They do not bend and provide a very solid anchor. There were several times that I stayed in campsites with very hard ground and I had to use a rock to hit the stakes into the ground, but they were not affected whatsoever. They can be tricky to remove sometimes if buried deep enough, so I also knocked them loose from the side with a rock, as well. They were again unaffected.
Poles
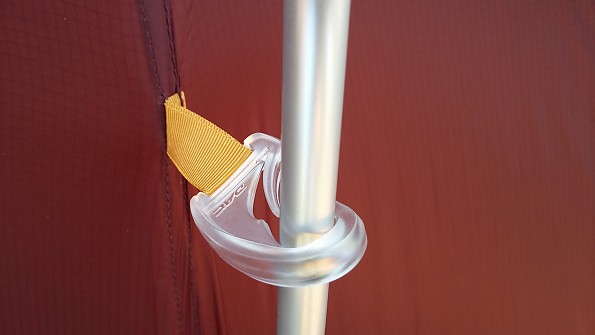
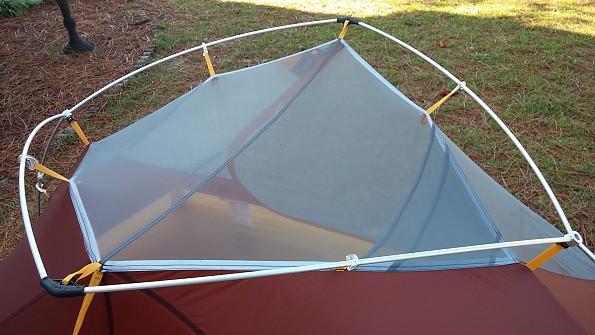
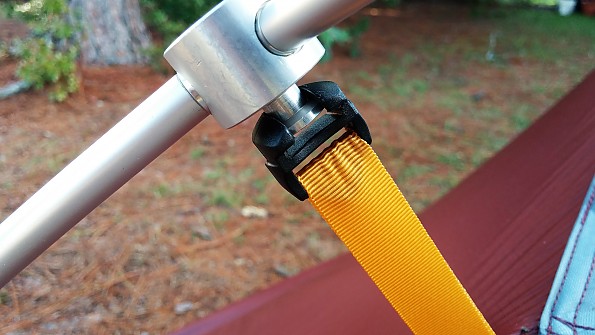
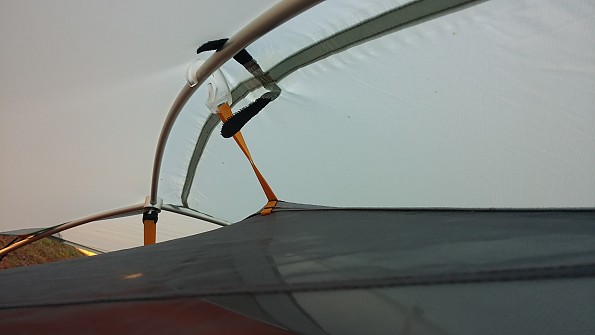
The Ripple Creek uses two DAC Pressfit ultralight hubbed aluminum poles that provide the tent with a lot of stability and help create its taut pitch. They each have two pieces that stick out on the poles, called S Stoppers. One is on of the bottom of the hub that connects to the body of the fly with a clip called an H clip and the other is located midway down the long pole that the fly fastens to the tent. Both poles are Y shaped. The bottom of the pole fits into one of the grommets on the side and each of the Y ends connect to the stabilizing NR joints located at the front and back of the top of the tent.
Clips
Several of the new Big Agnes tents (including the Ripple Creek and the Copper Spur) are using new clips, made by DAC, called Twist Clips, to secure the tent body to the poles at a slight angle. They are very easy to clip on and are made of a lightweight but really thick clear plastic that I’ve found to be very durable. These really appear to be meant to last a long time.
Features
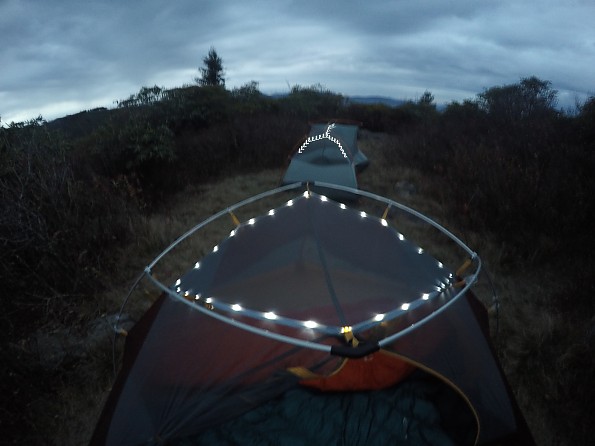
mtnGLO Lights
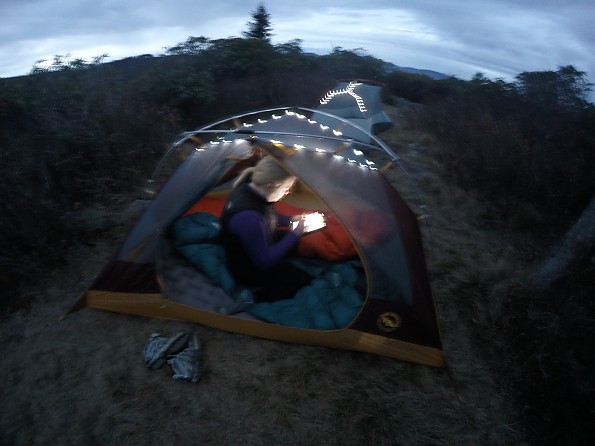
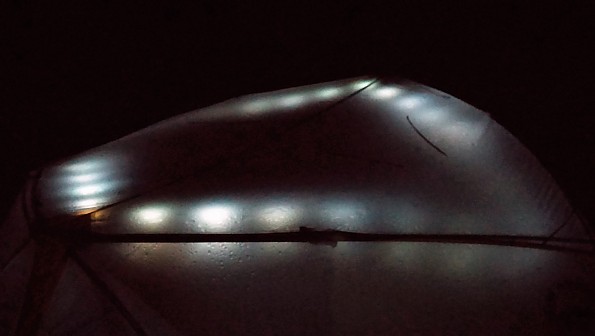
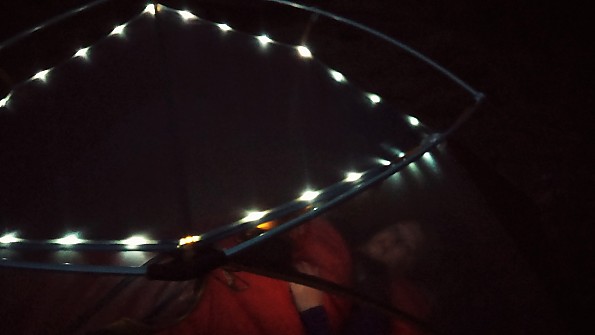
The Ripple Creek is one of Big Agnes’ new series of tents that use durable and ultralight strands of LED lights inside, called mtnGLO. The Ripple Creek uses a diamond pattern in the tent ceiling.
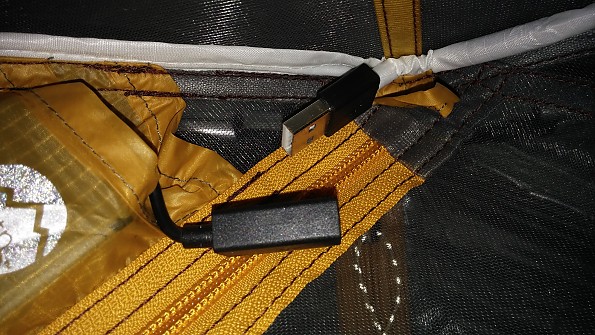
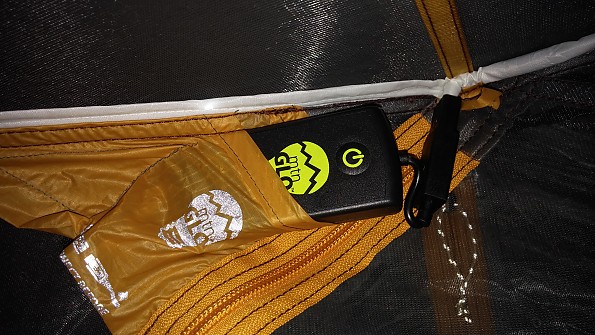
The mtnGLO lights are very simple to use. To get started, insert three AAA batteries into the battery pack, connect the USB power connection, turn on the on/off switch, and then press the power button (once for full brightness, twice for dim or 50 % brightness and three times to turn back off).
To ensure that your batteries don’t burn out by accidentally turning on the lights while packing up the tent, Big Agnes designed the power pack so that you could disconnect the lights from the USB power pack and it has a backup on/off switch. Also, if your batteries die and you have a portable USB power bank, you can use that or any other USB power device. I wish my headlamp had this option!
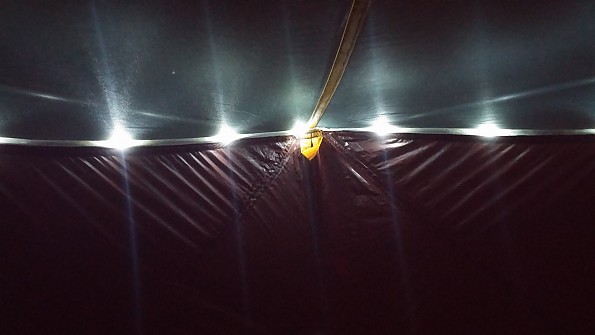
I was really glad to have the mtnGLO lights and found them quite useful. They make a really nice ambient light inside the tent that is helpful for setting up camp, settling in for the night/changing clothes, and reading. They are also really nice to have when you are outside your tent because it creates more light in your campsite, and it makes you be able to see your tent from a distance if you go out to gather firewood or leave to cook/eat dinner, or go off for a night hike.
The Ripple Creek’s mtnGLO lights cover most of the tent ceiling and create a pretty bright light. It is significantly brighter inside the tent than the Copper Spur UL2 mtnGLO.
I read reviews that the mtnGLO lights are not bright enough for reading, but I think they are bright enough in the Ripple Creek with the full brightness setting.
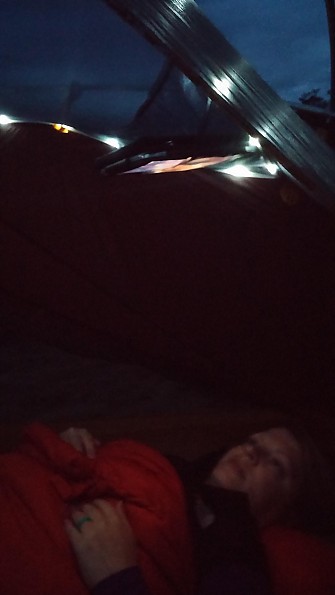
All in all, the mtnGLO lights are awesome and I wish every tent that I own had them built in. I used them all the time and was so appreciative to have them. Are they necessary? No, but they sure are nice to have and I feel they are worth the price for the upgrade.
Battery life: I can’t calculate exactly how many hours I used the lights, but I probably used them around 17 -20 hours and they haven’t died yet.
The mtnGLO lights also won one of the most coveted gear awards, the Backpacker Magazine Editor’s Choice Award this year.
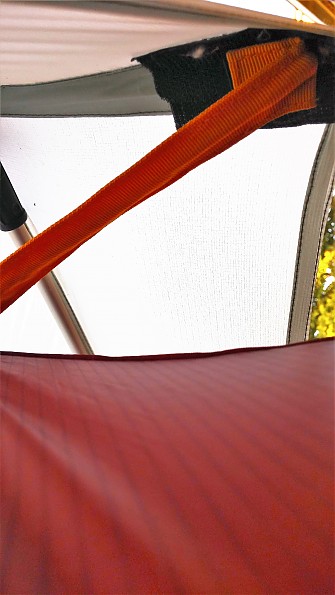
In addition to the mtnGLO lights, the tent has reflective zipper pulls, guy lines, and stake loops (only on the sides).
Rear extended floor/dry vestibule
I am not really sure what the terminology is, so I refer to the back of the tent as the rear extended floor/dry vestibule. This is one of my favorite features of the tent. I’ve never seen a tent with this design before, but I love it and I think it is a great idea. I’ve gotten plenty of gear wet in a vestibule, so the fact that there is an option for additional dry storage is great! Other options would be to fit a dog there or just have extra open space in the tent to not feel so claustrophobic.
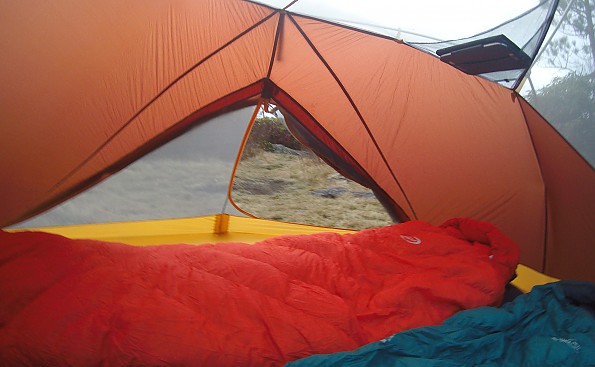
Rear door
The rear section also has a door so that the person sleeping on that side may exit without crawling over his or her tentmate. If you have ever slept two people in a tent with one door, you will know that this is a really important thing to have, even if it isn’t the easiest to get in and out of. I did find that it wasn’t terrible to get out of, but it isn’t the easiest. You definitely have to crawl to get in and out of it. I don’t get out of the tent too often once I’m in for the night, but I love having the option. While it isn’t the most ideal for people to crawl in and out of, it makes a fantastic doggie door! Even my 110 lb lab would have no problem getting in and out of it.
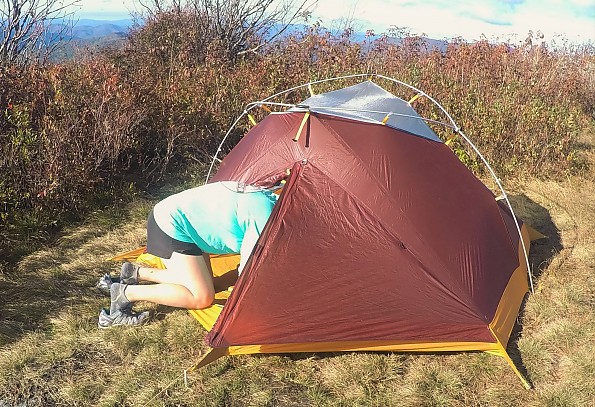
Front door/vestibule
The front door is a nice and wide “D” shaped door. It is very easy to get in and out of. You can almost walk into and out of it.
The front vestibule is very generously sized at 12 square feet, so you could easily put gear for two here and put a dog in the back or as I mentioned earlier just have extra floor space.
Room & Storage
I've already discussed room and storage, so I’ll talk a little bit about the pockets. There are six total pockets: two single pockets in the lower mesh section and two sets of double pockets which are on the ceiling. The double pockets are designed for electronic devices like tablets, cell phones, or IPODs. They even have a place at the bottom of the pocket to accommodate a cord for headphones.
The more features that improve quality of my backcountry experience, the better! If you need even more extra space in the tent, it also has hang loops inside and is compatible with both the Big Agnes triangle and square gear lofts. If you really want to tech out this tent, it also is compatible with the Big Agnes Entertainment Loft and the Powercase/Loft with Joey T55.
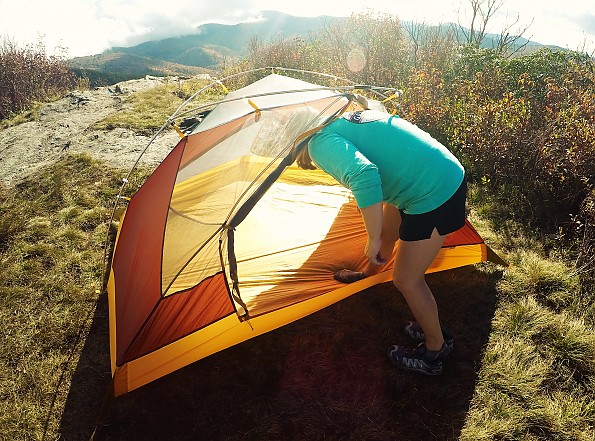
Setup
The setup of the Ripple Creek is fairly easy. It looks way more complicated than it actually is. Admittedly, since this tent is different than any other tent I’ve seen, I was a little bit confused on the initial set up (*neglecting to read the setup instructions may or may not have also contributed to the confusion). I recommend that you practice setting this one up at home before you take it out into the field.
Once I got it set up I realized that it is super easy and very quick to both set up and take down. You may be a little bit more limited with site selection because the 39 square foot floor is large for a two-person backpacking tent and it is not free-standing, so you have to be creative if you are on a rocky surface.
Easy Setup:
1. Lay the tent flat, gold side down.
2. Stake down each attachment point (5 or 7 depending on how taut you want the tent).
3. Lay out the poles so that they make a “Y” (the Y end facing each other) and make sure that the connection piece in the hub of the pole is facing downward.
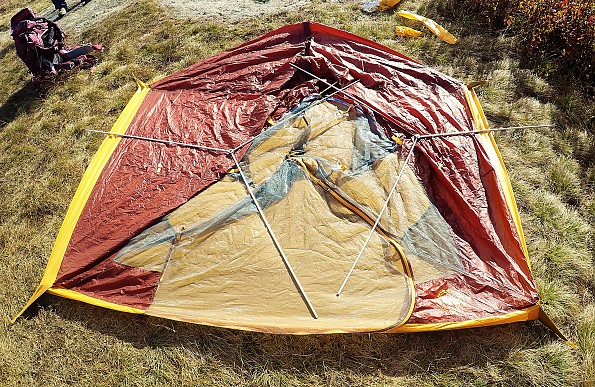
4. Find the “NR joints” on the front and back of the tent (located on top of the doors at the point) and insert the short ends (Y ends) of the poles into each of the joints insert the long end of one pole into the grommet on the side of the tent.

5. Clip on the Twist Clips and connect the bottom of the hub to the H Clip.
6. Stake down the back door
7. Drape the rainfly over the top of the tent (the long pieces go in the front and the flat piece goes in the back). Attach the Velcro stays on the underside of the fly to the poles if you feel you might encounter some wind/heavy rain.
8. Attach the black elastic loops to the clear plastic S Stoppers on the long poles on each side.
9. Clip the black hook to the black ring on the back and attach the vent piece on the tent body to the Velcro.
10. Stake down the fly in the front and on the sides.
I know that sounds like a lot of steps, but if you have two people setting it up it really seems to pop right up. One person can set it up quickly, but it seems almost instant when two people set it up.
Weather Resistance
The Ripple Creek is fully seam taped and has a waterproof coating that makes it completely waterproof. I was inside it during several intense storms and never once saw a leak. Columbia, South Carolina, had a massive rainstorm that lasted for several days, so I decided that I should set it up and leave it outside to see how it fared. After several days and at least 6 inches of rain, not one drop got into the tent.
Ventilation
The Ripple Creek may have less mesh than most ultralight backpacking tents, but the way that the partial fly is cut allows plenty of circulation through the sides and through the top of the back. There is a really good amount of space between the fly and the vestibule, as well.
During non-rainy weather, you can roll back both the front of the fly and the back flaps to allow a cross-breeze.
The two-way zipper on the front of the fly can also be unzipped during a light rain or nice weather to allow some additional air circulation.
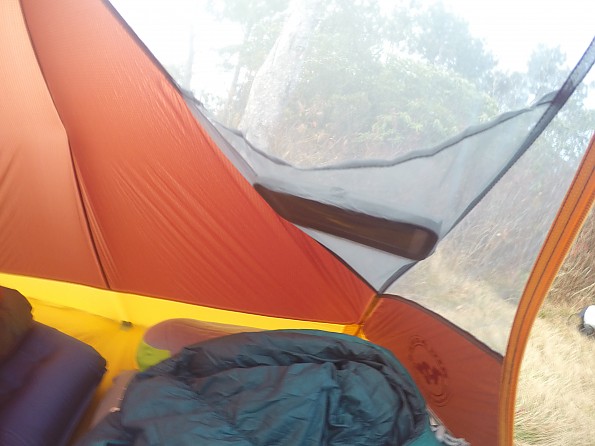
As you have read earlier, the Ripple Creek has a few portions that are single walled. I’ve never heard of a single walled tent that isn’t prone to at least some condensation. I’ve slept in the tent in the rain three times and only saw condensation once. The one time, there was so much condensation on the single wall portions that I was afraid that the tent walls had leaked rain.
After looking at the pictures that I had previously taken before the storm came in, I realized that I did not do the best job of setting up the tent and it was not pitched as tautly as it should have been. I imagine that this contributed to the problem. It also was warm and humid outside, so that probably made the situation worse.
After sleeping in it two other time times in the rain and adjusting the pitch, it did not have any condensation at all. The one incident of condensation led me to leave the tent out in the pouring rain for three days at my house to make sure that the issue was only condensation and not a leak. When I went in to check it I saw water beaded up on the wall and thought “Oh no!” Then I put my hand on it and found it was bone dry and all of the beads of water were from the outside.
Stability
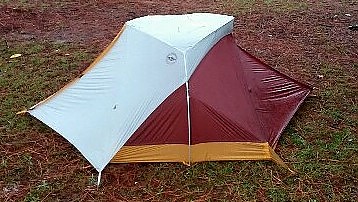
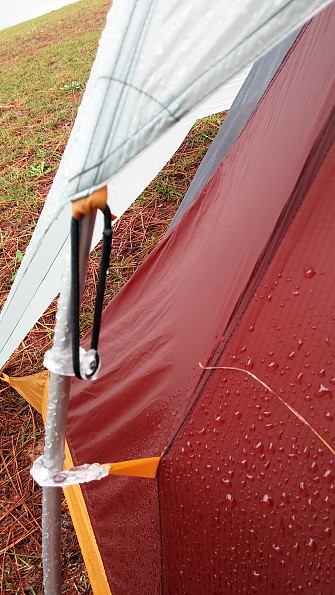
The shape, guy lines, and strength of the poles and stakes makes the Ripple Creek pitch very taut. I was very impressed with the stability of this ultralight tent. It got stuck in some really bad storms in Montana, Wyoming, and South Carolina and was never anything but taut and stable. There is no doubt that this tent was built to withstand crazy weather. This is a tent that I would love to see in one of those wind tunnel tests.

In this picture, the wind was howling! Anyone who has ever been in a storm on the plains of Montana or Wyoming can tell you that they produce mass amounts of wind. You can see here that the Ripple Creek did not budge. Later on that evening, driving rain was added to the windstorm and my husband and I stayed completely dry.
Packability
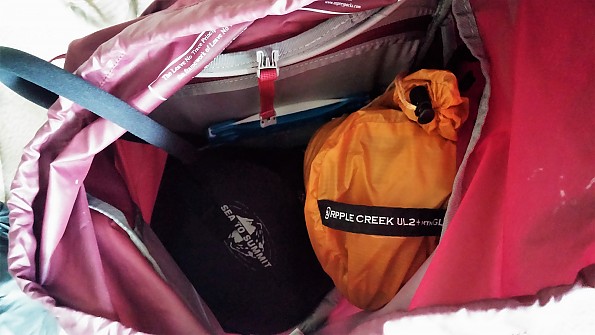
The Ripple Creek packs up into a longer and skinnier stuff sack than most tents. It is kind of difficult to squeeze the tent and fly into the long and skinny stuff sack, but it works. I found it too tight to put the poles in the same bag, so I just started carrying them separate. It could fit, but I didn’t want to risk ripping anything. I do like how nicely it fits in my pack though.
I carry an Osprey Aura 50 that has a very tight interior, so it fits much better than a wider stuff sack.
Conditions
This tent was tested in Wyoming (Grand Teton National Park), Montana (on the Yellowstone River, just outside YNP), South Carolina (Columbia), and in the Balsam Mountains of North Carolina. It got hit with some serious rain and wind storms in Wyoming, Montana, and South Carolina. I slept in it for six nights and loved it!
The temperatures ranged from 75 degrees to the mid 30s. Conditions ranged from calm, normal conditions to days of constant rain to howling winds and driving rain. This tent really was put through some brutal weather testing and it really shined!
My experience with Big Agnes
One of my very first pieces of gear was a Big Agnes Insulated Air Core pad, so I’ve been using their gear from the very beginning of my backpacking days. I remember that sleeping on the ground was going to be a deal breaker for me to go backpacking, but my friend Ryan showed me his Insulated Air Core and I realized that sleeping on the ground was not a bad thing if you have the right pad. I have bought gear from them ever since.
I have had some gear that needed repairs over the years from them and I can’t speak highly enough about their customer service. Every time that I needed a repair, they had my repaired or replaced gear to me within a week of receiving it, no questions asked. Each representative that I spoke with was very concerned about getting my gear to me quickly so that I wouldn’t miss any trail time.
Their great customer service and repair/return policy makes me buy gear from them without hesitation. Backpacking gear can be really expensive, so knowing that I have bought gear from a company that stands behind their gear is a really big deal to me.
Purchase Considerations
Is this tent lightweight enough for me? Yes
Does this tent have enough usable space? Yes
Is there enough room to set up and pack up camp with two people inside if it is raining? Yes
Does this tent handle wind and rain well? Yes, like a champ.
Is this tent expensive? I think the price marked is definitely fair, but if you add the $80 footprint, it gets pricey.
Does this tent have two vestibules and two doors? Yes
Does this tent have somewhere that I can hang my tablet or enough floor space that I can set it up? Yes
Does this tent fit in my pack well? Yes
Would I buy this tent? If I were in the market for a new tent – Absolutely
Conclusion
The Ripple Creek has pretty much everything I could ask for in a tent. It is lightweight, has a ton of room, is fully protected from the weather, doesn’t take up much room in my pack, and it even adds the convenience of built in lights and tablet compatible media pockets.
The only things I would like to see improved is the durability of the floor and the stake loops. Other than that, this is a really awesome tent. Nice job, Big Agnes!
Thank you for taking the time to read my review of the Big Agnes Ripple Creek UL 2+ mtnGLO tent. Thank you to Big Agnes and Trailspace for the opportunity to test this very unique tent. I really enjoyed testing it.
Source: received for testing via the Trailspace Review Corps
(Sample provided by Big Agnes for testing and review)
 Reviewed by
Jason Berry
+173
 July 6, 2017
Lightweight, roomy tent at discontinued/ closeout price.
Pros
- Weight
- Room
- Price
Cons
- Setup takes some practice
- Not freestanding
Ashleigh has set the bar extremely high with her review so I am not even going to try and compete. I purchased the Big Agnes Ripple Creek from gearx.com and used the price match policy to cut the price down to $229.
Big Agnes has discontinued the Ripple Creek and supplies are limited. At this time there are two places online that have this tent in stock. I can't recall the name of the first place but they are asking $599 so there is no need to worry about that. Dowdle sports and outdoors has it in stock at $213+$15 shipping. I picked up footprint from REI garage for $8.
First Impressions:
When I picked up the box off the front porch my first thought was" wow, this thing is light". That was confirmed when I put tent and footprint on my scale and came up with 4 pounds 3 ounces. Not bad at all considering the amount of room you get. Setup was easy the first time although a little slower than freestanding tents.
After setting it up in the yard and giving it a 30-minute water hose test I knew the Ripple Creek could handle serious rain, but I was concerned about water pooling on top of the rainfly. It stayed on the outside but had me concerned.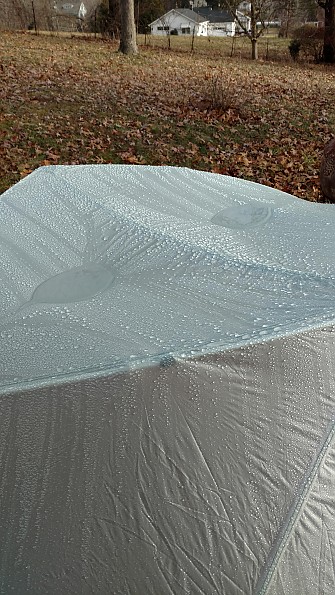
After a few more setups I realized that by connecting the back of the rainfly first, staking out the front second then making the head and foot connections it created a crown effect that eliminates the pooling issue.
Backcountry Use:
Having now gotten 18 nights in with the Ripple Creek I am impressed with its quality and design. I would recommend using a footprint to help protect the floor. There is plenty of room inside for two people and two backpacks will fit in the indoor vestibule area by just letting them overlap on top of one another. The outside vestibule has enough room to do the same thing and add two pair of boots.
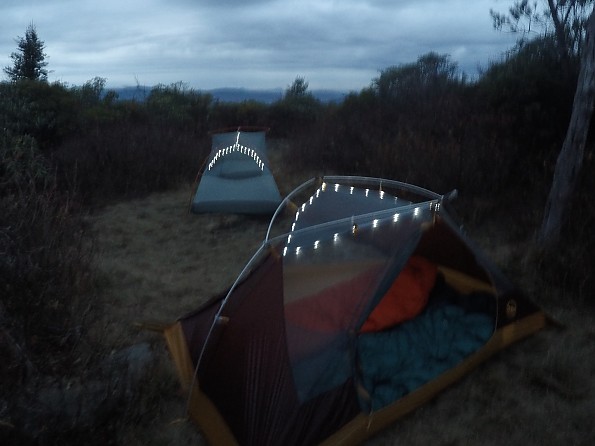
The picture below is from a solo trip with my 80 litre pack. Multiple storage pockets for small items that you want to keep easy access to. The MTN glo lights are nice to organize with, but in my personal opinion they are not worth paying extra for.
So far this tent has stood up to sustained 15 to 20 m.p.h. winds with rain and sleet. Two 40 m.p.h. gusts that had her bowing gracefully and standing back up undamaged (numbers are from national weather service for Cosby, TN. The nearest measurements available.) And a lovely two nights with Tropical Storm Cindy that I don't have wind data for but it rained flat sideways at times. The bathtub floor and design of the rainfly kept every drop out.
With two people or solo there has been zero condensation, wind probably is helping this, it would take a muggy summer all night rain to really test it. Not being a freestanding tent may cause some problems for younger or less experienced users but us old people and battle scarred backpackers shouldn't have any issues.
You can see Ashleigh's review for packed size, I have to store it vertical in the 50 litre which makes packing a bit of a pain. The 80 litre swallows it sideways without any trouble.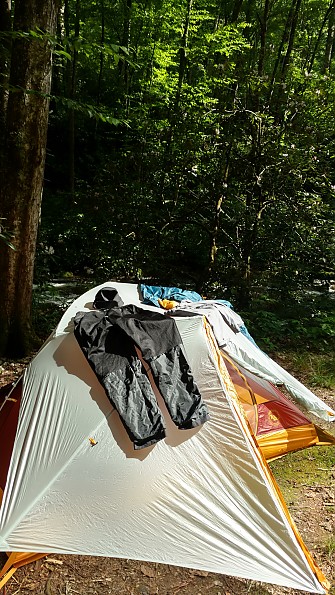 Makes a good laundry rack (above)
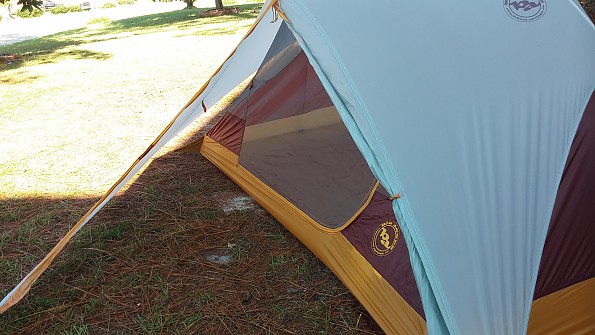
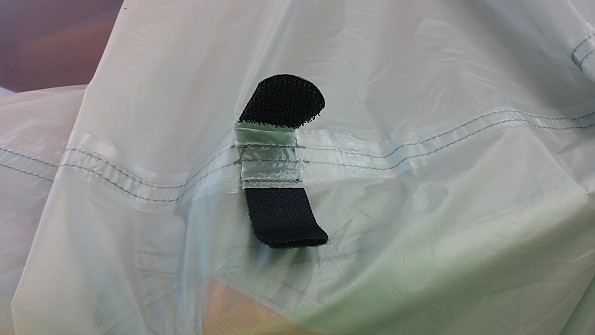
Side view showing single wall door for back vestibule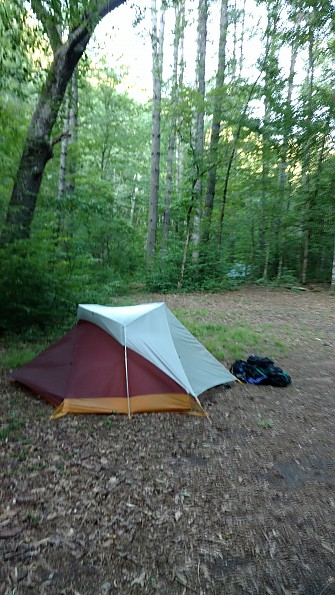
Summary:
A four-pound two-person tent for under $230 dollars with a ton of room and as good as any weather protection. Non freestanding makes setup in the rain a challenge, but by leaving the rainfly attached at the back when you roll it up you can get staked out and the poles in without much trouble.
Source: bought it new
Price Paid: $228
![]() Reviewed by
Reviewed by
Maria Rico
+13
 March 15, 2023
Amazing idea, very portable, but poor design and construction. Broke after less than 10 uses.
Pros
- Great to getting toddlers into camping!
- Lightweight
- Relatively easy assembly
Cons
- Massive irreparable rips along the floor: poles attach to the base of the tent at a completely unreinforced point, creating a direct line of tension that relies exclusively on the strength of the fabric. Therefore, it does not age well compared to other tents I used (and compared to some that I also abused)
I was so in love with this tent.The lights! The weight! The room!
I took it kayak camping and backpacking but, after less than 10 uses in a span of maybe three years (because children), it ripped on four points along the base. I can’t blame the poor tent: the poles attach to the floor on completely unreinforced fabric and create tension against each other.
I can see the point of tension creating a fold on the floor on the photos of every review for this tent; I don’t know how people have managed to keep it together. The design fails to continue the strong seam on the body of the tent into the floor transition to distribute the force. Moreover, the elastic string connecting the segments of the poles de-elasticized at record speed so now assembling the poles is a massive hassle and can hardly be done by one person.
I contacted Big Agnes and they asked me to send it back and charge me for the repair and their website explains that they will not change the fabric (aka no reinforcement?), simply patch it. So this one is going to the bin and we’ll be trying other brands.
Background
Many decades of tent user, first time tent-breaker. The tent broke after maybe 5 uses, always set up on soft soil, never gravel nor snow. In comparison, I had an MSR lightweight tent that lasted a literal eternity before we decided to upgrade to a more toddler-friendly one.
Source: received it as a personal gift
Your Review
You May Like
Specs
| Price |
Historic Range: $299.93-$399.95 Reviewers Paid: $228.00 |