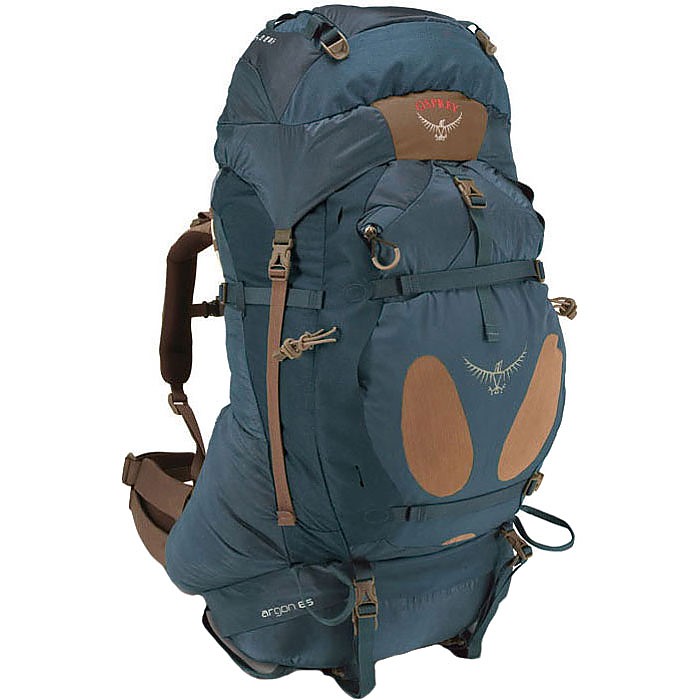
Osprey Argon 85


 Reviewed by
Bill S
REVIEW CORPS
+4,657
 February 2, 2011
Summary
Described by Osprey as "a favorite of weekend warriors to elite mountaineers," I tested a 2010 Argon 85 expedition pack. The 2010 model is the third generation version of this pack.
The Argon 85 (loaned by Osprey for the duration of the test) comes in three frame sizes: medium, large, and extra large, with the two larger frames having slightly bigger capacities. I tested a medium frame, which has a 5,100-cubic inch capacity. Hip belts are available in small, medium, large, and extra large.
I weighed my Argon 85 pack at 6.1 pounds (2.78 kg), matching Osprey's published weight.
The Argon 85 is the middle size in the Argon pack series. The other Argon packs are the 70 and the 110 (the numbers indicating the nominal capacity in liters of a medium frame). The Xenon 70 and 85 are the comparable women's versions.
My testing included multi-day backcountry ski and snowshoe trips, shorter "dry-weather” trips, and a number of day hikes, all with large loads. A sled with a large load was hauled during one ski tour.
As with the three Osprey packs Barbara (my wife and frequent backcountry companion) and I own, the Argon proved well made with an excellent fit and was very comfortable under load. The Argon's fit is due to its well-designed adjustability and, most important, the thermoformable hip belt, which allows you to custom heat mold the BioForm CM hip belt.
(As always, I strongly recommend working with a trained professional pack fitter for any pack, especially a complex expedition pack like the Argon. I consider a trained, experienced pack fitter essential for a pack intended for long distance and heavy hauling, particularly for month-long expeditions in remote areas.)
There are a few quibbles, even with this pack. For an expedition pack, the two side pockets are not adequate for a 1-liter water bottle with an insulating cozy or for supporting pickets or snow wands.
Additionally, the provision for an internal hydration system, well-thought out for warm weather use, is not really adequate for extended treks in sub-freezing weather.
A lesser quibble, due to a slight misjudgment on my part, is that the 85 proved too small for the intended part of my testing in Antarctica. I should have selected the Argon 110, which has a 6,700-cubic inch capacity for the medium frame.
Unique Features:
- zipper pulls usable with insulated expedition gloves
- side zip access for main and secondary compartments, in addition to top access
- removable AquaSource ReCurve hydration pouch
- removable top pocket/lumbar pack with dual compartments
- thermoformable waist belt
- compression via internal strap, Z-threaded side straps, and StraightJacket back compression
- emergency whistle built into the sternum strap
- Leave No Trace principles printed at top of the main compartment in English and French (no excuses!)
- ice tool and ski loops with elastic tie-downs
Pros:
- excellent fit (particularly when using an experienced pack fitter)
- plenty of adjustments for varying size loads and conditions
- large capacity for three-season trips
- multiple attachment options
Cons:
- side pockets not useful for a water bottle inside a cozy, pickets, or wands
- load lifter straps a bit tricky when pack is heavily loaded
- emergency whistle use requires sternum strap to be unbuckled for access
- thermoformable BioForm CM waist belt is fairly rigid, requiring extra space in a car or on an airline, and requiring some care when putting pack on
- custom heat molding of the BioForm CM waist belt should be done by a trained pack fitter
Best For: Hauling big loads long distances
The Pack
The Argon series is intended for large loads carried for long distances, usually in mountainous terrain. Since the pack series comes in three capacity sizes, it is important to measure the size of pack needed for your use by gathering your gear for any expeditions and trips and stuffing it into the pack at the dealer.
I had the aid of Osprey staff in selecting the proper size frame and waist belt, and a friend who is a trained and experienced pack fitter to handle the thermofitting process. Despite years of experience, I misjudged the capacity I needed. I should have sized up to the Argon 110 (6,700 cu in). This would have matched my old standby pack for such expeditions, a Dana Designs Terraplane of nearly the same capacity that I have used from Alaska to Antarctica.
I discovered the Argon 85's capacity shortfall during the tenth month of testing when I gathered together all of my gear for an upcoming Antarctica trip and attempted to fit it into the pack. The lesson here is to gather your gear together and actually try putting it into the packs you are considering.
Setup
When I received the pack, the only thing I needed to do was to take the pack and waist belt to my pack fitter friend to thermoform the waist belt. This consists of placing the belt in a specially designed oven, attaching it to the pack once warmed to the correct temperature, loading the pack with 30 to 40 pounds, adjusting the pack, then wearing the pack for a half hour while the waist belt forms to your body.
It is possible for an experienced person to do this at home with his own oven, but Osprey highly recommends going to an authorized dealer equipped with the specially designed oven.
The height of the shoulder straps can be adjusted by altering their placement on a large Velcro pad, but mine were exactly right for me without adjustment.
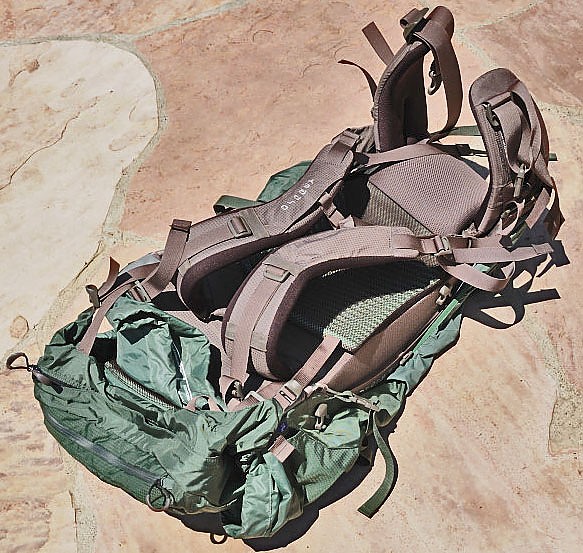
Figure 1. Note the thermoformed waist belt.
Backcountry Tests
Ski Tour: After a few short hikes with loads, I headed off on a backcountry ski tour of several nights, accompanying the Scout Troop of which I used to be Scoutmaster. In addition to 55 pounds in the pack, I attached a sled in which I carried an extra load.
Towing a sled is a severe test of comfort for any expedition-bound climber. When your pack is heavily loaded with gear, plus your sled is full of food, fuel, and group gear, many so-called expedition packs are very uncomfortable.
Not so with the Argon. It proved very comfortable, even when hauling gear up inclines as steep as you ever want to haul a sled up.
(I'll note that I have found that the best way to haul a sled is to attach the sled’s waist belt around your pack, rather than your waist, which is encumbered with the pack's waist belt and possibly a climbing harness. Attached this way, you reduce the waist clutter and pull with the pack's more comfortable padded waist and shoulder harnesses.)
After returning the extra gear to its owners, the next day I headed farther into the backcountry, leaving the youth to their present troop leaders.
Snowshoe Tour: Subsequently, I used the pack for a shorter snowshoe tour (a lighter-weight trek of only a couple nights out, but with all the gear in the Argon, no sled assistance, and a 40-pound load more appropriate to a weekend snowshoe campout).
Hikes: I also used the pack on a number of training hikes on my usual hills with loads. On the training hikes I carried gallon water jugs (up to 60 pounds for 10 miles and 2,300 feet cumulative altitude gain), while for the climbing instructor courses I teach, I hauled gear (ropes, hardware) to the training area (approximately 65 pounds carried over two miles and 1,500 feet of elevation gain).
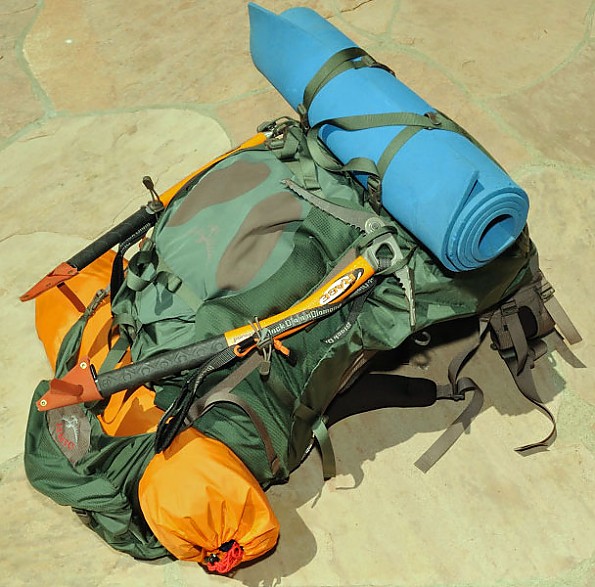
Figure 2. The Argon has plenty of straps, pockets, and attachment points.
Features
As is common with most big hauler expedition packs, there is a steep learning curve to figure out the purpose of all the pockets, straps, and attachment points. Ultimately, I had to abandon my usual "techy" viewpoint that "I don't need no stinking manual" and had to read the very helpful instruction sheet. Perhaps 8 to 16 ounces could have been saved by reducing the number of straps, though the Argon is lighter than most expedition packs of its size.
Frame: Starting with the comfort features, the frame consists of a plastic frame sheet, ribbed padding inside a mesh bag (for ventilation), and aluminum ReCurve rods. The usual shoulder, waist, sternum, and loadlifter straps are there. As experienced backpackers know, you want most of the load to be on your hip bones, rather than on the shoulders.
Hip Belt: The Argon's thermoformed waist harness did an excellent job of keeping the load on my hips without slipping down, once I had followed the usual procedure of loosening the shoulder and loadlifter straps, lifting the pack onto my shoulders, fastening the waist belt and adjusting it to my hips, tightening the shoulder straps and sternum strap, then tightening the load lifter straps.
The pack did not bounce or slide down and the waist belt remained at the top of my hipbones where it should be.
One caution about the Argon's thermoformed waist belt — once formed, the belt is moderately rigid. This means that it does not fold flat for tossing in the trunk of the car with other packs or for stuffing into a duffel for airline travel. For travel, it would be necessary to remove the belt and wrap it around the pack before placing it in a duffel.
Load Lifters: I found that with a heavy load it is necessary to make sure there is sufficient length of the load lifter straps to grasp for making the adjustment once the pack is on. I loosened the straps all the way a few times, leaving too little to grasp.
Putting it on: Another caution is when picking the pack up and putting it on. When the pack is heavily loaded, most people lift the pack off the ground and set it on a slightly bent knee for a moment while slipping an arm into the shoulder strap. If a male backpacker is not careful, the thermomolded waist strap may come up between his legs in a somewhat uncomfortable way.
It only takes a couple of lifts to learn to rotate the pack slightly to clear the stiff waist belt. Then again, you could use the macho method of a straight-on lift and flip over your head (a challenge when you have 50 to 60 pounds of climbing gear in the pack).
Ventilation: The ribbed padding in its mesh bag did a good job of providing ventilation on the 80°F days that I did training hikes with up to a 50-pound load (10 miles, 2,400 feet cumulative gain), though not as well as my external frame packs. The Argon's ventilation is close to, if not the best, of any internal frame expedition pack I have used.
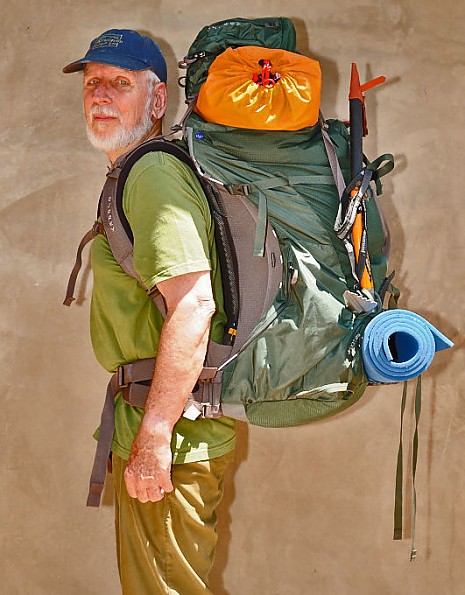
Figure 3. The Argon loaded with about 50 pounds for snowshoe overnight (-40°F sleeping bag, Therm-a-Rest pad, Black Diamond gloves, Outdoor Research expedition mittens, and balaclava in sleeping bag compartment; plus 8000 meter jacket, down pants, XGK, GSI cook kit, GTX parka, fleece jacket, two full water bottles, and a few other items). There is plenty of ventilation between pack and back.
Shoulder Straps: The positioning of the shoulder straps, held to the pack by a large section of Velcro, is adjustable over a very wide range of heights. The same is true of the waist belt. If you are an experienced backpacker, the initial positioning of the shoulder and waist straps will be easy and rarely changed. Your professional packfitter will help do this initial task properly for you.
Tightening of the waist belt and shoulder straps is also quite easy with the pack on.
Emergency Whistle: The sternum strap's buckle has Osprey's usual emergency whistle. Although this feature is on our other Osprey packs as well, I have yet to figure out how to use the whistle while wearing the pack with all straps fastened. It is necessary to unbuckle the sternum strap and slide the buckle all the way to the end of the strap to get it to your mouth to blow.
Plus, to keep the whistle handy, you would have to wear the pack at all times. I believe it is far better to have a dedicated whistle, such as a Fox 40, that you wear on a lanyard around your neck all the time.
Pockets: As is usual for expedition packs, the Argon has a plethora of pockets. They are, however, arranged somewhat differently from some other expedition packs.
The pockets include:
- the main compartment,
- a secondary compartment outside of the main compartment,
- two pockets in the top lid (one on top of the other),
- a sleeping bag compartment on the bottom,
- an elasticized pocket with two openings on the lower left side (as you look at the back of the pack), and
- a zippered pocket on the lower right side.
In addition, inside there is a removable AquaSource pouch for a hydration bladder (not included), and a StraightJacket consisting of flaps and straps on the outside of the pack. Finally, add two ice tool loops and a ski loop on either side with retainer elastics for each.
AquaSource Pouch: The AquaSource hydration bladder pouch can be removed from the pack and used alone by unclipping two clips at its top. The two straps used for attaching a foam pad or tent to the bottom pack outside the sleeping bag compartment can be removed from the pack and attached to the AquaSource to carry as a lightweight hydration pack, as well as holding a water supply inside the pack. When inside the pack, the hose can be fed out through either the left or right sides of the main compartment top.
During the ski and snowshoe treks in my testing, temperatures were above the 20-25°F range with no wind chill. Thus, carrying a hydration bladder inside the pack in the AquaSource pouch presented no problem with keeping the water liquid with the help of a simple neoprene hose cover.
However, based on many years of winter backcountry experience and experience in polar regions and at high altitude, having the bladder inside the pack with the hose in the open will be inadequate to prevent freezing of the water at temperatures and wind chills below that range, even with blowing a small amount of air into the hose to clear the bite valve and hose.
The AquaSource pouch is light enough that you can use the standard practice of wearing your hydration bladder in the AquaSource pouch under your parka and running the hose down your sleeve or otherwise keeping the system under your parka except when drinking. I have used this approach very successfully with a basic hydration pouch and standard bladder on many multi-day ski tours and high altitude climbs in sub-zero (°F) temperatures.
Top Lid/Lumbar Pack: The Argon's top lid can be removed for use as a lumbar pack, and has its own belt attached. I used the lid as a lumbar pack for several of my training hikes, carrying a hydration bladder in the AquaSource pouch.
This arrangement would work very well for someone bagging a peak or doing a short one- or two-hour hike out of base camp. The top lid is plenty large enough for a lunch and the usual Ten Essentials.
In general I do not like lumbar packs. However, the Argon's top lid with its wide belt proved quite stable with a minimum of the bouncing I have experienced far too often even with dedicated lumbar packs.
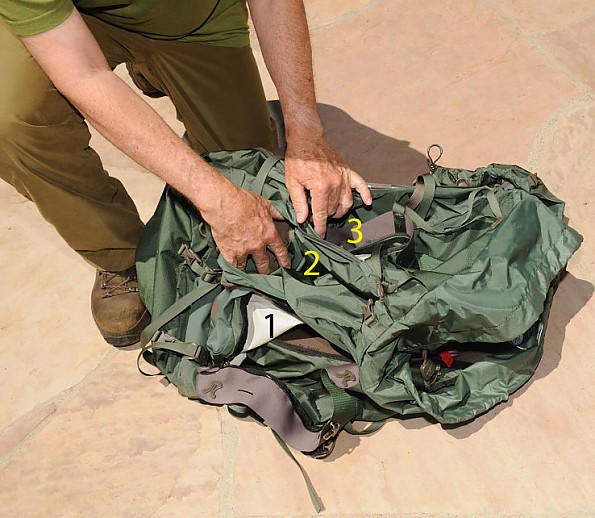
Figure 4. Side access to (1) main compartment, (2) shovel pocket, and (3) secondary compartment
Accessibility
As important as comfort is in a big hauler is accessibility to the pack's contents. Over the years I have had other toploader packs that carried well, but when sitting out a storm required unpacking almost the entire pack to get at needed items.
The Argon's two main compartments and sleeping bag compartment are quite easily accessible. The main compartment is accessed from the top via a drawstring collar as well as a side zipper that extends the full length of the main compartment, covered by the StraightJacket wing.
Inside the main compartment, there is the usual strap and buckle over the top of the load to cinch it down, with the collar extending six inches above it. The Leave No Trace Principles are printed on the inside of the pack collar in English and French.
The secondary main pocket is accessed by a zipper under the opposite side StraightJacket wing. The side zip access on the two main compartments makes it easy to get at that item at the bottom of the compartment, even when crowded into a tent with two more climbers beyond the stated tent capacity.
Outside the secondary pocket is an open-top pocket, closed with a buckle that can serve as a shovel pocket. The shovel pocket was large enough for my Black Diamond D9 shovel.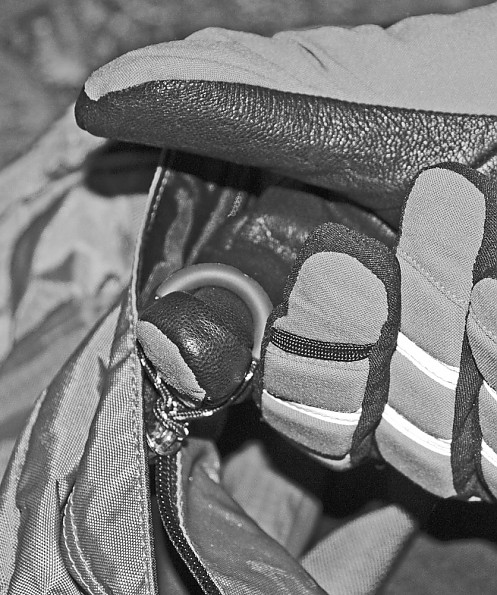
Figure 5. All zipper pulls are large enough for well-insulated gloves.
Zippers: All zippers have a glove-friendly pull on them, an absolute must for expedition packs in cold weather, and all too often missing.
Storage
Pockets: One of the Argon's two small side pockets is an enclosed zipper pocket which might serve for a spare pair of gloves and balaclava. The other is a woven stretch pocket with two entries, convenient for keeping your rain jacket handy. They are just large enough for a 1-liter Nalgene, though not with an insulated cozy on the Nalgene.
You can place the bottoms of only a couple of pickets or a half dozen snow wands in the small side pockets, though you could simply hold these by cinching the side tension straps down tightly. However, as I found during the setup for an avalanche pit demonstration in one of my courses, pulling one or two wands out loosens the hold on the bunch (unlike having a pocket to support the lower ends of wands or pickets).
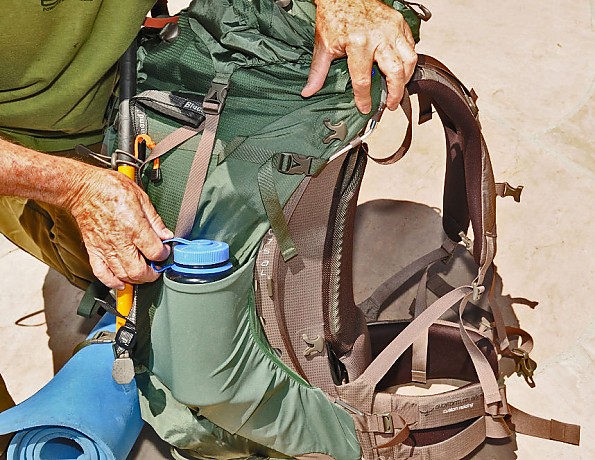
Figure 6. The right-side lower pocket fits a 1 liter Nalgene without a cozy, but not with the cozy. It can be used to support wands or pickets.
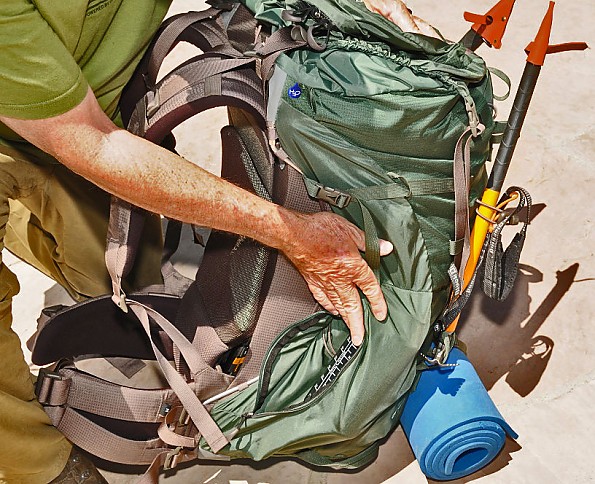
Figure 7. The left-side lower pocket will take a 1-liter Nalgene without a cozy. It is less convenient for wands or pickets.
Sleeping bag compartment: The sleeping bag compartment proved to be the right size for my -40F degree sleeping bag and inflatable pad and pillow, plus a spare pair of gloves and balaclava. My closed cell foam pad rode in the straps outside the sleeping bag compartment (the same straps that are removed to act as shoulder straps for the AquaSource pouch for a day hike).
StraightJacket: While the StraightJacket wings are primarily for compression and holding the pack's contents (and hence center of gravity) close to your back, I used them on a snowshoe trek for holding a tent. The wings also have slots for additional accessory straps.
Compression Straps: Other provisions for compressing the pack and its contents close to your back are the Z-laced side compression straps and the compression strap internal to the main compartment. The placement of the main and secondary compartments means that careful consideration must be given to what items are placed in which compartment, since the secondary compartment (and shovel pocket) are farther from your back.
Ice Tools/Ski Loops: There are two ice tool loops with elastic tie-off straps and two ski carry loops. The upper part of the ski is held in place with the side compression straps. My wider tele skis rode well, though I only had to go a short distance on the dry before getting to skiable snow.
Summary
The Argon does very well for hauling big loads for long distances, with a few minor
quibbles. With the three capacity ranges, three frame sizes for each capacity range, and readily adjustable waist and shoulder strap positioning, plus thermoformed belt, the Argon should prove very comfortable for most men needing an expedition-sized pack.
I expect the women’s version, the Xenon 85, which is anatomically designed for women, would also serve well for most women. Just be sure you match the capacity of the pack to what you will actually be carrying.
Price Paid: Sample loaned by Osprey for testing and review; sample pack returned
![]() Reviewed by
Reviewed by
TC
 June 30, 2008
Purchased this pack online at the recommendation of a friend on the quality and comfort of Osprey packs. Put about 20 miles with 45-50 lbs in the pack. Terrain was high alpine, over snow, some tricky traverses, and some flat trail walking. Pack was very comfortable once I snugged down the straps from the belt to the aluminum exterior rods on the suspension system.
Initially I had some issues that were very much my fault as I did not get the pack custom fitted and left the straps undone. They need to be snugged down so that the rods are opened wide.
I am 6'2" and 220 lbs and purchased the large pack which I am on the cusp of the belt size with. I could use an XL belt, but that is no problem as they are very easy to swap and the large belt is plenty comfy, just a bigger gap than they recommend.
The shoulder harness is very easily adjusted and I did so after one day on the trail. The shoulder harness fit me fine. The waist belt appears stiff, but really conforms and I had no more pressure points after properly snugging down the side straps. The front buckle tightens with a brilliant little cross setup, allowing the belt to take a tapered shape to wrap on your hipbones. I did not get it custom molded, it was plenty comfy though.
Functionally, this thing is nutty!! The sleeping bag compartment is good volume, but just for a bag really, and that is all you need. The interior top load compartment is huge, and you can keep stuffing your junk in there. No problem with 4 days worth of gear and I could easily put more in there. I had a lot of clothing and food, not an ultralight guy.
There are two front pockets that really make the pack a joy to use, especially when you are constantly changing clothes for snow (rain) or footwear for stream crossings. The stretch pocket is terrific for wet gear and sandals and the internal front pocket holds a jacket, pants, fleece, gloves etc for easy trail changes. You can also access the main compartment from the front, which helped me a couple times when I needed gloves and my sock liners.
The ice ax loops and tie downs are tremendous and there are ski loops as well. All the compressions straps unclick and are useful as tiedowns for gear. I carried tent poles in the stretch side pocket and used the side zip pocket for sunscreen and other quick access stuff. The lid is pretty large and has a really tricked out compression system.
I lent it to a friend for a dayhike on the trail and he said it made a great fanny pack, I had a daypack with me. The fanny pack has the same buckle as the pack itself, so you have a spare just in case. All the buckles and zippers are high quality though, but it's nice to know you have an extra of the most critical piece.
I would not suggest keeping an inflatable pad on the lower supplied straps. I gouged mine badly when setting the pack down on rocks, keep it up high under the lid or strapped to the lid itself. A closed cell would be fine there. I did not use the internal bladder sack, but the tube ports are great and I just set my MSR bladder right on top and fed the hose through the port and clipped it to my shoulder strap.
It is pretty obvious this is a really well thought out backpack and a joy to use. I did not get mine custom fitted, but would suggest doing so to have the internal stays fitted to your back, this will help to keep the pack from sliding down as you hike.
I may have to sell mine and get an XL, but that is on me as I bought it online and measured myself and did not try on the different sizes with weight in them. I will definitely be talking to Osprey about the pack sizing and getting the stays bent to my back. I love this pack and can't wait to get out on the trail again with it.
Oh yeah, the sternum strap whistle produces the same pitch as a marmot squeak and is useful for harassing your trail partners or letting animals know you are around.
Design: Top Loading Internal Frame
Size: Large 85+ liters
Number of Pockets: 8
Max. Load Carried: 50 lbs
Height of Owner: 6'2"
Price Paid: $350
![]() Reviewed by
Reviewed by
pearljam42
+45
 July 16, 2012
Perfect pack for long excursions — very comfortable, great capacity, and durable. Add a few of the accessories to it (rain cover, grab bag, etc.) and it has to be considered a top-of-the-line pack.
Pros
- Suspension/comfort
- Capacity
- Durability
Cons
- Price (what's new?)
- Accessories sold separately (rain cover, grab bag, etc.).
I have owned the XL in mustard for about 4 years now and this pack is seriously the best I have ever used. It has nearly everything you are looking for in an expedition pack — capacity, size, comfort, and style. The suspension is very comfortable and as long as you have your pack/gear strapped down, it's easy to forget you are carrying such a large load.
I did not opt for getting the hip belt molded because, in my opinion, it became comfortable enough without it after two short excursions. The ventilation system truly does keep the sweat off your back (within reason, of course) and the hydration pocket holds my 100-ounce Camelbak Omega reservoir without any problems.
The sleeping bag compartment is large enough to easily hold a synthetic North Face long bag and the external pocket can stow rain gear, smelly clothes, and so on without getting anything wet.
The pack isn't totally waterproof, but it is water resistant to the extent that your stuff won't get soaked if it's a light rain. I ended up buying the Osprey pack cover and that has performed admirably as well.
Perhaps the only nuisance is that it is fairly awkward trying to get a wide-mouth Nalgene bottle out of the side pocket because it doesn't have the standard water bottle pocket(s). Other than that, it is expensive, but it sure is worth it.
![]() Reviewed by
Reviewed by
hilo4321
+8
January 13, 2011
It's not a typo, I got this pack used at a quarterly REI sale, and am quite pleased. It was was missing the recurve (side support) bars, the bar they go into at the top, and several straps, but Osprey sent the pieces to me for $15 (would have been free had I not needed faster shipping). Amazing on their part.
On to the review. This thing is huge. Unless I am go on a 2 week trip by myself, I will never need a larger pack.
I was a bit wary of its weight, but it more than makes up for it with the comfort it provides; much more than my previous pack. There are plenty of pockets, loops, and straps to accommodate most any needs, which are all designed quite well. I found everything to be quite intuitive.
If you are using the pack for a shorter trip, there are flaps on the front that can tighten essentially the whole bag. This increases its usefulness tremendously, because other wise it would be a floppy mess when underpacked.
One of my favorite features is the ability to convert its pieces into a great day pack system. The bottom straps can be removed and combined with the water sleeve to wear by itself as a mini backpack. Then you wear the removable top cover around your waist as a pretty comfortable hip pack; it even has the meshing for breatheability for your back.
If you're so inclined you can also use the actual hip belt, rather than the strap inside the cover, but I think it's only worth it if you are covering a lot of ground.
I have admittedly only used this on one extended trip to Glacier NP, but it stood up quite well to the beating it took from me and the weather. I am very excited to go on another trip to use this pack, and if you are looking for a 3-10 day bag that has everything and more, this is it!
Price Paid: $30
![]() Reviewed by
Reviewed by
Timojl
+2
December 6, 2010
I've had my Argon 85 for almost three years now. I've made multiple 2-3 week trips with it and its performance is just unbelievable. Comparing to my old packs the Argon is more comfortable, more reliable and much more functional than any of my previous packs.
I used loads between 24-30 kilograms (52-66 pounds) and my usual pace was around 20 kilometres per day (12 miles). The terrain ranges from gently rolling hills to arctic tundra and the occasional steep hill. At first I was a little surprised by the flexing of the support structure, but I started to like it very early on.
I had the pack custom molded at the store. If nothing more, the molding makes it easier to carry the pack with the waist strap open since the straps will otherwise point to the sides. The pack needs very little adjusting after the initial adjustment. During the walk it's very easy to adjust the straps and take the weight off your waist or shoulders.
The compartments are spacious and I like to pack everything inside. The curved shape makes it difficult to pack very long and bulky items, but I did manage to fit a five gallon bucket into the top compartment once (don't ask me why...)
I love the fact how you can buy add-ons to the Osprey packs. One thing I missed about the Argon was a pocket or pouch for small items in the waist belt. That was easily fixed with one of the add-ons.
Overall the Argon 85 is probably one of the best if not the best large backpack out there at the moment, but any potential buyers would obviously try it on before buying.
Price Paid: € 279
![]() Reviewed by
Reviewed by
Brenden
May 8, 2009
You will never need another pack in your life. I packed at least 60 lbs in this thing and it feels 10. My pack is the extra large size weighing in at almost 7 lbs and it didn't phase me one bit. If you want to stay out of the concrete jungle for awhile this is your pack. Take whatever you want, leave no trace.
Design: Argon 85 XL
Size: 91L
Number of Pockets: Alot
Max. Load Carried: 60+
Height of Owner: 6'4
Price Paid: $320
![]() Reviewed by
Reviewed by
John Sosbee
March 29, 2009
This review is just to tell everybody to TRY ON YOUR PACK in the store with weight in it before you buy.
I was all set to get the Osprey. It has great features, good reviews, nice aqua compatibility, etc. etc. The salesman at REI said it is a very good pack but it just happens the pack doesn't fit his particular body style. I thought "whatever."
Well, we sized it, adjusted it, loaded it up with about 30 pounds, and yikes!, the hip belt just doesn't work. Maybe my hips and glutes are cut just the wrong way. I then loaded up a Gregory and it was 100% better.
So - the Osprey is probably an excellent pack for many folks, but TRY IT FIRST. 4 stars so i don't drive down the average, because it is a very nice pack to be sure.
Your Review
Where to Buy
You May Like
Specs
| medium | large | xl | ||
|---|---|---|---|---|
| Price |
MSRP: $379.00 Historic Range: $189.48-$399.00 Reviewers Paid: $30.00-$350.00 |
|||
| Weight | 6 lb 1 oz / 2.78 kg | 6 lb 7 oz / 2.92 kg | 6 lb 11 oz / 3.02 kg | |
| Capacity | 5100 cu in / 85 L | 5300 cu in / 88 L | 5500 cu in / 91 L | |