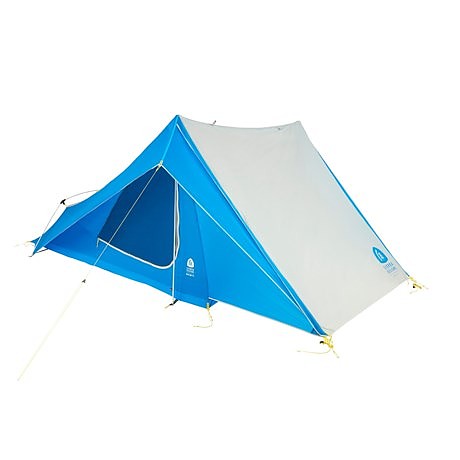
Sierra Designs Divine Light 2 FL


 Reviewed by
Twig
REVIEW CORPS
+9,190
 April 5, 2017
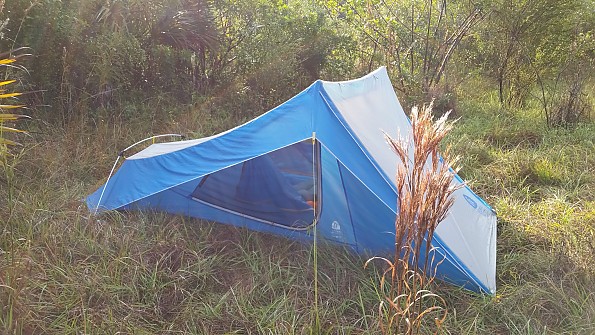
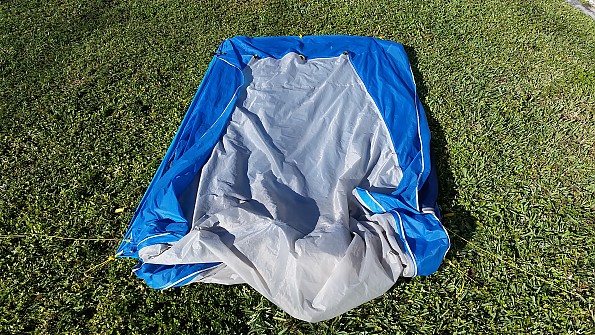
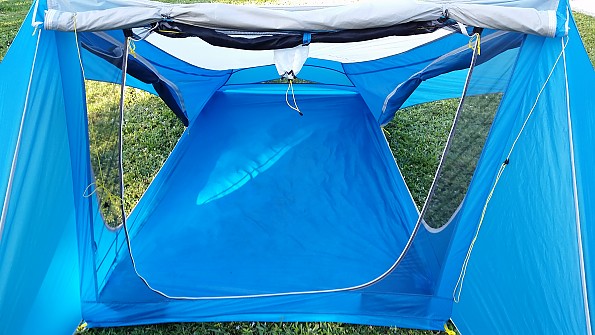
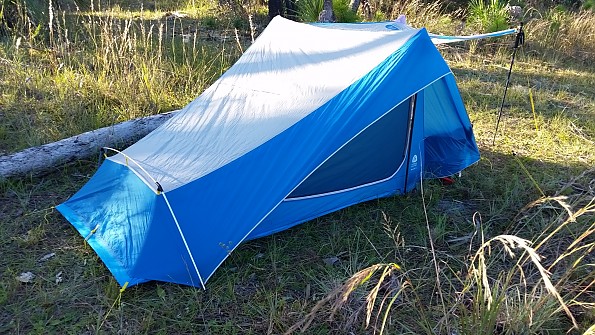
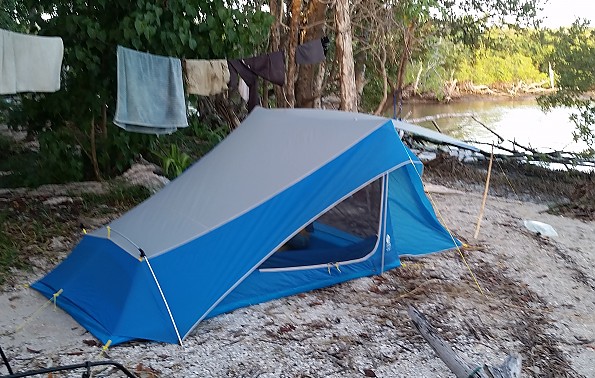
The Divine Light 2 FL is a new addition to Sierra Designs' line of lightweight backpacking tents, combining characteristics of the Flashlight 2 and Tensegrity. Most notably, it utilizes spreader poles at the front of the tent to create a wider distance at the peak than at the bottom. This amounts to a noticeably different living experience inside the tent—a huge amount of space and headroom for sitting upright!
The tent also sports side awnings and a large roll-back vestibule awning, which increase the coverage, facilitate easy entry/exit, and provide a lot of adjustability in ventilation and escape from the elements. Best of all, the Divine Light weighs in at a svelte 3 lbs (tent and required foot-box pole) by utilizing trekking poles for the structure. Not bad for a 2-person, 3-door, feature-rich tent that actually has plenty of room for 2.
On the downside, it is not free-standing, suffers from single-wall condensation, and takes some practice to set up.
Pros
- Lightweight / utilizes trekking poles
- Ability to sit upright, vertical walls maximize interior room and livability
- Plenty of interior space for 2 persons and gear
- Hybrid rain fly/mesh design, 3 doors (2 sides plus front)
- Light-colored roof lets in exterior light
- Vertical poles provided
- All materials and pieces are of good quality
- Multiple pitching configurations
Cons
- Despite excellent ventilation, can still suffer from single-wall condensation
- Non-freestanding
- Somewhat large footprint
- Structurally-imperative guy-lines (holding up vertical poles) can get snagged when entering/exiting sides of tent.
 Manufacturer Specs:
- Minimum Weight: 3 lbs 1 oz / 1.39 kg (Does not include 6 oz. vertical poles or stakes)
- Packaged Weight: 3 lbs 15 oz / 1.79 kg
- Vestibule Area: 10.30 ft2 / .96 m2
- Floor Area: 29.30 ft2 / 2.72 m2
- Peak Height: 45.5" / 115.6 cm
- Dimensions (L x W): 88" x 50" (Head) / 46" (Foot) / 224 cm x 127 cm/117 cm
- Packed Size: (L x W): 14.5" x 6.5" / 36.83 cm x 16.51 cm
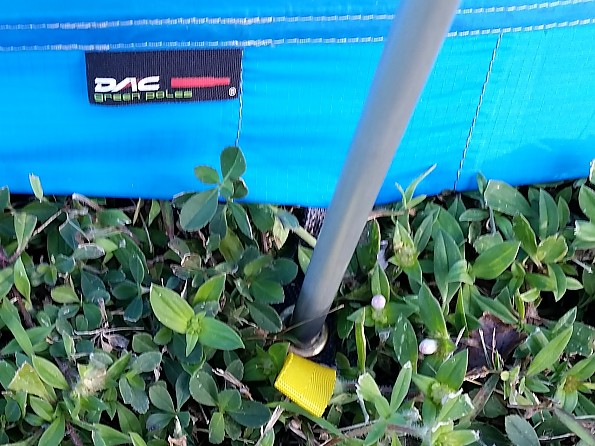
- Pole Type: DAC NSL / DAC Pressfit
- Fly Fabric: 20D Nylon Ripstop, Silicone/1500mm PE, FR CPAI84
- Floor Fabric: 30D Nylon Ripstop, WR/3000mm PE, FR CPAI84
- Body Fabric: 15D Nylon No-See-Um Mesh
 Weights (my measurements):
At a minimum, the tent and required foot-box pole weigh just a hair over 3lbs/48 oz.
Everything else can either be left behind or substituted for something lighter/dual-purpose:
- Vertical poles: 2.9 oz each / 5.8 oz both
- 2 stuff sacks: 1.7 oz
- 11 stakes: 4.4 oz together
What’s included:
- Divine Light hybrid (fly/body integrated) tent
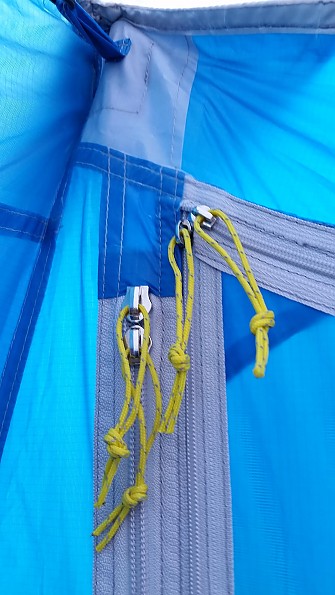
- 7 reflective line pull-outs w/ Linloc 3’s
- 4 reflective guylines with Lineloc clamcleats
- Nightglow lantern accessory (fabric headlamp/flashlight diffuser)
- 1 curved foot-box pole
- 2 vertical poles (can be replaced by trekking poles)
- 11 DAC J-Stakes
- Tent stuff bag & stake/pole bag
Additionally, a footprint can be purchased separately for $39.95. I did not use a footprint while testing the tent and generally find the extra weight/cost to not be necessary.
Setup: Ease of setup is somewhat subjective, depending on how much experience one has playing with non-freestanding tents. They can be finicky little oddities and always require a lot of stakes. Fortunately, I have a fair bit of experience in this realm, and rather enjoy such challenges.
To avoid frustration and a lop-sided tent, it is important to follow the same procedure, in order, when setting up a non-freestanding tent. Practice at home in your backyard or a park before setting out into the backcountry for the first time. And if it’s been awhile, do a refresher.
I forget details such as how high to set my trekking poles (owning several trekking pole-compatible tents, all utilizing different heights, confuses things further). I suggest marking the poles or writing this information somewhere on the tent with a permanent marker.
Pitching this tent is more involved than a simple dome design, but comparable to similar non-freestanding designs. There is no separate fly to mess with, so this makes setup easier but can have its disadvantages too. With a bit of practice, I was able to pitch the tent in the 5 minute benchmark, by myself, in the dark.
During my testing period, the tent was not yet publicly available and came with NO pitching instructions (as of publication of this review, they are still not available but I’m confident SD will provide them eventually). It was fairly easy to figure out a procedure by following the instructions for the SD Flashlight 2 (available online).
The prep for setup involves finding a medium-sized level piece of ground, with consideration given to all the usual factors such as wind direction/speed, humidity, entry/exit, privacy, etc. If ventilation is desired, positioning the head into a light wind and raising/rolling-up the awning effectively turns the tent into a wind-scoop. If stormy conditions are expected, position the foot into the wind, instead.
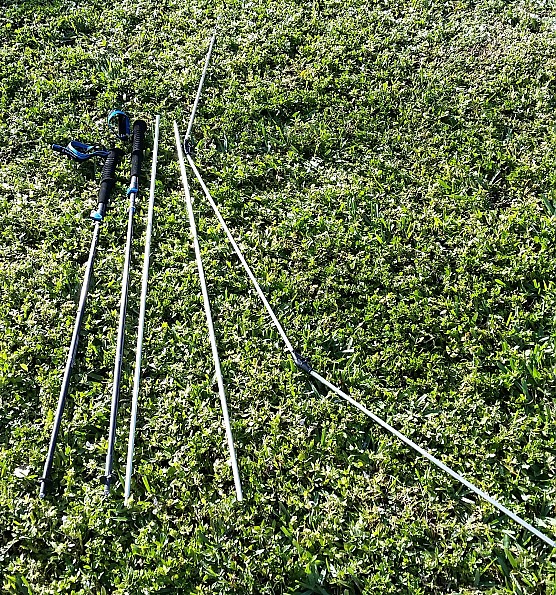
Comparison of trekking poles, stock veritical poles, and the foot-box pole.
Assemble the foot-box pole and either 2 trekking poles or the 2 stock vertical poles. These are 46" long, which equates to 117 cm. A minimum of 8 tent stakes are required to pitch the tent: 4 in the main body corners, 2 on the vestibule corners, and 2 on the side guy-out points.
A 9th stake at the middle foot-end pulls the fly out to allow better ventilation and the remaining 2 stakes can be used in conjunction with an additional set of trekking poles to prop open the vestibule awning. Alternatively, they can be used to stake out the bottoms of the vertical poles, although this is not necessary.
Here are the setup steps that worked best for me (but may differ from the manufacturer’s instructions, once available)
- Tightly stake-out the 4 main body corners, then the 2 vestibule corners.
 2. Insert the foot-box pole in the grommets and attach the 2 H-clips to the 2 joints, followed by the middle clip.
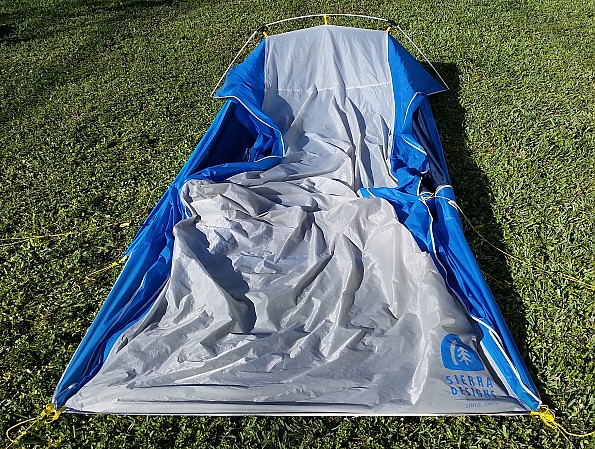 3. Insert the vertical poles into the awning peak sleeves and bottom grommets. If using trekking poles, the awning peaks create a cup for the pole handles, while the tips may or may not fit inside the grommets, depending on pole design.
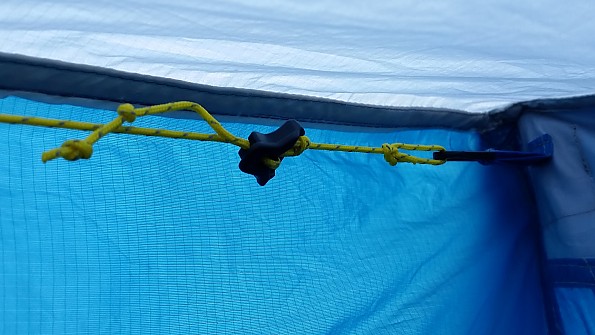
 4. Stake-out one vertical pole, and then the other, keeping the tension between the two balanced (may involve several adjustments using the Lineloc camcleats).
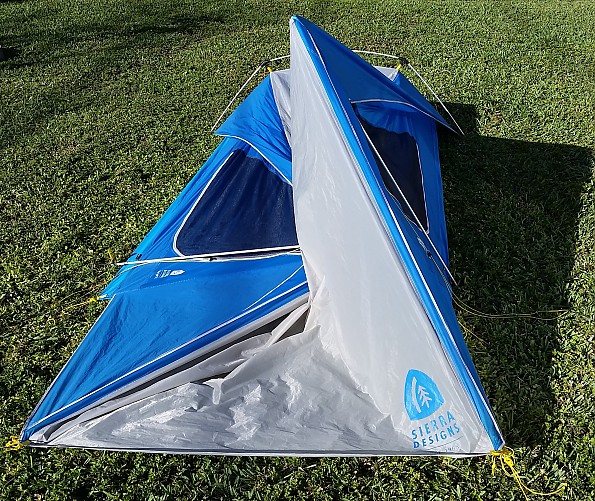
 5. Stake-out the rear-vent. Ideally, set the stake high out of the ground, with the guy-line at the top, to maximize the opening.
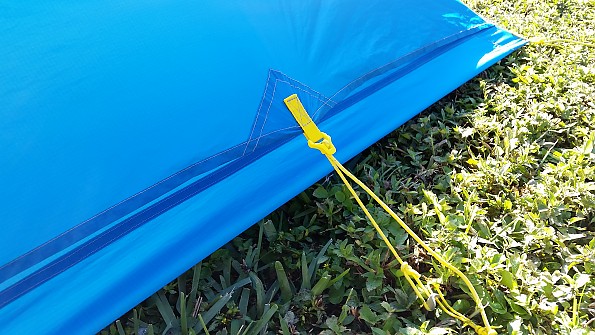 6. Do a 360 around the tent, re-tightening all the guy-lines and pull-outs. Configure the vestibule awning and door windows as desired for privacy, weather, and ventilation.
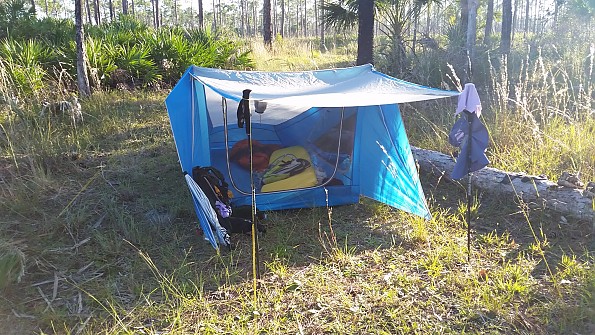
Stability: It can be a little challenging to get a taut pitch with the Divine Light, especially if the ground is slightly uneven or the area is lacking in space. Staking the corners evenly at the very beginning is key, as well as balancing the vertical pole spread. On several occasions, I managed to get the front end of the tent slightly off-center from the rear. As a result, there were some wrinkles in the body of the tent. In another instance, I pitched the tent in a slight bowl, resulting in a funny shape.
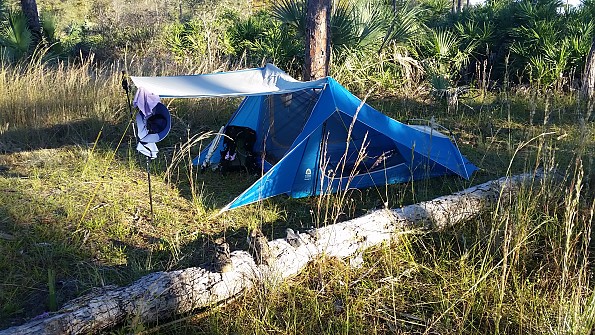
 Here I used a tree to prop open the awning since I was pretty limited on space at this remote Everglades campsite---high ground is few and far between!
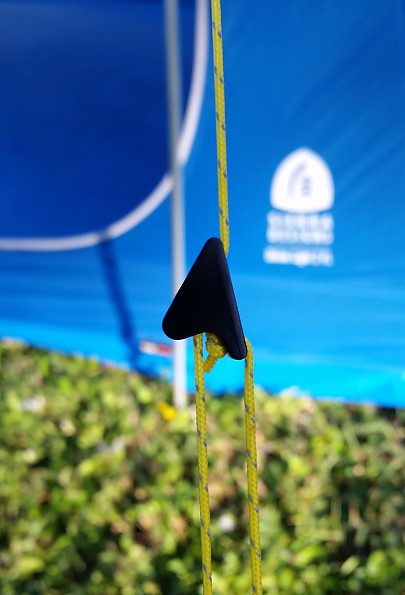
Stability ultimately depends on maintaining the tension of the side guy-lines…this is the tent’s Achilles heel. During a thunderstorm, one of the stakes pulled out and the whole structure was compromised until I wrestled it back in place. These guy-lines are also positioned in front of either side door, begging to be tripped over during a middle-of-the-night bathroom break. While I mostly managed to avoid entanglements, an unsuspecting neighbor snagged one, leading to a big surprise for both of us. The lines are orange and reflective, but still…keep klutzy neighbors at a distance if you can!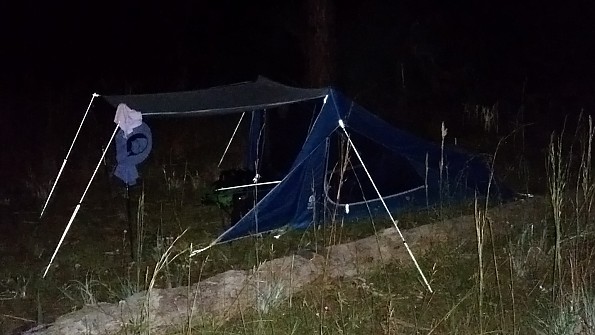 The tent's reflective trim and tracers stand out pretty well at night. Watch out for those guy-lines!
I also experienced a fairly typical amount of stretching/sagging due to absorbed water weight. Silnylon is notorious for moisture-induced stretching. A taut pitch the night before often ends in a saggy tent the next morning. Given the non-freestanding design and a large surface area, the Divine Light is perhaps even more susceptible to this effect.
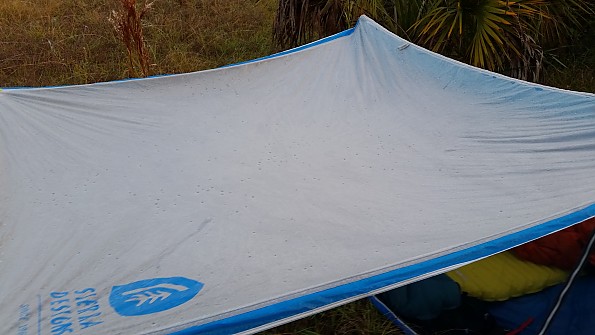 Sag in the awning is typical in the dewy mornings...an area that can trap water if the awning is left up
Weather Resistance: The Divine Light performed as expected during the encounters I had with rain…that is to say, it kept most of the rain out. In the worst case, I had to pitch it during a thunderstorm. Since the fly is integrated, the interior is mainly protected during setup. But there was some water inside, once finally pitched.I will emphasize that this was a really heavy downpour and pools of water collected on top the tent before I could get the poles up. I suspect the water seeped in through the doors. In a light drizzle, this shouldn’t be a problem. Once I got the tent up and the bit of water mopped up, the tent stayed dry inside.
 Hard to tell in this picture, but it shows the rain beading on the outside of the tent
Also, I did not notice water pooling anywhere on the top, so that is good. The shape of the tent seems to shed water pretty well. The window panels zip all the way up for side-ways rain and the vestibule awning offers full coverage, so really there is only a small possibility of getting some splash-back at the foot-end. I’m also confident that the bathtub floor keeps water out (as it also held condensation run-off in).Ventilation: The Divine Light has good to excellent ventilation, depending on the configuration of the front awning and window panel openings. Even when the windows are closed and the awning is down, air can circulate under the vestibule, through the solid mesh front, and back to the foot box. With the window panels open, there is good cross-circulation as well.
At no time did I suffer from the tent being too stuffy. In fact, on several occasions I had to close the vestibule and window panels just to keep from getting too cold (I was trying to get away with just a light poncho liner in December, so cut me some slack :). On that same trip, I started the first night with the awning rolled all the way back, taking full advantage of a light sea breeze in balmy conditions. This adjustability really appeals to me, given my varied uses.
However, having spent many a night in the humid conditions of Florida, I have yet to use a tent that doesn’t suffer from condensation. Better ventilation just means that the surrounding moisture-laden air can settle on the interior surfaces of a tent more easily. And this tent has a LOT of surface area. It is also primarily single-walled. As a result, I came in contact with condensation regularly…enough to cause pools of water on the floor some nights. Most of the time condensation ran down the walls all the way to the bottom and foot end but also dripped on me. None of this surprised me or made me think it is a design-flaw, it’s just the way things are in this environment.
But one thing is for sure, because of the amount of surface area and that fact that the tent body can’t be separated into several pieces, it takes a long time to dry in the mornings. Most days I just packed a wet tent and let it dry when pitched again in the hot, late afternoons.
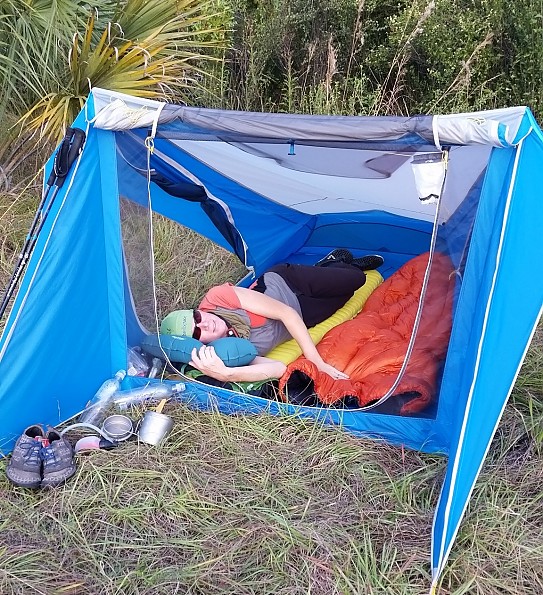
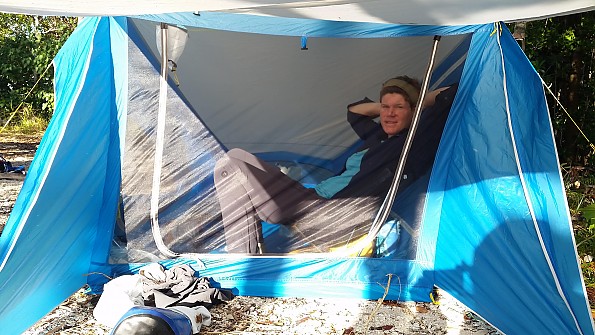
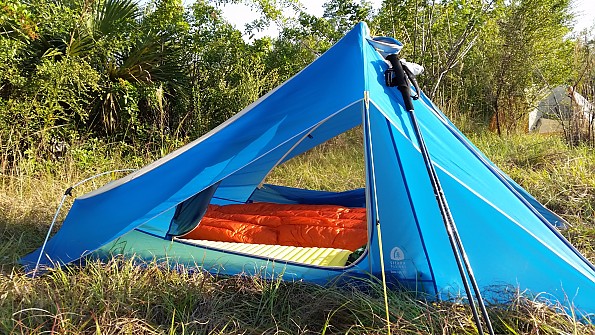
Room & Storage: Ample space is the Divine Light’s main selling point. This is one of the few 2-person backpacking tents that I can confidently say will comfortably fit 2 people and their gear. I daresay that even a third could squeeze in, if desperate times called. It might even accommodate a small family.
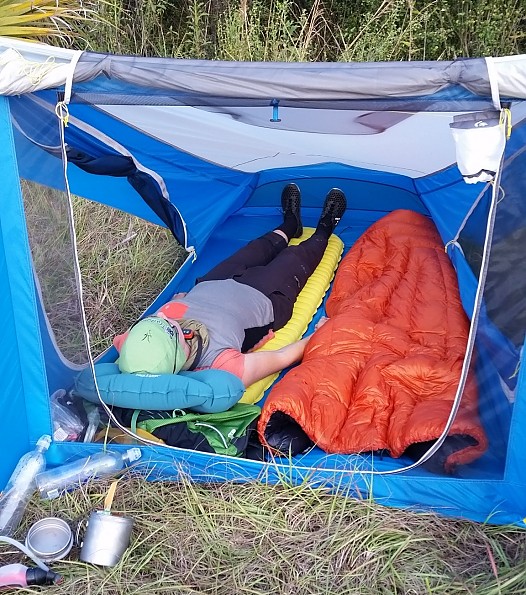
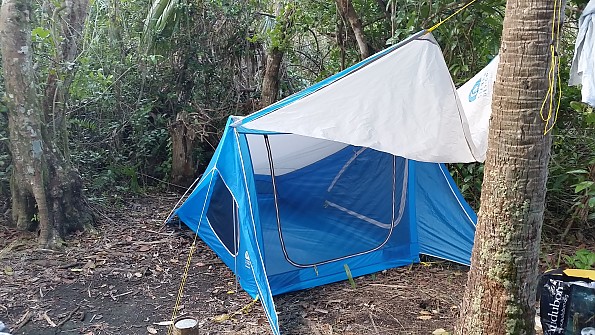
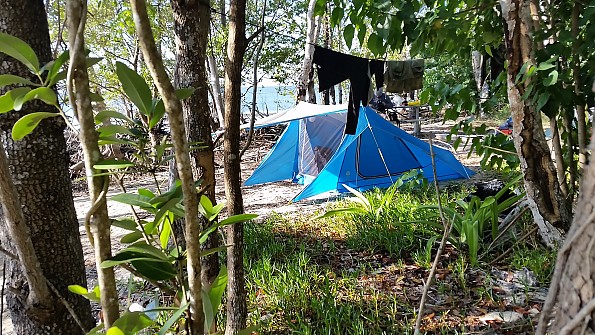
Much of the tent’s "livability" can be ascribed to the spread of the vertical bars. Instead of the walls closing in at top, they open up….a very unique concept in a tent. This greatly improves the total amount of interior space, but more importantly, headroom. It proved invaluable one morning in the Everglades…I was able to sip my coffee in peace and comfort, sitting upright in my camp chair, while hundreds if not thousands of no-see-ums raged just outside (I am not exaggerating, see the pictures).
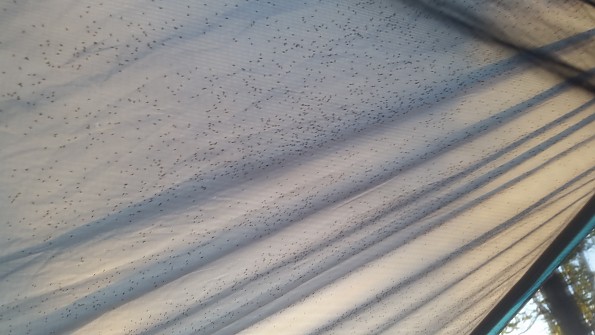
It's not pepper sprinkled on the tent....all those little specs are biting insects... no-see-ums (which can actually be seen). I refer to them as wings-n-teeth. Thankfully the small-sized mesh kept them at bay!
The sides of the tent are protected by a 10-inch wide awning, giving some rain coverage for an occupant trying to get in and out. These awnings also allow the door window panels to be opened during a rainstorm (provided it isn’t blowing sideways). At 35" max height, they require some maneuvering for clearance.
Additionally, a 3rd double-zippered, U-shaped door in the front mesh allows access to the vestibule and another point of entry/exit if the awning is propped-up or rolled back. In fair weather, I preferred to come in and out through the front door, just because it was slightly easier.
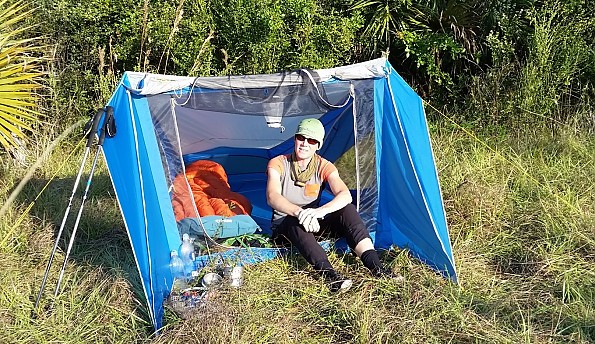
The front awning vestibule also provides a huge amount of versatile area for storing gear and sheltering from sun or light rain. When pitched upright with a second set of trekking poles or sticks, I liked to refer to the area as my foyer. It is definitely my favorite feature of the tent. Namely, it’s possible to stay dry while cooking a meal on a small camp stove here…just be careful!
It also makes your space very inviting and a social focal-point. Great views and a feeling of connected-ness with your surroundings are another strong-selling point…but this assumes you’ll pitch the tent somewhere worthy of the view, which is up to you!

I took my own tent dimension measurements, which were mostly the same as the manufacturer's, with the main difference being that I measured the max height of the tent from the center and not from the peak at each vertical pole. This is more factual regarding the usable height of the tent. Head-end: 42" height at middle, 57" width at top, 49" width at bottom. Foot-end: 16" height, 45" width. Body: 86" length. Vestibule: 30" length x 50" width x 42" height.
From these dimensions and pictures, hopefully you can figure out if the tent would be a good fit. After all, "roominess" depends very much on the person describing it.
Packability: Relative to the pitched size, the Divine Light packs fairly small. The poles fold into a compact length of 17” and the body of the tent compresses well. Unlike my SD Lightning 2, the Divine Light has no integrated stiffening rods, so it can be rolled or stuffed into a pack any which way. When using trekking poles, the only hard parts are the foot-box pole and stakes. On the downside, since the tent body cannot be separated from the fly, the weight cannot be divided as easily among partners.

Ease of Use and Features: I’ve outlined much already, but the Divine Light is loaded with large-scale, unique features as well as numerous small details such as linelocs, zipper-pulls, and door tie-backs. There are too many to cover them all, but I highlight a couple major features and try to provide pictures of the many smaller ones.
Doors: The Divine Light has two J-shaped, double-zippered side doors (one for each occupant). These side doors have 2 layers: a no-see-um mesh window and a protective nylon panel that can unzip to increase ventilation and the view to outside. The doors can also be rolled up and secured by toggles at the top, so that they are out of the way completely.
I was impressed by the functionality and ergonomics of the J doors. The zippers slide easily throughout the arc, using only one hand. With other tents, I often have to apply tension with the other hand and different points in order to fully open the door. I also like that the doors hang down in place over the opening, even with the zippers all the way open. This effectively creates a flap…which I found is very helpful in keeping hordes of insects out when the tent occupant is trying to escape or retreat unnoticed.
However, the zip-down window panels do cause a few problems. One, it is easy to mistake the panel zipper for the door zipper, or vice-versa. Second, when the panels are fully opened, they can flap down into the door opening, making it problematic to zip the door closed. I tried just tucking them into the pocket they create, but this only works if they are partially unzipped. It would be easy for Sierra Designs to devise a means to secure these better.
 To the left are the door zippers, the 2 at the top right are for the window panel...easy to mix up.
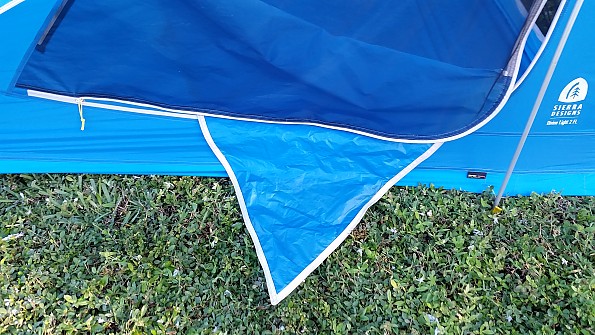 The window panel getting in the way of the door zip
Poles and stakes: I like that the vertical poles are provided with the Divine Light. Given the price-point, this would seem to be something expected, but you’d be surprised. Many trekking-pole compatible tents do not include any substitute poles or charge extra for them (I’ve owned two like this). That is fine if the buyer is certain they will always pair the tent with their own trekking poles. But this can be off-putting to buyers that haven’t yet committed to using trekking poles or don’t want to.
It also makes it more difficult to loan your tent to your buddies for the weekend (perhaps not a bad thing, depending how hard your buddies are on gear). Having the option to bring the stock poles along and free your trekking poles for other uses (day-hike peak bagging, for instance) adds a lot of flexibility. The provided DAC stakes are very good quality, hold well, and are relatively lightweight.
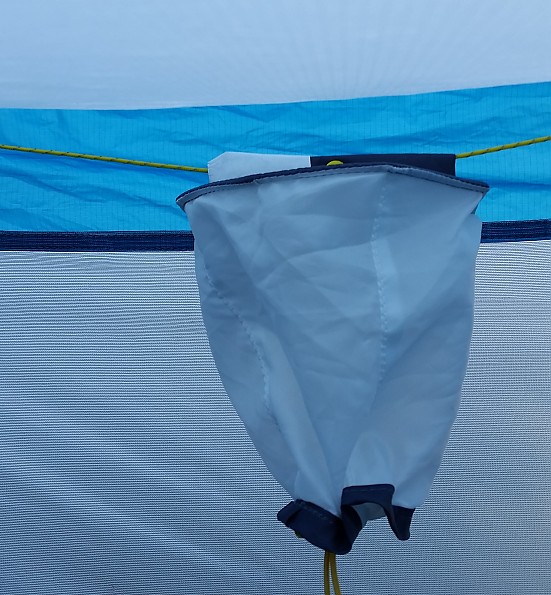
There are 2 mesh pockets at the head-end for storing small items.
Night Glow lantern: This a new accessory that comes included with the tent and can be purchased separately. A headlamp or flashlight is placed inside and the fabric acts as a light diffuser, creating a warm glow. It functions as advertised, is lightweight, and packs down small. The line that the lantern is hung from can also serve to hang other items, provides some internal tensioning, and is easily removed.
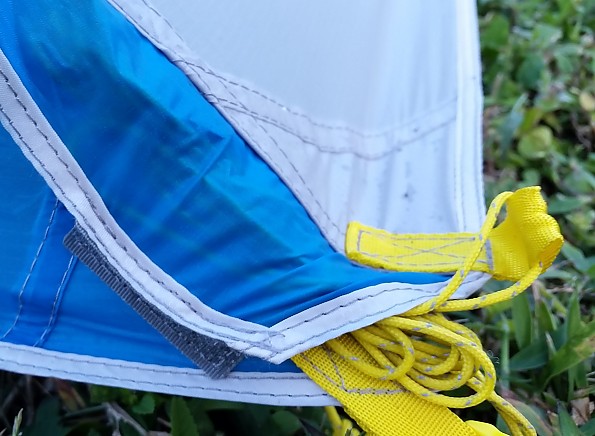
 Lastly, velcro on the ends of the vestibule awning creates a nice pocket for storing the guy-lines.
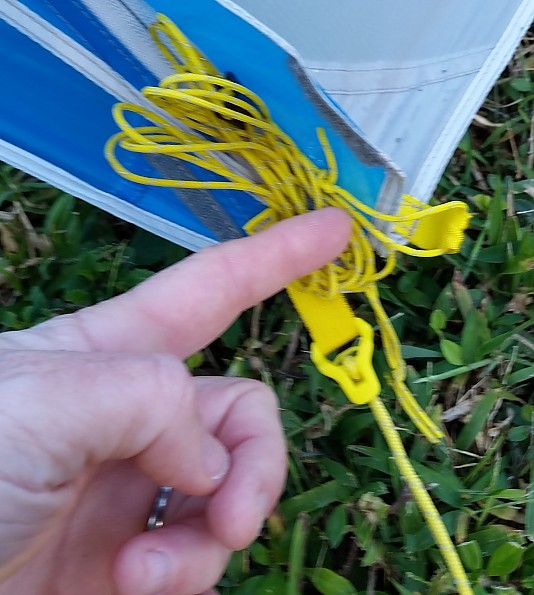
Construction & Durability: All materials are of good quality, with no short-cuts (that I could tell). This tent definitely has all the marks of a high-end product. The stitching is good and the seams are factory taped. The only part that has suffered is the no-see-um mesh. I noticed a few snags right off the bat, and more as time passed. But these are common to tents with such fine mesh…which includes most tents these days.
Conditions: I tested the Divine Light from November through February in South Florida. I used the tent for backpacking, car camping, and on a 4-day kayak expedition. I did not experience very severe weather, but it did rain on several occasions. The tent weathered one thunderstorm and winds up to 20 kts. Thank you to Trailspace and Sierra Designs for the opportunity to test this tent.
Source: received for testing via the Trailspace Review Corps
(Sample provided by Sierra Designs for testing and review)
Your Review
Where to Buy
You May Like
Specs
| Price |
MSRP: $389.95 Historic Range: $149.00-$389.95 |
| Minimum Weight |
3 lbs 1 oz / 1.39 kg |
| Packaged Weight |
3 lbs 15 oz / 1.79 kg |
| Doors |
3 |
| Vestibules/Gear Closets |
1 |
| Vestibule Area |
10.30 ft2 / .96 m2 |
| Floor Area |
29.30 ft2 / 2.72 m2 |
| Peak Height |
45.5 in / 115.6 cm |
| Guylines |
4 |
| Stakes |
11 DAC J-Stakes |