Sierra Designs High Route 1


![]() Reviewed by
Reviewed by
DAVID K BANKER
+29
 May 4, 2022
Very light and compact tent. Easy to set up.
Pros
- Less than 2 lbs
- NOT made in China
- Easy to set up
Cons
- Stakes provided are very small, but just put a rock on them
Very light and compact. Excellent three-season tent for extended backpack trips.
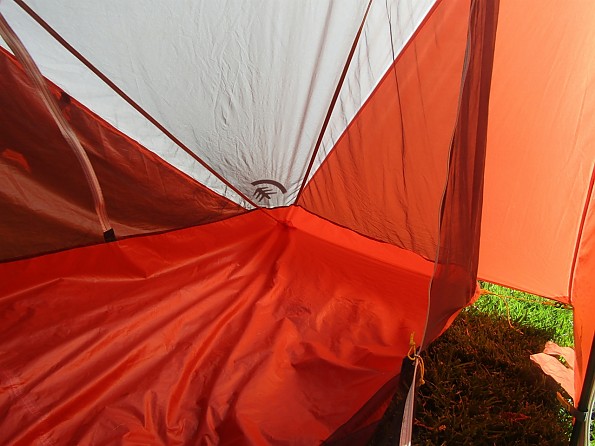
It has two vestibules, one with a full size door for getting in and out, and the other with a small "door" for putting gear in and out. It is a very reasonable size for folks I would say up to 6'3" with some space at the head or foot for things you want to keep access to—flashlight, water bottle, etc.
It can be set up as a complete double-wall tent, or the two parts can be set up separately, like a tarp tent or a "bug net" tent. But I would say that it is best if you decide what you want at initial setup, as changing it in the middle of the night in a rainstorm would be disappointing.
It does not come with a footprint, but a chunk of tyvek left over from our last construction project works great.
I did not find it at all difficult to set up...pretty intuitive...but best to do it once in the backyard on a warm afternoon than trying for the first time on a hillside after dark in a drizzle. This is not a free-standing tent: it uses trekking poles, but uses them one end up for net tent and the other end up for tarp tent or full tent configuration.
Background
Over the past MANY years, I have had literally dozens of different tents. Some in the high deserts of California, and others in late January in Alaska.
Source: bought it new
Price Paid: $249
 Reviewed by
Inga Aksamit
MEDIA
INCENTIVIZED REVIEWER
+938
 September 25, 2017 (original Sep 17, 2017)
The High Route tent is a light tent that is designed to be stable in nasty weather and offers plenty of headroom. It's not intuitive to set up, but with practice it becomes straightforward.
Pros
- Lightweight (but not UL)
- Good headroom
- Unique design
- Flexible--can be used as a tarp or tent
Cons
- Space inside the protected nest is limited
- Bulkier than other 1-person tents
- Not intuitive to set up
The Sierra Designs High Route 1 FL tent, a collaboration between long-distance hiker Andrew Skurka and Sierra Designs, has been highly anticipated over the last couple of years of development. I believe Sierra Designs is one of the most innovative mainstream outdoor companies there is, consistently coming up with new ways to solve old problems having to do with balancing weight, function and cost.
Andrew Skurka is a professional backpacker who has hiked thousands of miles, including the 6,875-mile Great Western Loop and the 7,778-mile Sea-to-Sea Route. Together, I thought they could come up with a unique design that would be lighter than other Sierra Design tents, a cinch to set up and be rock solid.
They succeeded on a number of fronts. The High Route tent is unique. I’ve never seen anything quite like it. It’s not a cinch to set up and it’s not lighter than my personal gold standard for a solo tent, the Sierra Designs Tensegrity. It is purported to be very reliable in extreme conditions, such as high wind.
The Design
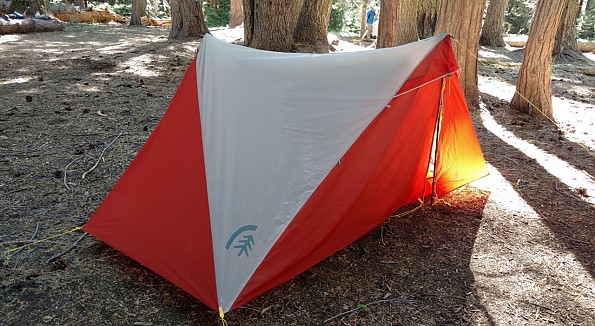
The non-freestanding pyramid-inspired design is basically a tarp with an optional “bug nest” inside. Picture a tarp that uses two trekking poles for support and has no bottom. Then envision a rectangular box comprised of netting and a solid nylon bottom that is suspended from the ceiling of the tarp. The suspended nest is big enough for a full size sleeping pad. When erected, the tent reminds me a little of a circus tent.
Field Test
Though the tent took some practice, including several tours through the instructional video, it went up without any major issues in the field. It’s fussier to set up than other tents I’ve owned so I ended up not connecting the four loops inside because I was tired of fiddling with guy lines, angles, and the trekking poles. I was able to sit up without hitting my head and it didn’t feel claustrophobic inside, though I missed the window views of my Tensegrity. Unfortunately, I haven’t experienced any severe weather yet so I’ll have to update this review if I can test that aspect.
I liked having two doors, which is a nice feature in a one-person tent. This allows easy entry on one side and potential access to gear storage on the other. The doors can be rigged up to be open to the world but it takes a little effort and probably isn’t worth doing for both doors unless there is a need for a lot of ventilation. Ventilation was not a problem on my field test but the weather was balmy.
There is a good amount of storage space inside the fly, though anything outside of the nest will be sitting on the ground which could potentially flood in a serious storm. This is the same as other tents with gear closets but it felt like I had less “protected” room inside the nest compared to other tents.
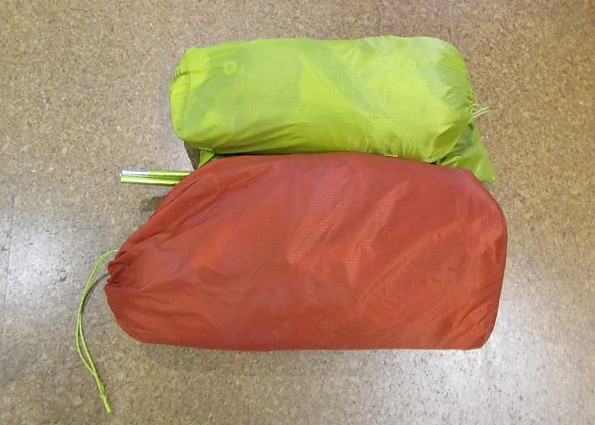
I was disappointed that the weight wasn’t lighter than my Tensegrity. The High Route came in at 2 lbs, 10 7/8 oz on my kitchen scale, compared to 2 lbs, 5.5 oz for the Tensegrity and was much more bulky in the stuff sack. When I’m solo, I need gear that is both lightweight and compact and the High Route is about as bulky as the two-person tent I share with my husband.
The tent is not as perfect as I had hoped with the collaboration between Sierra Designs and Andrew Skurka, and Skurka himself has addressed some of the shortfalls in this article, “Imperfections: A self-critique of the Sierra Designs High Route Tent.”
The Setup
After taking the tent out of the box, I kept fluffing up the material, trying to make sense of the shape. It’s a game my husband and I play. We like to set up the tent right out of the package without reading the instructions, just to see how intuitive and easy it is to set up. Forget it. With the High Route, preparation and pre-study is mandatory. It is strongly recommended that Skurka’s pitching video on the Sierra Designs website be viewed before attempting to set up the tent. I set it up three times before I took it into the woods, just to be sure I could remember all the nuances.
Unlike a traditional tent, where the tent is set up first and then the fly is attached over it, the High Route requires that the outer tarp (analogous to the fly) be pitched first and then the nest (sometimes referred to as the tent body) is suspended from the top. I’m going to go into detail because it was very confusing the first time around.
The tent is rectangular but it got confusing as to how to orient it until I ascertained where the doors were supposed to be. There are two doors on either side so when the rectangle was set up, the zippered doors wer in the middle of both of the long sides of the rectangle. I made sure the zippers were closed and the plastic buckles secured. It helped me orient the tent properly when I realized that the two white triangular pieces of fabric formed opposing corners.
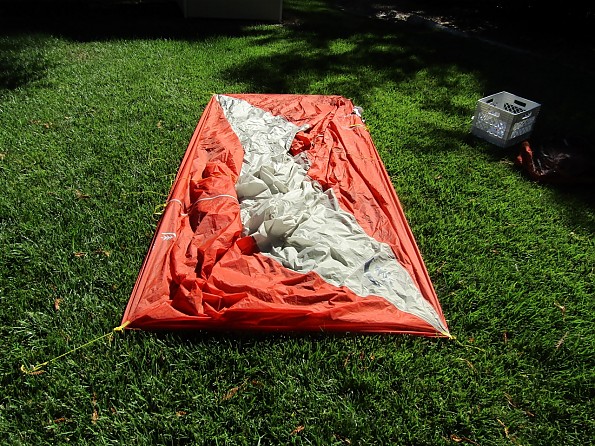
Skurka emphasizes the importance of making sure that the angles are correct before proceeding to stake the tent out. I can attest to the importance because the first time I was sloppy about it and the tent was impossible to erect properly. So, I got my protractor out (just kidding) and made certain that the corners were exactly 90 degrees and the guy lines were 45 degrees from the corner. I then staked out the four corners.
The next step was to erect the tent. This required some agility the first time because I couldn’t see what was going on inside. I got the trekking poles ready by extending them to 48 inches (120 cm), though I ended up extending them further. I unzipped one of the doors but left the plastic buckle clipped. I slipped the trekking pole inside and felt around the ceiling, right above the zipper. There was a little pocket that received the blunt end of the trekking pole. The sharp end went into a grommet at the bottom of the zipper on a small piece of webbing. There were two Velcro cuffs that helped secure the pole. I had to crawl inside the tent the first time to see where everything needed to go because it wasn’t making sense from looking at it from the outside.
Now that the outside of the tent was erected, I installed the nest. I placed the nest inside and located the four hooks, one on each corner. I slipped the hook into the four corners of the fly. This step is optional—once the sleeping pad is inside the nest it provides some structure. Next, I clipped the yellow buckles on top of the nest into the receiving end on the ceiling, located near the trekking poles. This was an exciting event the first time because I could finally see how the nest worked. Before that, I couldn’t visualize how the nest fit in.
The door can be staked out to provide ventilation or it can be zipped shut in stormy weather but I left it unstaked because I was worn out from so much fiddling around. There are extra tie-out loops and cord in case the tent needs to be further secured against wind.
It comes with 8 stakes and 6 are required. If windy conditions are expected, bring all 8.
The Bottom Line
The Sierra Designs High Route 1 FL is a tent that is best suited to the serious backpacker who may encounter severe weather. The tent is designed to be stable in nasty weather. It’s relatively light but not as light as other Sierra Designs tents. It has good headroom and does not feel claustrophobic. With some practice it can be relatively straightforward to set up, but is not as intuitive out of the box as many other tents I’ve tested.
I consdidered giving it 3 stars but in the end, the tent performed well once I mastered the setup. I don't think tents should be that challenging to figure out, so I took a half star off for each of the issues noted: non-intuitive setup, small space inside the nest, and the bulk of the packed tent.
Source: tested or reviewed it for the manufacturer (I kept the product after testing.)
Your Review
Where to Buy
You May Like
Specs
| Price |
MSRP: $299.95 Current Retail: $229.95 Historic Range: $194.99-$299.95 Reviewers Paid: $249.00 |
| Minimum Weight |
1 lbs 12 oz / .79 kg |
| Packaged Weight |
1 lbs 15 oz / .88 kg |
| Tarp only weight |
1lb 1 oz / 0.48kg |
| Body/Bathtub only weight |
11oz / 0.31kg |
| Number of Doors |
1.5 |
| Dimensions |
102” x 42” / 259cm x 107cm |
| Vestibule Area |
7.3 ft2 / .68 m2 |
| Interior Area (Tarp) |
29.8 ft2 / 2.76 m2 |
| Interior Area (Nest) |
16.6 ft2 / 1.54 m2 |
| Awning Overhang |
5 in / 38.5 cm |