DIY: Collapsible Cylinder Wood Stove


![]() Reviewed by
Reviewed by
ross mallick
+234
 February 18, 2018 (original Feb 11, 2018)
DIY wood burning cylinder stove offers the same functionality as commercial models at 1/10th the cost. Most suitable for family sized tents and groups of two or more backpackers in winter.
Pros
- Collapsible for backpacking
- Cooks and heats for family sized groups
- Saves carrying fuel
Cons
- Requires 3 hours to make, not counting shopping for parts
- Heavier by 1 1/4 pounds compared to similar sized titanium stoves
- Wood fuel must be cut and collected at campsite
This DIY (Do It Yourself) stove is not a branded or sold product, requiring the user to collect the parts and build the stove themselves. I built the prototypes for personal use and to instruct Junior Forest Wardens (children) to make it themselves.
As I do not have the time to make them for sale, I have provided instructions on how this can be done by the users. This model is one of four types I instruct children to make under adult supervision. For this review I have covered only the largest collapsible model.
When looking for a tent stove for winter use I found the only lightweight models were made of Titanium costing up to $500 including taxes and shipping. The supplies for this model costs $49.50 retail.
The parts needed are the following:
- 30 gauge steel sheet metal “Joist Panning Lining” used to form a fitting notched cylinder. $7 for single sheet of 16 by 35 inch metal
- Two stainless steel kitchen plates. $6 for nearly 11 inch diameter plates.
- 3 inch stove elbow $5
- 2 or 3 galvanized metal 30 gauge 3 inch pipes at $7.50 each
- 4 6 inch bolts for legs $9
- Hinges and Latch $5
- Wire, rivets or bolts, and wire mesh $2
The sheet metal forms a cylinder when snapped together. The flat end needs to be cut to fit tightly over the steel plates so as not to leave an air gap and provide strength and rigidity from inside the cylinder. The snapping together at the seam is best put facing out to prevent an air gap between the plate and cylinder. Doing this places the joint opposite to the way it is intended making it difficult to keep snapped together while drilling.
It helps if a second person holds it together while drilling the holes or use claps, though I did it with neither. This is the most tricky part of the construction. The amount to be cut off the sheet metal depends on the diameter of the plates, which with my plates comes to only 1 cm.
A hole is cut usually in the top far end of the cylinder for the stove elbow. To facilitate cooking, when first burned, cooking pots filled with liquid or weighty objects should be put on the curved top of the cylinder so it becomes indented from burning, thereby creating a flatter surface for more efficient cooking and balancing pots and pans. This is essential if the stove is to be used for cooking or boiling. Two pots should be fitted on the top to maximize the flat cooking area.
A load of wood will last about two hours, and produce approximately three burning embers coming out the front air vents. If you have a floor on your tent then a spark arrester over the vents is essential. I used a file holder from a dollar store with mesh slightly wider than mosquito netting. For additional protection I have a rotating air vent cover which also covers any gaps between the hinged door and the stove body. This virtually eliminates the burning ember problem but I do keep a small fire retardant cloth beneath the door just in case.
If you are not planning to put the stove pipe out a door or window, then a stove jack is essential to prevent tent burns. Commercial ones are available for about $100, but I use a $3 stainless steel kitchen plate identical to those I use on the front and back of my stove. Cut out the centre in an oval shape that makes a close but not tight fit with the stove pipe. The gap will enable the tent to move in the wind without dislodging the pipe from the stove. I open a tent seam, install a zipper, and open it up to insert the jack tying the edge of the plate to the zipper thereby preventing the tent from touching the hot stove pipe.
If you have a roof opening then a fire retardant cloth covering will prevent snow and rain coming in. The disadvantage of the top opening is that embers may fall on the tent roof. An opening on a side wall will nearly eliminate this risk of tent burn but requires a tripod to hold up the pipe. When the campsite is vehicle accessible I use a camera tripod but otherwise cut three poles on site and tie them together to form a tripod to rest the pipe. A spark arrester in the pipe and a directional wind/snow cover can also help prevent ember burns.
An optional addition are stove legs. These are convenient but add weight. When vehicle camping I use a folding barbeque stand without the grill to hold up the stove. Adding the grill makes for another type of cooking appliance. With no legs, stones or logs can be used keep the stove off the tent floor material. Under no circumstances should the stove cylinder be placed directly on the tent material. I had a visitor who tried to put it on the floor. I warned him to put it on the stand provided as otherwise it would burn a hole in the tent floor. While I was out he put it on the tent floor, and burned a hole in the canvas.
I use 6-inch bolts as legs. In the two pictures shown, the vertical legs are stronger but more elaborate to construct while the splayed legs are easier to make but leave less space under the stove. These provided enough space between the stove and floor to prevent overheating and burning though I notice some commercial models give more clearance. This may reflect the different tent materials that might be used. I have only used canvas. These legs can be easily removed for transport. The 1/2 pound steel bolt legs could be replaced by aluminum to save 4 ounces. The aluminum support strut of the vertical legs shown in the photo touches the external stove edge without melting, so legs that do not touch would remain intact. I used a 3 sided square aluminum hollow rod open on one side for the strut and legs could use the same.
The tools required for construction:
- Jigsaw with metal cutting blades
- Electric drill with metal cutting bits (a bench press drill is easier but not essential)
- Tin Cutter
- Riveter (optional as tiny nuts and bolts can be used instead of steel rivets)
In my mid-sized Canadian hometown the only international chain carrying most of the supplies is Home Depot, though national chains such as Rona and Home Hardware also carry them. The plates and mesh were obtained from Dollarama, a national dollar store chain.
To hold the stove together I use wires or bolts with wing nuts to make disassembly and assembly easier with gloves in winter. To give added strength to the stove I place the stove barrel seam at the bottom, drilling holes with the two ends slotted together and held in place with wires or bolts to prevent their separation while in use.
This stove has a capacity of about 1600 cubic inches, an exact calculation being difficult because of the bulging plates. It weighs 3 ¼ pounds without legs, and with legs a 1/4 pound more, totalling 3 1/2 pounds. The largest factory produced titanium collapsible cylinder stove of slightly smaller size (1560 cubic inches) is posted as weighing 3lbs 4 ounces, but includes an 8 foot stove pipe weighing a pound. This suggests their stove without the pipe is 2 lbs 4 ounces making it 1 1/4 pounds lighter than mine. With legs on both models the titanium is 1 1/4 pound lighter and roughly $450 more expensive. Whether saving the weight and the labour is worth the price difference depends on one’s circumstances.
The stove can be cut in smaller sizes. It is long enough in this description to accommodate the pre-cut logs sold in some gas stations. It can be constructed in a smaller size more appropriate for solo or two person camping. This would require trimming the sheet metal and/or purchasing smaller plates.
When backpacking the stove pipes are a weighty addition as well as taking up a lot of space. For a higher price it is possible to buy telescoping pipes that fit inside each other but I doubt the space saving is worth the price, though I have not tried them. For the extra cost I would go all the way and splurge on a titanium stove pipe. When I received one in the mail I thought I had been cheated it was so compact, light and fragile. However it worked.
The $50 for my order of a 36-inch pipe was as much as the cost of my whole stove and pipes combined, and not long enough. The 8 foot pipe which they use on their model would cost $133 and weighs a pound. An aluminum stove pipe of the same length weighs 1 ¼ pounds (4 ounces more) and costs $28. If there was one item I would add to my stove the first would be a titanium pipe. However, I would only think it worthwhile for avid and long distance backpackers.
One way to avoid weighty steel pipes is to use aluminum pipes which are available at some of the same hardware stores at about the same price and at great weight savings. However, aluminum pipes should not be used directly out of the stove or even coming out of the elbow as they will melt and can be used only further up the pipe. Mine melted a one inch hole just above the elbow.
By adding a 1 foot steel pipe out of the elbow and then using aluminum pipe for the rest of the length I solved this problem. As the heat output of stoves varies with fuel type and outside temperature, the length of steel pipe out of the elbow needed to prevent melting should be tested before going on a trip.
Aluminum pipes, unlike steel, can separate at the snap together seam so need to be held in place by wires. This ease of separation means they can be easily manually unsnapped and inserted inside each other for a single tube the same size as the titanium column for transport. Putting them inside each other not only saves space but give strength to the bundle, making it unlikely to be seriously damaged in transit.
I used two tripods at nearly a horizontal pitch to hold them up, but this 11 ½ foot length is overkill and an 8 foot length is more than sufficient. The aluminum is also delicate and crushes easily, which I know from falling on one and turning it from round to flat. I would recommend aluminum for long distance backpackers, but for those with motorized transport steel piping is a more durable option. Where space is a limiting factor such as possibly in a canoe, sled, ATV or snowmobile then aluminum is preferable. The user needs to make these calculations.
I cannot compare the performance of this model with commercial stoves as I have never used them in this style. There is no reason to think it would be any different. However a homemade stove is not going to have the finish of a factory made model, though with practice it could come close.
The price difference is what sets this stove apart from commercial models. It is a matter of personal preference whether the labor is worth the savings involved or paying extra for a titanium stove that is 1 1/4 pounds lighter is more worthwhile. Method of transport, type of camping, and budget is critical in making a decision.
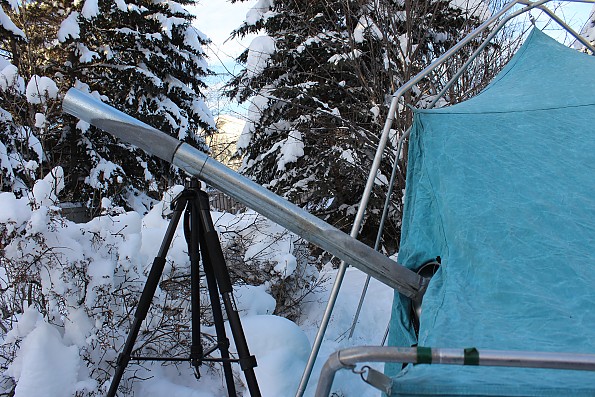 External view of tent with stove pipe supported by camera tripod
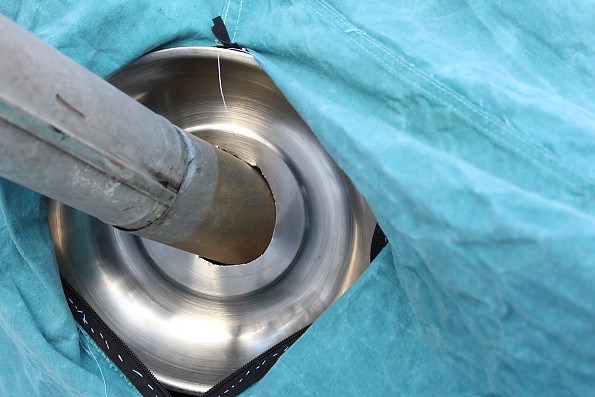 Stove pipe coming out of tent with canvas held apart by stove jack stainless steel kitchen plate. The tent is kept from touching the pipe by wires through the zipper and plate edge.
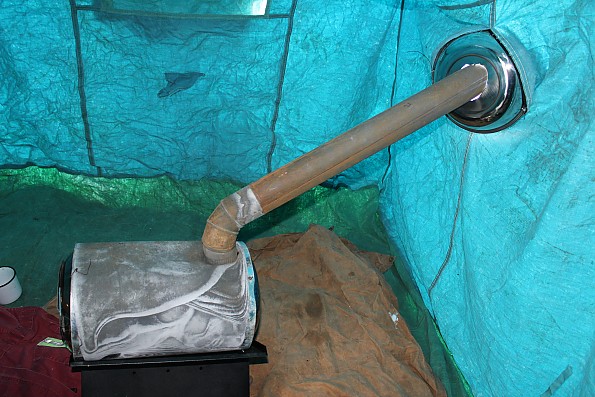 Interior tent view of stove with pipe exiting through stove jack
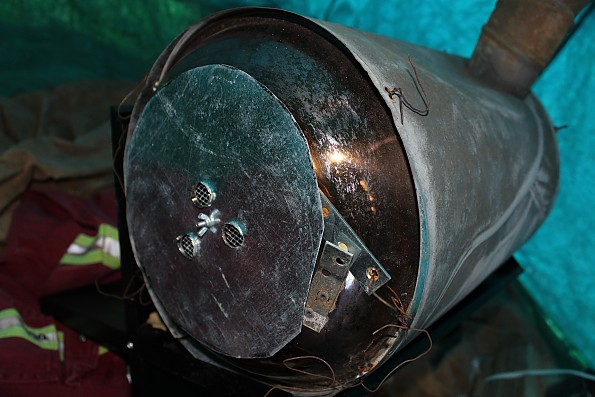 Front view of stove showing spark arrester mesh and rotating air vent cover in front of latched door
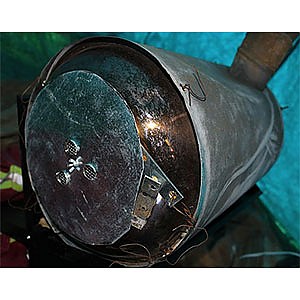
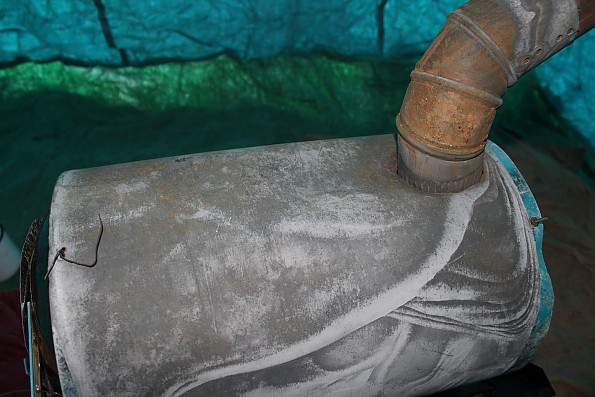 Stove with flattened top not showing up very clearly
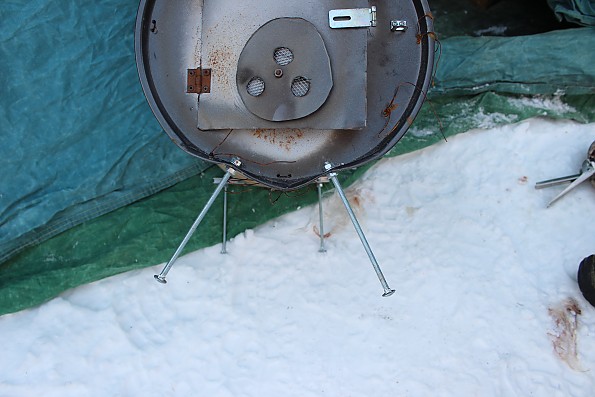 Another prototype showing removable splayed legs
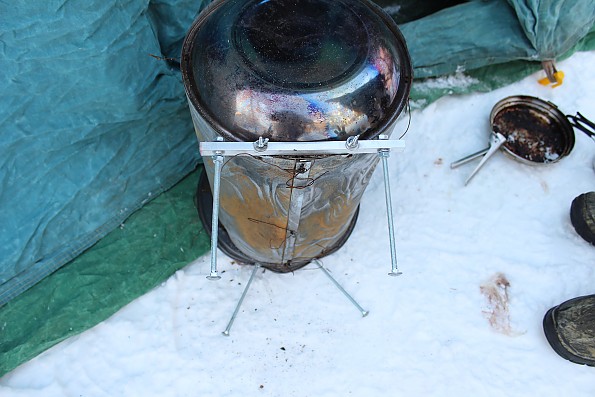 Prototype showing straight down 6 inch bolt legs
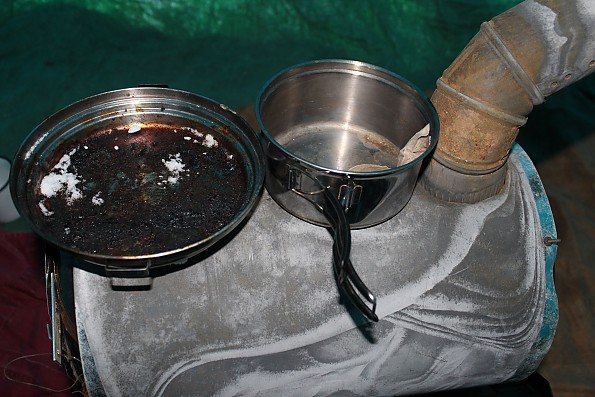 Stove showing how a pot and pan fit on stove top
Source: Self-made