Zpacks Triplex


 Reviewed by
Bill S
REVIEW CORPS
+4,657
 December 21, 2014
The ZPacks Triplex tent combines wonderfully lightweight and compact packing with roominess for two (and adequate for three). It would work very well for a solo hiker as well given its light weight. It appears to be plenty durable for extended hikes such as the long thru-hiking trails.
While during sunny days, the inside of the tent got somewhat warm, the thorough ventilation kept this tolerable (you should be on the trail hiking then, anyway), and provided plenty of dry shelter during the huge rainstorm I went through.
Pros
- Lightweight
- Fairly roomy
- Breathes well, thanks to extensive screening
- Provides good shelter during rainstorms.
Cons
- Cuben is non-breathing, hence gets condensation in humid conditions
- Cuben acts like a drum in heavy rain or under dripping trees, hence loud, more than any other tent I have used
- Tent design requires fairly flat ground for optimal setup — uneven sloping ground can result in a poorly set up tent with some loss of usable space
- The non-freestanding design requires many guy lines and stakes and is somewhat slow to properly set up
Weight 24 oz/470 gm
Background: Backcountry travelers have always wanted to lighten their loads. John Muir took only the clothes he wore plus whatever food he wanted to stuff in his pockets. When I got my Kelty pack in the 1950s (directly from Dick Kelty himself), I was handed a small pamphlet that gave the suggested items to be carried. The total weight was 14 pounds, including Kelty pack (external frame), sleeping bag, ground sheet (plastic), “camp rain protection” (also plastic), extra clothing, and cook gear.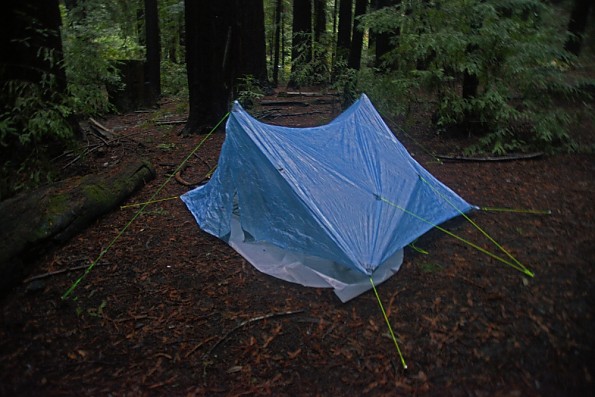
I will readily declare that I am not an ultralighter. In my seven decades as a backpacker, mountaineer, and backcountry skier, I have learned that one should take the gear needed and appropriate for a safe and comfortable journey, appropriate to the terrain and expected conditions, with provision for the unexpected. Sometimes, this means a 60 pound pack (climbing ropes and protection weigh a lot, despite ropes meeting CEN single rope standards now being 9mm or less in diameter and removable protection being made of very light aluminum alloys).
However, as the years advance, I have been striving to lighten my load. The campfire was your stove when I started backpacking on my own, so no extra weight there beyond matches. But, due to reaction against the proliferation of unsightly fire rings, strict fire regulations, and the growth of Leave No Trace ethics, backpacking stoves are now de rigueur. My primary stove weighs just a couple ounces, though the fuel and canisters add up to quite a bit for a week-long backpack.
Many of us have been using plastic drop cloths since the 1950s and before, sometimes in the form of a large tube (“tube tents”). While light, these tube tents and many setups of tarp tents have some disadvantages. One is that such plastic sheets are not very durable.
On my first summer of climbing in the Alps, I used a tube tent for the first few days in the Biolay campsite in Chamonix and my friends, Tom and Ivan, used two plastic tarps. It poured rain the first four days we were there, and I soon discovered that the cord I ran between trees acted as a conduit for the water to run from both ends and drip on me, my sleeping bag, and all my gear. I gave up and spent the equivalent of $16 in French Francs for a tiny pup tent.
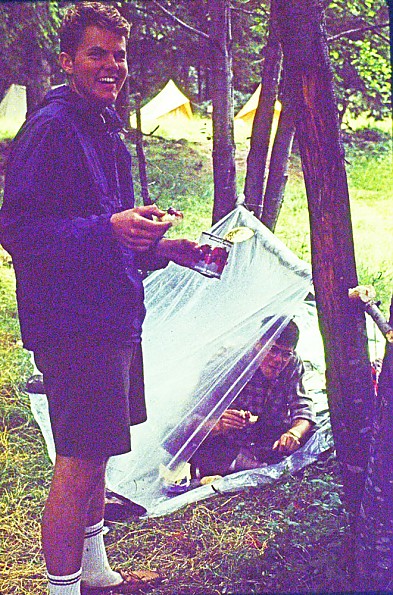
Tom and Ivan "ultralight" in Chamonix 1964
In the years since, I have acquired and worn out a wide variety of backpacking tents, some very light for their time, plus some full-on expedition tents that served me well on Denali, Antarctica, and in mountain ranges on the North American and European continents. But I wanted to cut the weight still more.
I had gotten some very light packs that could carry 30 pounds or so comfortably. But they did not really have the capacity for all my gear, despite having very light stoves, sleeping bags, titanium pots (bad idea, by the way, since titanium is a poor heat conductor – why do you think they make supersonic aircraft from titanium?), and so on. The big weight item remained the tent.
Yes, very light plastic sheets still work…sort of, along with light, yet strong and waterproof fabrics like silnylon and Cuben. I have had enough experience with tarps and tarp tents to be well aware that they are more “survival” than “comfort”. The wonderful 3-season weather in the Sierra Nevada (especially with our now multi-year drought) often allows just throwing the sleeping bag out on the ground. But mountains everywhere in the world are well-known to be rain generators, and a serious rainstorm will blow a lot of water into your shelter.
Most of the true ultralight tents on the market are made by craft builders, although there are a few from major tent manufacturers. But, as is common in advertising, a lot of the "light" tents are not really that light.
Details: A friend, who is an ultralight fanatic (at least, all of us who know him agree that he is an UL Fanatic although he vehemently denies this accusation) has urged me for several years to get an ultralight tent. After looking at all his tarps and tents owned (he has a variety of rectangular tarps, shaped tarps, a convertible poncho/tarp tent, tarp tents, and full tents) I decided to order a Triplex from ZPacks.
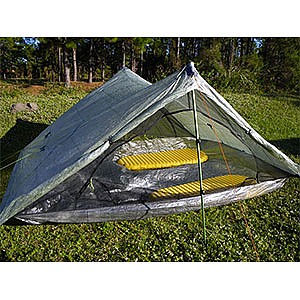
The Triplex, as its name implies, is nominally a 3-person tent, made of Cuben Fiber, with a sewn-in 60x90 inch bathtub floor (the size of a standard “Queen” mattress), attached to the tent top (available as a tarp without the floor) with a mesh insert for ventilation. The tarp top overhangs the mesh that extends along the sides between the tarp and bathtub floor to shield the interior from blowing rain.
The “doors” are screens, both front and back opening with 2-way zippers. The tent (the “tarp”) has triangular flaps that extend at both ends to provide nominal vestibules, which proved to be more “rain deflectors” than vestibules. I immediately discovered that the 90 inch, long dimension is transverse to the ridgeline, which means that the normal sleeping bag orientation has to be transverse to the ridgeline axis, rather than having your head toward one of the “doors”.
My spouse is precisely 60 inches tall, and hence would have her feet and head against the vent screens at the front and rear of the tent, while my 69 inches would have to be curled into a partial fetal position, if we chose to sleep in normal orientation. Sleeping 3 persons in the long dimension means that the middle person has to climb over one or the other occupants to get in or out. As a 2-person tent, the Triplex works just fine, leaving plenty of room to bring your gear into the tent with you, out of the rain.
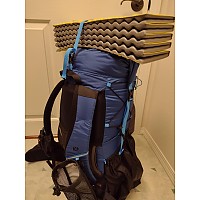
The Triplex is wonderfully light at 24oz/470 gm for the tent itself. If you do as most Ultralighters do and use your trekking poles to set up the tent, this beats my other 3-person tents and even most of my 2-person tents by many pounds.
I did get the optional fold-up carbon fiber poles, primarily because on rest days or when doing a side trip to bag a peak, I would rather leave the tent pitched. The total weight of tent, carbon fiber poles, stuff sack, and the required minimum of 8 stakes is 3 lb/940 gm, according to my digital scale. I have bivy sacks that weighs that much.
If you use your trekking poles, you can save the weight of the carbon fiber poles, which weigh 8 oz/156 gm. The required 8 pegs are 3.875 oz/111 gm, 12% of the total. You can get by with 6 pegs in many situations, although using 10 pegs, one for each of the 10 guy lines, makes for a smoother pitch. In comparison, I have two 4-season tents (one a solo, the other a 2-person) that weigh about 5 pounds with poles and pegs, both of which are free-standing.
I chose blue for the color of my Triplex. The two other colors available are Olive Drab and White. You can also order (at extra cost) a heavier weight Cuben Fiber in Dark Green or a standard weight Camo version.
The Triplex has one of the major flaws of tarp tents and most ultralights (for me, at least) — it is not free-standing. This makes setting the tent up more complex and more time-consuming than tents of the dome variety. This is one of the sacrifices that must be made for ultralight tents.
The tradeoff is that the poles needed to make a tent free-standing do add to the carry weight. In researching UL tents, I noted that Shires’ very popular Scarp 2 Tarptent (reviewed in Trailspace) weighs in at double the weight of the Triplex, and plus another pound if you add the extra stiffening poles.
The Triplex (and the other tents and tarps in ZPacks’ Hexamid series) is made of Cuben. This makes it completely waterproof, which also means non-breathable. That in turn, means that condensation will occur on the inside surfaces of the tent.
However, the ZPacks design has plenty of mesh to provide ventilation that reduces the condensation, plus any heavy condensation will slide down the Cuben fabric and drip off outer edges of the tent. The Cuben Fiber also makes it significantly more expensive than many other tents touted as ultralight.
ZPacks estimates that the lifetime of the tent is a bit more than one major thru-hike of the Appalachian Trail. I suspect that with care, it will last a lot longer than that. Cuben Fiber is, after all, a favorite material for competitive sailboats because of its great strength. But Cuben, along with silnylon and other super-light materials, has a reputation for puncturing and tearing easily if brought in contact with objects having sharp points or a sharp edge.
While I did manage to produce a 2-inch slit in the supplied stuff sack (due to shoving the tent stake bag into the already-filled stuff sack), there are no other signs of significant wear or holes. The slit was easily patched using the Cuben Fiber repair tape supplied with the tent.
Despite being easy to puncture with a sharp object, the bathtub floor in mine has not yet shown any significant wear. But then, I take my boots off when entering the Triplex, sit on a sleeping pad, and usually put a plastic drop-cloth underneath to act as a “footprint,” protecting against sharp rocks and sticks.
Cuben (and silnylon) is not fire retardant, plus it shrinks when overheated. Note that the fabrics used in most modern tents are also not fire retardant. I confirmed the flammability of the Cuben Fiber by cutting a 1”x2” piece of the supplied Cuben Fiber repair tape and holding a lit match close to it. It ignited quite readily, though it did burn somewhat slowly and shriveled while it burned. So the usual caution against cooking in the tent should be absolutely obeyed.
ZPacks says in their FAQ, “Most plastics break down under excessive sun exposure, and Cuben Fiber is no different.” In other words, don’t leave your tent set up all summer in direct sunlight. The same holds true for other tent fabrics as well, as I have proven multiple times with my tents over the years.
One thing about the Triplex and other Cuben tents is that the material is almost transparent to the point that you might be hesitant to completely strip down when changing clothes in it. This is especially noticeable at night with a lamp illuminating the tent interior. I suspect that with enough usage, the fabric would become more opaque and move from “almost transparent” to “translucent”.
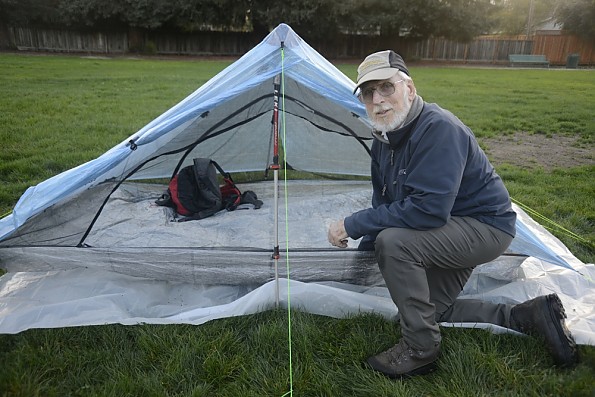
I suspected from the High Adventure Training courses that I help with that setting up ultralight tents and tarps was more complex than most of my other tents, especially the free-standing ones. In addition, ZPacks ships the Triplex without the guy lines attached. So I set the tent up in the back yard to attach the guy lines and to familiarize myself with the set-up procedure before getting out in a rainstorm.
ZPacks provides pre-cut front and rear guys with the attachment loops pre-tied, and a length of cord to be cut and tied for the remaining guy lines by the new tent owner. The front and rear guys have the stake loop already tied and a small carabiner attached with a plastic tensioner that is to be used to clip to the plastic rings on the door flaps. Instructions are provided on line for the lengths to be cut and loops to be tied for the remaining guys.
Many ultralighters use their adjustable trekking poles to set up their tents and tarps. ZPacks specifies setting the poles to an extension of 122 cm (48 inches, the same length as the optional foldable carbon fiber poles). Using your hiking poles this way saves the weight of dedicated poles.
One other advantage to using the trekking poles is that you can stick them in the ground as you set up the tent, which makes setup a bit easier than with the carbon fiber poles. However, if you want to do a day hike, you may want to take your trekking poles, although that removes the tent’s support. There are shaped and padded pole-top pouches on the tent into which the tops of the carbon fiber or trekking poles are placed.
During the first setup, I had to do a lot of fiddling with the adjustments, with the result that it took over a half hour, including the time cutting and tying the guy lines. The first few backpacks required a bit of fiddling and learning to find the optimal order to lay out the tent, peg the guy lines, and insert the poles on the “standard” uneven ground always found on all backcountry tent sites.
This time has been reduced to the 5 minute range on a flat tent site with practice and repeated setups. There is still a fair amount of readjustment to be made when the ground is uneven. I can get my smaller free-standing tents set up and pegged securely in 30-45 seconds (I won one of them in a tent-setup contest with a time of 38 seconds). Even my primary expedition tent takes only about 5 minutes to set up and peg down.
The following two time-lapse videos were made that way to shorten the amount of time needed to see the whole process. There are several things to look for in the videos (use the “pause” symbol to see the details). While the setup is on flat ground and gives a nice, symmetric, taut tent, you will have to make adjustments when on the more common tent setups when backpacking. The setup and takedown times in each of the 2 videos are about 5 minutes of real time.
The first video is setting up the tent. Note that as the tent is taken out of the stuff sack and spread out, the guy line for one corner of the Triplex is pulled out and staked. Then the guy line for the opposite corner is pulled out taut, then folded back about 5 inches/12 cm, then the stake placed and hooked. Be sure that you pull the second corner taut and fold the guy line directly back so the loop is directly in line and you don’t end up with a cattycorner bend. This allows placing the trekking (or optional carbon fiber) poles in the correct position.
Next, the other two corners are pulled out and pegged. With the poles and all four corners in place, peg the front and rear guy lines. Note that the pegs for the front and rear go through the pre-tied loops that ZPacks has put in the guys. At this point you have 6 guy lines in place. Note that I clipped the supplied carabiner on the front through only one flap and rolled the other flap, using the clip on the sidewall. This was to leave the door open for putting the rest of the gear in. On the back door, I clipped both flaps through their rings to leave the door closed. In the rain, you might want to close both end flaps to reduce the amount of rain getting in.
Only 6 guy lines more to go! You can reduce the number of remaining stakes by combining the 3 guys on each side to a single stake each. Because I had mis-tied the left middle guy line loop, I used an extra stake, something you might have to do anyway on typical uneven ground. On the right side, the single stake worked for all 3 guy lines. I suggest combining all 3 when possible. I do this all the time with my expedition tents and find it works quite well, even in strong winds. Unzip the front screen, put the gear inside, arrange as you prefer for occupancy, and enjoy.
The next video shows taking down and packing the Triplex. This is a simpler process that is basically just collecting the pegs into their storage bag, stuffing the tent, putting it in your pack, grabbing the poles and hiking to your next camp.
As shown here, if you have no wind or rain, you can pack the contents of the tent and move everything outside. However, if it is raining, and particularly if it is windy, you may want to leave the pack inside to keep the tent from blowing away (I have seen this happen in our training courses more than once). In any case, leave one of the guy lines and its corner peg in place until the end.
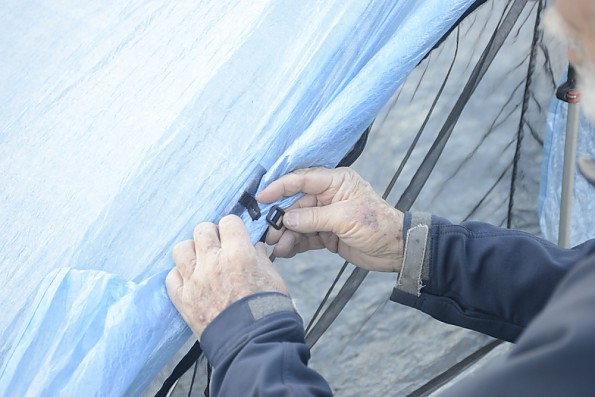
Start by zipping the doors closed (except the front, if you are leaving your pack inside on a windy day, in which case, take the pack out as the last step before stuffing the tent). Make it a practice to put the pegs in the peg bag (cleaning the mud off them as much as possible). The Triplex stuffs in the Cuben Fiber bag readily. I do recommend using care with the peg bag (I tore the 2-inch hole in the stuff sack trying to shove the pegs in after tightly stuffing the tent).
You may ask, why not roll or fold the tent with the peg bag inside (and the folded carbon fiber poles, if you are carrying them to use instead of your trekking poles)? Well, why do you think they call it a “stuff sack”? It is fast and easy to stuff the tent, but takes a bit of extra time to neatly roll or fold the tent (any tent), especially in the wind and/or rain.
Oh, and do remember the ground cloth and check the area for forgotten bits and pieces. Plus tidy up the area according to Leave No Trace principles.
Field testing: After the backyard setup, I did some hikes in the dry weather we have been having during our current drought. After finding that setting up on the typical ground that we have in most backpacking areas I go to is uneven enough to make setting up the Triplex with the guy lines made according to ZPacks instructions (i.e., fixed length with no adjustability) a bit untidy, after a few tilted campsites, I headed over to one of our local parks.
Since the soccer field was not in use and quite flat, I spent a couple hours doing repeated setups (and takedowns) to learn the optimal approach. It is important to set your adjustable trekking poles to the correct height, 48 inches/122 cm, from the ground to the pole pocket. Allow for sticking the tip of the pole in the ground. The optional 48 inch carbon fiber poles should not be pushed into soft ground, since the tent will not hang quite right. Having the trekking poles adjusted slightly longer actually seems to help.
The set up Triplex - Note the edge of the bathtub floor which prevents ground water from entering
In the accompanying photos and videos, you will note that I used a plastic tarp under the tent as a ground cloth, but did not tuck the tarp under the tent as you should when it is raining or rain is expected. That was intentional, since it was dry with a clear blue sky in the park. I normally do tuck the ground sheet under my tents any time there might be rain. In the photos, you can see that the sewn-in bathtub floor comes up far enough that it would take a significant flow of water to flow into the tent.
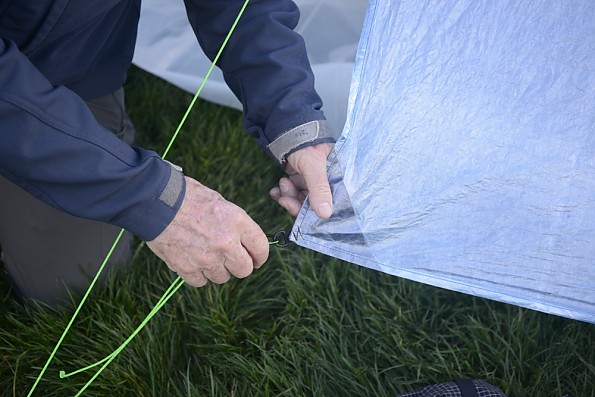
The doors are attached to the front guyline using the supplied carabiner and clipping through the plastic rings on each flap. Attaching the carabiner to both door halves provides a small vestibule and helps shield the interior from rain blowing through the mesh while still providing plenty of ventilation.
The doors can be rolled up and clipped to the tent side, providing plenty of ventilation.
Having now gotten some practice under my belt, the setups and takedown on subsequent backpacks worked out much better. But, those were all in good weather. I did find, however, that the fixed-length guy lines that ZPacks prescribed making from their supplied guy-line, do not provide a “picture-book” smooth pitching of the tent on the usual uneven ground.
I highly recommend creating adjustable guys, whether by tying a tautline hitch or using plastic tension adjusters on the lines, which you can find in many stores that sell camping supplies. The inside of the translucent Cuben tent did get a bit on the warm side in direct sunlight (like a greenhouse), though opening the end flaps for full ventilation helps a lot.
Details of weather testing: It was a dark and stormy night: It is all well and good to backpack and camp in nice weather, but real life in most years here in California includes winter rains, along with summer orographic storms in the High Sierra, Trinity Alps, and Southern Cascades. Our current drought was dragging into October and into early November.
I started to get anxious to try the Triplex in heavy rain conditions. One compelling reason was that we have had serious cold rainstorms on the last few High Adventure Training (HAT) courses my spouse and I help teach for adult Boy Scout leaders. The students who used tarp setups have all gotten damp, as have some of the instructors, while those using more enclosed tents generally stayed dry. Last year we had at least one student getting close to hypothermia.
With my heavier tents, we have stayed dry (we make use of the vestibules to change the wet outer layers, which then go into plastic garbage bags, as do the packs). We long ago learned to pack individual items in separate plastic bags. Still my goal in getting the Triplex was to reduce my carrying weight while staying dry and comfortable.
Finally, my son, the atmospheric scientist, arranged a series of drought-breaking storms for me. Well, OK, he is “not that kind of a weather person” (as he puts it — his research work involves lots of observations gathered from instruments he and his team put on satellites). But he did let me know that there were some storms brewing, left-overs from a typhoon on the other side of the Pacific that were redirected to my Northern California location.
Little did I expect that the series of storms that came in would set all sorts of records for inches dropped in 24 hours, flash floods, and mudslides, providing many days of heavy showers, making for several days of overly-excited reporting on the national TV news (note that I did not say “exciting” – TV newscasts aim for “excited” rather than “exciting”). Some of our local areas have reached almost 200% of normal, though the reservoirs are still low at this writing (late December 2014).
With the third storm of the first series starting to drop heavy rain, I drove over Saratoga Gap to one of our Scout Camp properties at mid-afternoon, discovering that the road was blocked “10 miles ahead”. I know the roads in that area well enough to expect I could detour to a narrow road to get around whatever the road blockage was, and then on to one of the Scout Council’s two camps. As I drove in through the camp’s gate, I notified the Ranger of my intentions. After staring out the door for a minute or two, he assured me that if my car was still parked there in the morning and the storm had let up, he might hike over to the campsite to see if I was OK.
I had packed on the light side, including the Montane waterproof sleeping bag I reviewed a while back, despite my reservations about its quirky zipper. I figured that if the Triplex did let water in, at least I would stay fairly dry. Since the trip was to just be overnight, I also carried a minimum of food and a very light-weight canister stove, but wore quality raingear (I could have saved more weight if I had worn my DriDucks).
The hike over the saddle to the Redwood campsite I chose in the Fritch Creek area on the Historical Trail and Nature Trail proved to be a bit more exciting than I had anticipated. First thing as I started on the trail, the rain started coming down in “buckets”. As I headed up the hill to the saddle, water was running down the trail as a fairly full and swift stream.
As I got to Hermits Knob, I encountered the first downed tree across the trail. Further along, I encountered two more of similar size. Each had a diameter of about 2-3 feet and was about 3-4 feet above the ground. These required a bit of maneuvering to climb over. There were a number of smaller trees down as well. Progressing around Mt. Radin (really just a hill) involved a fairly narrow, wet, muddy trail on a steep hillside. Dropping down from the saddle toward the upper logging road brought me to a tree blockage right on the final switchback, the tree having a lot of very springy and slippery limbs. By now, it was starting to get dark and the rain was picking up.
I got to the campsite, which has mostly slanted terrain, as the rain got even heavier. I proceeded to set Triplex up. In my haste, I neglected to set the proper trekking pole extension, so the tent ended up a bit lower than the setup in the park with the side vents not as open as they could have been. But that is not unexpected when setting up in a pouring rain after dark with very dark thunderclouds.
Since the tent was also on a bit of a slant, I had to sleep diagonally in the tent. I did have the fabric fairly taut, however. As you will note, I was in enough of a hurry that I did not fully tuck the drop cloth neatly under the tent, although it was under the vestibules.
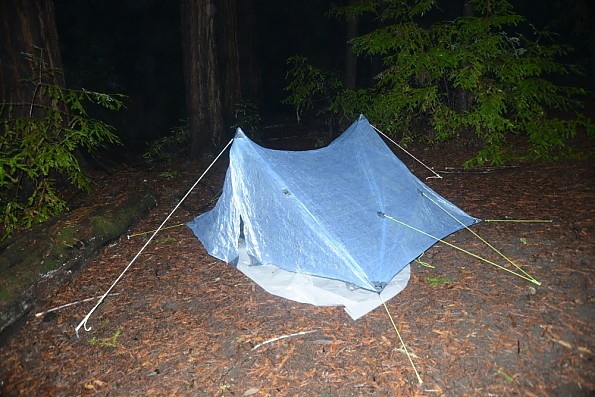
The Triplex set up in the rain among tall Sequoia sempervirens.
Cuben is not all that breathable, so there was light condensation on the inside of the tent roof, partially due to less ventilation, but also because it was pouring pretty hard, hence very high humidity. With the heavy rain, I was tempted to cook dinner inside the tent. But reason prevailed (as mentioned above, Cuben, like other synthetics, is flammable).
I cooked outside on one of the picnic tables in the campsite. This meant that after dinner, I had the damp rain jacket and bibs, plus boots, inside with me. But with plenty of room in the 3-person Triplex, I could put the damp gear in a remote corner of the tent, plus I stayed dry inside my waterproof sleeping bag.
One thing I had not expected was that, with the tent fabric pulled taut, it would act as a drumhead. As large drops came off the Sequoia branches, they would land loudly on the Cuben fabric. When the rain volume would pick up, the sound was not the gentle patter of a cloth tent, but a continual loud drumbeat. When the larger drops hit the roof of the tent, small sprays of the condensation would come off the tent roof and hit my face.
ZPacks claims that any condensation will just run down the walls and drop outside the tent. I suppose the larger drops of condensation were doing that. The spray was pretty minimal, so I was able to drowse off…UNTIL I was startled into full awakeness due to a loud crashing sound from an apparently very large tree. When the ground gets soaked and the wind blows strongly, even 100 foot tall Sequoia Sempervirens will fall down. So much for the belief that if a tree falls in the forest with no one to hear, it does not make a sound. OK, so I was there to hear it, but asleep.
The next morning, I awoke a bit before dawn, the rain having let up somewhat. I checked the inside of the tent and the gear I had laid out. Everything was pretty much dry, including my rain jacket and bibs. So I packed almost everything, then stepped outside the tent to fix breakfast. Having finished breakfast, packing the Triplex and putting everything in my pack went rapidly. I later found out that the rain gauge at the nearest reporting station showed an accumulation of close to 10 inches during that storm.
On the way out, I took the access road that the loggers use for tree harvests on Mt McDonald and the Fritch Creek area, rather than retrace my steps and log-straddling on the trail I took in. (I am Forestry Chair for the Scout Council, which means I oversee the maintenance of a sustainable, healthy forest on our 300 acres of redwoods on each of our two Santa Cruz Mountains camp properties - a major part of this is opening the canopy every 20 years, so the young trees can grow healthy, an artificial substitute for the historical periodic fires that did the thinning naturally, a combination of lightning-set fires and intentional fires set by the Ohlone and other Costanoan people before Europeans arrived). The access road was slightly longer, but much safer.
Conclusions: Briefly, the ZPacks Triplex lived up to the claims on ZPacks’ website very well. It is extremely light, more so than many of the other “light” tents on the market. But by not being free-standing, the Triplex requires a large number of guy lines to provide its full complement of roominess, making the setup time a bit long.
It proved in the heavy storms we are currently having (hopefully providing a more normal winter storm period for our drought-ridden state) to keep the occupants dry. When set up properly, the Triplex provides plenty of room for my spouse and me and our gear inside the tent. Although my bias for orientation of the floor (and thus the sleeping bags) is a 90° rotation to have the long dimension to go along the axis of the ridgeline, the current arrangement worked well enough.
As a 3-person tent, however, the middle person would have to crawl over one of the other two occupants. Although I did not try the tent with three people, it was clear that bringing the packs inside might be tight, even for dedicated Ultralighters, unless the gear was left outside. For our use, that is not a problem.
One of ZPacks’ claims is that the projected life of the tent is one thruhike of the Appalachian Trail or equivalent. Presumably, this refers to the “typical” thruhiker taking reasonable care and having typical weather during the normal hiking season, not a heavy winter or high winds.
Although Cuben is very strong and by no means delicate, it does puncture or split if a sharp object is pushed up to it when it is under the tension that a well-pitched tent would be. Accidents can happen, and it is great that ZPacks provides a length of Cuben repair tape with the tent (matched in color!).
The ventilation screening around the tent under the overhang and doors on either end provided plenty of ventilation. Even during the heavy rainstorm I had during my overnight in the redwood forest, the inside of the Triplex remained reasonably dry. While there was a fine spray from the minimal condensation when large drops were drumming on the tent, the ventilation provided a fair amount of drying effect, judging by the fact that my rain jacket and bibs had largely dried during the roughly 12 hours I was sleeping in the tent (or at least mostly sleeping).
On reasonably level ground, the tent does pitch well and provide plenty of headroom. Even hastily set up during a storm on sloping, uneven ground, there was plenty of room for me, and would have been with the 2 of us in the tent with our gear. On a normal backpack, with plenty of time to tune the tent setup, there is more than enough room for two with gear.
My quibbles with the wrong orientation of the tent, the fixed-length guy lines, and the number of guy lines needed are minor enough that I gave it 5 stars. The high price tempted me to downgrade it a bit, but the tent being made from Cuben Fiber means that the cost will have to be high.
Source: bought it new
Price Paid: $700 with extras
Your Review
Where to Buy
You May Like
Specs
| with groundsheet or floor | with stakes | ||
|---|---|---|---|
| Price |
MSRP: $695.00 |
||
| Weight | 22.8 oz / 646 g | 24.4 oz / 748 g | |
| Capacity |
3 |
||
| Floor |
60 in x 90 in / 37.5 sq ft / 3.5 sq m |
||