 by Seth Levy
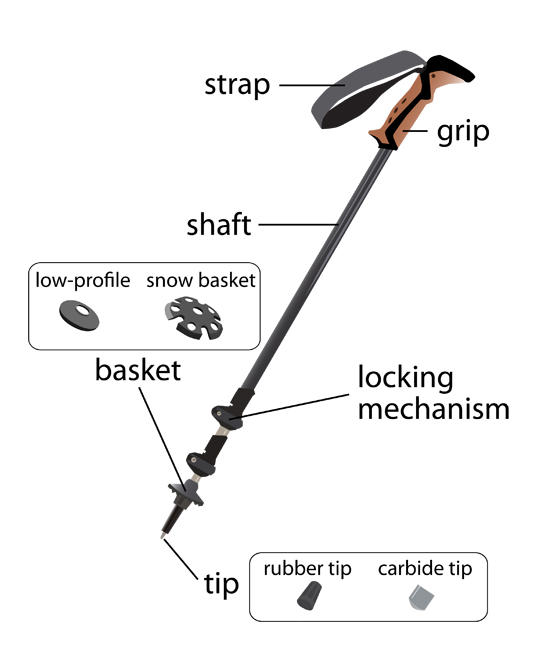
Trekking poles have become more complicated than the single-piece hiking staffs they've largely replaced. With the wide variety of styles, features, and brands available, deciding which trekking poles are the “right” ones for you, may seem overly complicated. Here's a primer on the parts of a trekking pole: from strap and grip down to basket and tip.
The Grip
(Illustration by Sarah Lampe)
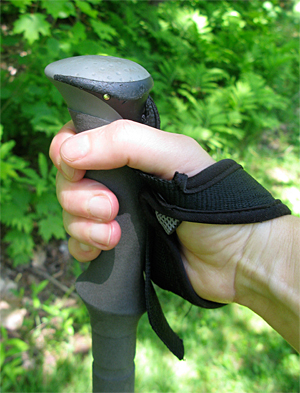
Grips come in different sizes, shapes, and materials. Since this is where your body meets the pole, it’s important to find a grip that fits and works for you.
The grip of your trekking pole should feel comfortable immediately, without causing any undue pressure or pinching. Ergonomic grips have a slight forward lean for a more natural hand position.
Some grips have raised ridges, and these ridges don’t necessarily match every hiker’s hand. You’ll know in a second if the grip is too large, or has ridges that don’t work for you. Hikers with smaller hands, like children and women, should consider poles with smaller grips.
Grips are made of various materials, including rubbers, foams, cork compositions, and plastics, which have different levels of grippiness. A grip should provide a comfortable hold, despite perspiration and rain.
Avoid cheap poles with smooth plastic handles, which can cause sweaty or gloved hands to slip off the pole. Rubbers, foams, and cork compositions are better choices because they retain more grip when wet.
On the lower-priced end, rubbers retain some grip when wet and are less expensive. Cork retains more grip when wet, is lighter, and costs a bit more. Foams retain the most grip and are the lightest, but are less durable.
Some poles feature “grip extensions,” where the grip compound extends down the shaft of the pole. Hikers who change their hand positions often or walk trails with dramatic elevation changes may appreciate this feature.
The Strap
A snug (not tight), comfortable strap offers support.
Trekking poles typically are equipped with adjustable wrist straps at the top of the grip. Properly adjusted straps offer support, so you don't have to grip the pole too tightly and fatigue your hand. Many hikers feel that straps should always be worn as they offer support, are useful in maintaining a good cadence, and make the trekking poles harder to drop.
Some hikers dislike the confining feeling the straps give them though, and either cut them off or just don’t use them. If the consequences of falling on a pole would be worse than the consequences of falling without their stabilizing assistance, they may be a temporary hindrance.
In order to give straps a fair shake, you need to adjust them properly. Put your hand through the appropriate strap from the bottom (note that straps are right- or left-specific) so it rests snugly around your wrist. Then grasp the grip and top of the strap with your hand. Too loose straps are a common mistake. A properly adjusted strap is tight enough to help support the weight of your hand on the pole, but not so tight that it’s difficult to remove or restricts circulation to the hand.
Strap preferences develop over time, so ensure that the straps on your trekking poles are comfortable. Bare nylon can chafe hands, so look for straps that have a soft chamois or fleece liner or padding on the inside to reduce friction. Test the mechanism that adjusts the length and tension of the strap around the wrist to ensure that it’s easy to adjust, even with gloves on, yet stays secure while hiking.
The Shaft Segments

Segments adjust for height and collapse for travel and storage.
The shaft segments of a trekking pole are made from a variety of materials, including aluminum and carbon fiber. Many people will be satisfied with an aluminum pole, but Gregg Fisher, Operations Manger at Leki, says, “If you want the lightest weight possible, carbon fiber is the way to go.”
Carbon fiber absorbs vibration, and has a nice springy feel. Keep in mind, though, that carbon fiber saves only several ounces per pole, costs more, and tends to be fragile. Fisher cautions that if carbon poles are “struck hard with a sharp rock, they might develop a weak spot” prone to breakage, whereas, “aluminum will just bend.” If your only reason for choosing carbon fiber is weight, consider that other features like shock absorbers and baskets can impact the total weight of the poles as much as shaft material.
Most telescoping trekking poles, aluminum and carbon alike, have three segments, each slightly narrower than the one above. The segments slide into each other and are held together by a variety of locking mechanisms. A few models available, often specifically designed for snowshoeing, have only two shaft segments. Two-segment poles don’t collapse as well as three-segment poles, making them harder to travel with or stuff into a pack during a rock scramble. Compact and junior length poles are available for those who don't need as much pole length. Tall individuals will want the longest poles available.
Locking Mechanisms: Internal vs. External

The internal locking mechanism is...inside.
A crucial and differentiating feature between trekking poles is the locking mechanism, which allows hikers to adjust the length of the trekking pole and holds the segments of the pole together. Until recently, internal locking mechanisms were the most common. Internal locks rely on friction to stay secure. A common internal locking mechanism is an “expansion joint,” essentially a plastic widget that expands inside the trekking pole when the shaft is twisted, keeping the pole at the desired length and preventing it from collapsing.
Where internal locking mechanisms are hidden inside, external locking mechanisms are clearly visible outside of the pole, where the segments join. Black Diamond has long produced trekking poles with the FlickLock external locking mechanisms.

An unlocked external locking mechanism
Tor Brown, Category Manager at Black Diamond, notes that the external locking mechanisms used by Black Diamond are “easier to adjust with gloves on, and because they are external, it’s easy to verify whether or not they are locked.” Leki introduced its own external locking mechanism, the SpeedLock, in 2010.
External locking mechanisms are indeed easier to operate with gloves, and can be easier to tighten than their internal counterparts. Many hikers believe that they are more reliable and less prone to collapsing. But, some longtime hikers question their durability over time.
Both internal and external types of locking mechanism allow poles to be easily disassembled, and both have their passionate adherents and detractors. The choice between mechanisms is likely a matter of personal preference. Regardless of your choice, it is very important to verify that the pole is securely locked. A loose lock can cause the pole to collapse when you need it most.
Shock Absorbers

A look at an internal shock absorber
The advent of shock absorbing technology separates trekking poles from their ancestors, walking sticks. Shock absorbers are springs or pieces of elastic material that, according to Fisher, “soften the initial impact of the pole striking the ground.”
Shock absorbers are not standard on most trekking poles, so you can expect to pay approximately twenty dollars or so more for poles that include them over rigid poles.
Are they worth it? As with many features on gear, shock absorbers have both their detractors and their devotees. On the up side, hikers with arthritis or other issues in the wrist, shoulder, or elbow may appreciate the cushion that shock absorbers provide. On the down side, shock absorbers add weight and complexity to trekking poles, and sometimes squeak.
Additionally, shock absorbers can reduce the assist that poles provide on ascents. As hikers climb uphill, they can use poles to push off and up, making the ascent easier. But with shock absorbers, a fraction of that push is soaked up by compressing the shock absorber, making the ascent more difficult. Is it noticeable? Not always, but hikers who want every advantage should consider this.
Baskets

Small baskets for three-season hiking can be replaced with snow baskets in winter.
Slots on the body of tips allow hikers to add baskets, little discs of plastic like those commonly found on ski poles. Baskets come in various sizes and shapes — from low-profile circles or cones to wide snow baskets for powder — and prevent the tips of the poles from plunging too deeply.
Whereas larger baskets are best for snow, smaller baskets are best for muddy conditions and can prevent pole tips from getting wedged between roots and rocks. Be aware that accessory baskets from one trekking pole brand may not be compatible with another brand's poles.
The Tip
The tip is where the pole interacts with the ground, and is typically made with a body and a point. The body is usually plastic and the point is often hardened steel. Hardened steel is harder than rock, so it bites into rock or ice to offer additionally stability.
For trekking above treeline in places like New Hampshire, Colorado, or the High Sierra, where the trail surface may be bare stone, hardened tips are useful. However, because they are so sharp, improperly used tips can scar rock or puncture the unwary hiker, so use them with caution.

A replaceable tip
Most trekking poles have tips that are easy to remove and replace. Hikers should avoid poles with non-replaceable tips, as tips are more susceptible to breakage than the rest of the pole and all tips wear out eventually. The body portions of some tips are cleverly sacrificial, made of a plastic weaker than the shafts of the pole. So, if the tip becomes stuck in a crack, the body of the tip breaks before the pole shaft. With replaceable tips, it’s simple to knock off the broken one and replace it with new ones from the manufacturer.
A variety of rubber tips, designed for use on pavement or indoors, are available to fit over the typical sharp steel tip. Some hikers use rubber tips to reduce the noise the poles make on the trail and to prevent them from scarring rocks and terrain. However, rubber tips also reduce the tips’ traction and can the cause tips to slip when you need them to stay put. Some manufacturers do not recommend them for trail use.
Special Features

Some trekking poles are equipped with special features. Poles with compasses embedded in the grips are increasingly common. These give a general sense of direction, but are inadequate for real navigation. Sometimes poles are even equipped with LED flashlights or secret storage areas, but most of these features fall firmly in the realm of the gimmick.
More common, and useful, are poles that are convertible to monopods for photographers. These poles have screws that fit the universal mount on a camera’s bottom, stabilizing it for shooting in low light or with long lenses.
Additionally, some backpackers use trekking poles as tent pole substitutes to pitch lightweight tarps and tents. Some shelters actually are designed to utilize trekking poles, and some hikers jury-rig their regular shelters to take advantage of trekking pole support. Using a trekking pole to pitch your shelter doesn’t require a special type of pole, but consider that tight guy-lines can cut foam grips, so cork or rubber composites are often a better choice.
Further Info
Trekking Poles: To Use or Not?
Selecting a Pair of Trekking Poles


