 by Seth Levy

(Image courtesy Andrew Burr/Black Diamond)
You've purchased a brand new pair of shiny trekking poles. Now that you have them in hand, how do you get the most value out of them? Proper fit, maintenance, and correct use are all key.
Fit and Adjustment
First, take a moment to get comfortable with your trekking poles by reading the instruction manual provided by the manufacturer. Sure, trekking poles appear to be relatively simple pieces of gear, but reading the directions now can prevent a screw up later. Also, the manufacturer will know the equipment best.
Know Thy Locks
Get comfortable with the locking mechanisms on your poles. Proper adjusting and locking requires this, so fiddle with them a bit until you feel comfortable re-adjusting on the trail. With external locks you usually can adjust the tension of the locking mechanism by turning the adjustment screw a fraction of a turn.
Proper Length
Trekking poles are adjustable to accommodate hikers of different heights, participating in different activities, on different terrain. Adjusting the poles is easy, but you'll want to determine which length is most comfortable.

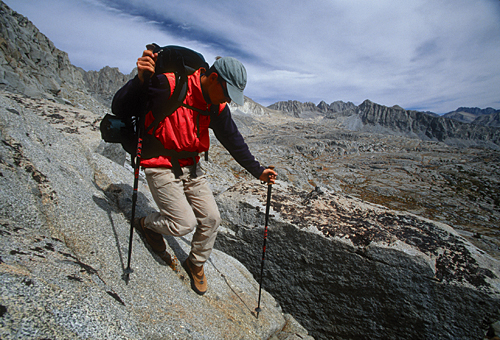
When adjusting pole length, aim for a 90-degree bend of the arm, then adjust for comfort
Gregg Fisher, Operations Manager at Leki, recommends that hikers “start with the pole adjusted so that your elbow forms a 90 degree angle, and then adjust it according to what’s comfortable.” Many hikers like to make poles slightly longer for a steep downhill and slightly shorter for a steep uphill. I’ve even heard of hikers adjusting poles to different lengths for a long traverse where one side of the trail is lower than the other.
How to adjust the length of your trekking poles depends on your model (so read the instructions):
- Tor Brown, trekking pole line manager at Black Diamond, points out that most three-section poles require you to adjust both the lower and the middle shaft sections to marked lengths. In this case, loosen the locks and adjust both sections to the desired total length (ex. 120 cm). Lock each segment securely. Holding the grip of the pole, your elbow should be bent at approximately a 90-degree angle and your forearm perpendicular to the ground. Fine tune the length as needed. Once it's comfortable, take note of the numbers written on the side of the pole. Knowing them will allow you to quickly adjust the second pole to the same length.
- A few poles are designed to have their lower section extended to the maximum length first. In this case, extend the bottom segment to its maximum extension, almost until the point where the shaft is marked “stop” (if you extend the pole beyond this point the locking mechanism won’t work and the pole could collapse). Use the pole’s locking mechanism to tighten the bottom segment firmly. Next, holding the grip of the pole, use the middle segment to lengthen the pole until your elbow bends at a 90-degree angle. Fine tune as needed.
Since the steps to adjust the length and lock a trekking pole depend on the model, read the manufacturer's instructions. For example, on poles with Black Diamond's FlickLock-AutoBinary combo, the lower segment fully extends or collapses the pole with a two-finger pinch of the AutoBinary system. All of the length adjustment then takes place on the upper section of the pole with the FlickLock.
Master the Straps
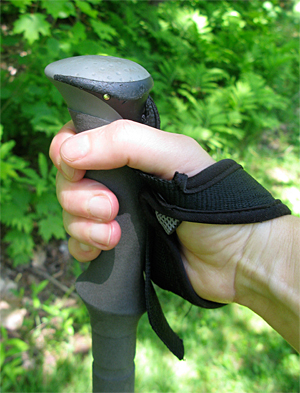
For support, put your hand through the trekking pole strap from the bottom, not top.
When properly adjusted, pole straps offer support, so you don't have to grip the pole too tightly and fatigue your hand. Some hikers find them restrictive however.
Whether you use the straps on your trekking poles comes down to preference, but give them a fair shake first by putting them on correctly.
- Put your hand through the appropriate strap from the bottom (note that straps are right- or left-specific) so it rests snugly around your wrist. Putting your hand through the top will not provide the necessary support.
- Grasp the grip and top of the strap with your hand.
- Tighten or loosen the strap as needed. Too loose straps are a common mistake. A properly adjusted strap is tight enough to help support the weight of your hand on the pole, but not so tight that it’s difficult to remove or restricts circulation to the hand.
Maintain and Repair Your Poles
Get Familiar
With occasional maintenance, trekking poles should last a long time. Disassemble the poles when you don't have any hikes planned and have a few hours to spare. Look at the locking mechanisms, the tips, and the straps. Getting familiar with the inner workings of the poles will help you maintain and repair them.
Clean and Dry
Fisher and Brown both recommend that after getting poles wet or dirty, hikers disassemble them, pulling the shafts apart. Then wash them under water, wipe them off with a clean cloth, and let them air dry before re-assembly. Storing poles wet encourages oxidation, which makes poles harder to adjust and more subject to slipping.
Repair and Replace
On aluminum poles, slight bends can be bent back by hand unless they no longer slide well in the other shafts. Several trekking pole manufacturers and their dealers sell spare parts like replacement baskets (in a variety of sizes and styles), replaceable tips, shafts, and expansion locks for their trekking poles. Check that the replacement parts work with the brand and model year of trekking poles you have before purchasing.
To Oil or Not?
What about a little spritz of oil to freshen up the pole? “Absolutely not,” says Leki's Fisher, noting that oil can cause the joints to slip during use, creating a potential injury. The Leki team should know about maintenance: every year at the Appalachian Trail Days festival in Damascus, Va., they repair more than 400 sets of poles, some so battered, according to Fisher, “you can’t even tell what brand they are.”
Black Diamond advises that a small drop of oil can be applied to the lever pin if the FlickLock mechanisms become hard to open or close. Use sparingly though and never put oil or silicone on the pole shafts.
Tips and Tricks for Using Poles
Poles have a learning curve and for some users they may feel clumsy and frustrating at first. Expect this and consciously develop a method to use them. Soon, this will become unconscious and the poles will just become part of your hiking experience.
Master Basic Techniques
- Start Easy: Stick to level trails your first time out with poles and give your gait time to adjust. Pay attention to where your arms swing as you walk and think about how the poles will affect your movement.
- Ascend: As you climb, place your pole ahead of each foot and slightly tense your biceps, pectorals, and laterals (side muscles), using the force of these muscles to help lift yourself uphill. You may need to breathe more deeply to compensate.
-
Descend: Carefully place your pole tips before, and lower than, your footsteps, tensing your shoulders slightly as you descend. You should use your upper body to absorb some of the force of your descent.
(Image courtesy Leki/Matera) - Cruise: As you walk along a flat stretch, swing and place your poles in time to your stride.
- Rock: As you ascend or traverse a rocky surface, carefully set the tips of your poles into the rock, and experiment with the amount of support they give you. Carbide tips can anchor into rock and provide important stability.
- Trust Fall: Try a controlled stumble and hold tightly to the grips of your poles. Learn to trust them so you can unconsciously rely on them for unanticipated trips and falls.
Master Advanced Techniques
When you are completely comfortable with your poles, you're ready to try some slightly more advanced techniques.
- Vault: For little streams and puddles a bit too wide to step across comfortably, build up a bit of momentum, plant your poles slightly ahead of your stride, and vault the obstacle.
- Corner: When moving at a high rate of speed around a corner, plant one pole on the inside of the turn and use your momentum to “swing” you around the bend.
- Accelerate: When moving at a high rate of speed on flat trail, set your pole tips slightly behind your stride and push yourself forward vigorously. You don't have to be a hiker to appreciate poles; some trail runners in ultras have been known to use trekking poles during races (when the rules allow).
Know When to Quit: Poles actually can slow you down or create hazards in some terrain, like scrambling up rocks, navigating ladders, or bushwhacking through dense vegetation. Figure out when they don't help, and learn to stow them rapidly.
Think of Alternate Uses: Look at other gear items, like your pack, tent, or tarp. Poles can be used for pack stays, tent poles, tarp supports, camera monopods, and many other things. Alternative uses will give you even more value from your poles, and potentially you can carry less weight.
Have your own trekking pole tips and tricks for usage, repair, or maintenance? Share them below.
Further Info
Trekking Poles: To Use or Not?


