Soto WindMaster


 Reviewed by
Bill S
REVIEW CORPS
+4,657
 March 23, 2014 (original Mar 19, 2014)
The SOTO WindMaster is a very lightweight stove top that screws onto gas canisters having the industry standard threaded coupling. In my tests, it performed very well in a range of windy conditions, on cool mornings, and with an intentionally chilled half-full fuel canister. It also works well for simmering and "gourmet-style" meals.
I recommend it for use by backpackers and others aiming for light weights for solo and 2-person outings. It is not suitable for large groups (4 or more).
Pros
- Lightweight and compact
- Burner has “crown” which provides improved wind resistance without a separate wind screen
- Pressure regulator maintains a fairly constant flame throughout most of a canister’s life
- Easy-lighting piezo igniter
- Simmers well and controllably
- Boil times are good for a light, compact canister stove
Cons
- Stove does not come with a canister base support, hence unstable for large pots, especially with the smallest size canisters, and company does not offer one (other brand versions for canisters are available, however).
- Per the printed Cautions and Warnings, stove is limited to pots less than 5 ½ inches in diameter (7 inches with optional 4-prong pot support)
Warranty: No warranty listed in instruction sheet or on website
Update:
I spent the weekend going in to Carson Pass, intending to go to Round Top Lake. For various reasons (see my trip report) I ended up at Frog Lake. No matter - I had the SOTO Windmaster to use for several meals and melting snow. See the update addendum "Cold Weather Test" below
Note:
Because of the extended warm spell, mostly under clear, warm, but often windy skies, the tests results do not include cold weather or in-snow testing (80° days in Feb and Mar?!?!!). I will be adding in-snow results shortly in an update. I did conduct several boil tests, using a partially empty canister chilled for two days in a 0°F freezer and water at 40°F for a preliminary check on cold weather performance, plus some very cold mornings (by SFBay Area standards) of 45°F.
Background:
Small backpacking stoves suffer a number of limitations when used in conditions that are windy and/or cold (particularly compressed gas stoves), or when preparing meals for more than a couple of people. Comparison of backpacking stoves generally and specifically canister stoves is difficult because of how “boil time” ratings published by the manufacturers relate to cooking under conditions in the field.
In principle, the “standard” method for determining boil times is to start with 1 liter of water at 20°C/68°F (“room temperature”, also known as the chemist’s STP = Standard Temperature and Pressure). Most manufacturers give the time for boiling 1 full liter of water, while some give the time for a half liter (500ml), half as much.
The nominal boiling temperature of pure water is 100°C/212°F. In reality, the temperature of boiling water varies with impurities in the water, atmospheric pressure (lower boil temperature with increasing altitude) and other factors. The pot in which the water is contained also affects the speed with which the water is heated, as does the use or non-use of a lid.
With compressed gas stoves, the air temperature affects the pressure of the vapor reaching the burner, with the rate also depending on the air pressure (the reason that canister stoves work well at Himalayan altitudes at subfreezing temperatures that render them useless at lower altitudes). As the fuel in the canister (a liquefied mix of butane, isobutane, and propane) decreases, the pressure of the vapor decreases as well. Manufacturers determine boil times starting each run with a new, full canister, as opposed to the backpacker or climber cooking on a mostly depleted canister. Thus, published boil times are difficult to compare with what you get in the field.
During my tests of the SOTO, I used the stove from full canister to the “last drop”, in still and windy conditions, starting with tap water at 20°C/68°F and water that had sat out in an uninsulated Nalgene overnight at 40°F, and air temperatures from 80°F down to 40°F, as well as a half-full canister that had been left for two days in a 0°F freezer. There are some “magic tricks” to beat the laws of physics to increase the efficiency of canister stoves and shorten the boil time (see the section below on “Beating the Laws of Physics”).
Over the years, my household has accumulated close to 30 stoves, a mix of alcohol, Esbit and similar tablet, compressed gas (butane, propane, and mixed gases), white gas, kerosene, wood, and multifuel stoves. Various ones of them have been used from Death Valley in summer, at 17,000 ft altitude on Denali, at altitude in the Peruvian Andes and in winter in California’s Sierra Nevada, and in Antarctica.
Each has its strengths and each has its weaknesses. Many backpackers and climbers have a strong preference for compressed gas stoves because of their reasonably quiet operation, ease of lighting, capability for simmering, and not having liquid fuels that can be spilled or leak out of the fuel bottles into the contents of your pack, especially the food. However, compressed gas does not perform well at low temperatures nor when the amount of fuel remaining in the canister is low. In addition, the empty canisters must be packed out. On long trips, the combined weight of the required fuel plus canisters is very high.
Expedition mountaineers generally prefer white gas (aka “Coleman fuel”) because of the high heat output (hence faster melt and boil times), along with economy of weight of combined stove, fuel, and fuel containers for longer trips, plus white gas is relatively unaffected far into the sub-zero range (note that kerosene tends to “gel” at extremely low temperatures). Ultralight backpackers prefer alcohol stoves because of their light weight (especially if home-made from beverage cans), despite the lower heat output (about 50%) per weight of fuel.
Since this is a review of a stove, I need to quote from a well-known climber, Clyde Soles, who has used, reviewed, and tested many a stove – “Treat all stoves like the barely controlled explosions they are.” I have personally witnessed explosions and other dangerous incidents with backpacking stoves that involved very experienced backpackers and mountaineers, as well as beginners. Know your stove and treat it with respect.
There are three major burner designs used in backpacking and mountaineering stoves, the roarer burner, the silent burner, and the Meker-Fisher burner. Liquid fuel backpacking stoves almost all use either the roarer or silent burner designs. While some compressed gas stoves use the roarer burner design (notably the so-called “multi-fuel” and “universal” stoves that have a choice of liquid or compressed gas fuels), a large fraction of compressed gas backpacking stoves use the silent burner design, which is characterized by a wider disc or cylindrically shaped top with many small holes around the edges.
Recently several companies making compressed gas backpacking stoves have gone to the Meker-Fisher design, very familiar to those of us who took high school and college chemistry classes, where you had a choice between the traditional Bunsen burners and the Fisher burners. The Fisher burner is characterized by a wide opening at the top, covered with a wire screen. This screen introduces increased turbulence into the flow, providing better mixing of the air/gas mixture, and a hotter, better distributed flame.
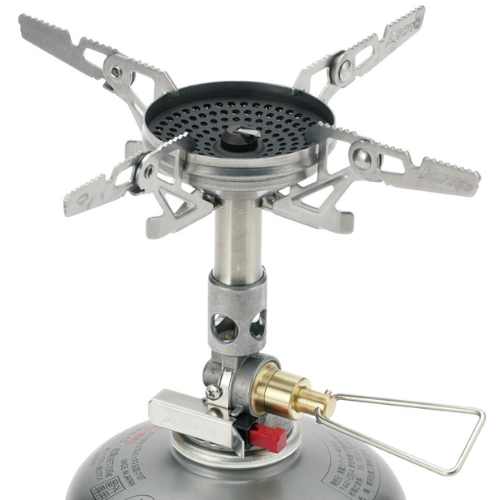
The Soto WindMaster uses a Fisher-type burner, combined with a “crown” ( raised wall surrounding the burner) to provide a built-in wind screen. In addition, the pot supports are designed to provide a minimal clearance above the rim of the burner to the cookpot (measured at 7mm), restricting the wind flow, with the bottom side of the burner shaped to deflect most of the wind downward away from the flame area.
Another addition to the WindMaster is replacing the traditional needle valve with a pressure regulator valve. Several other stove manufacturers have added pressure regulators to their compressed gas stoves, but SOTO has integrated it into the flame control valve. This pressure regulator is intended to maintain a constant pressure throughout the fuel supply’s life, making the boil time constant throughout a canister’s full supply of gas. Soto also makes a claim that boil time is virtually unchanging with air temperature, hence I included timed trials at a range of air temperatures and times of day (our “winter” has been characterized by daytime highs in the 60 to 80°F range).
Details:
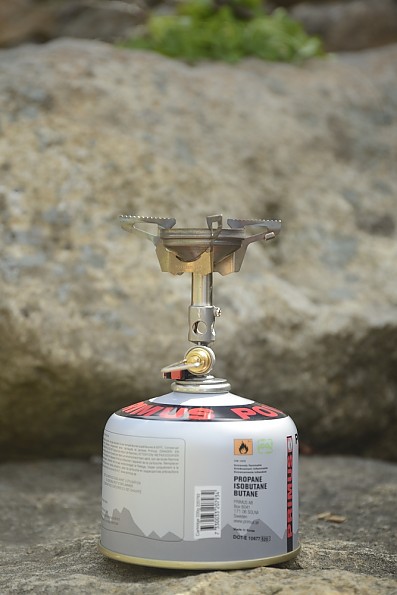
When Trailspace’s Chief of Gear Reviews, Seth, was looking for someone to test the SOTO, I quickly volunteered, noting that the weight and size are significantly smaller than many of the compressed gas stoves out there. The SOTO WindMaster is a screw-on top that fits the industry standard threaded coupling. This has the advantage of fitting canisters which are available in many parts of the world where climbers and backpackers go.
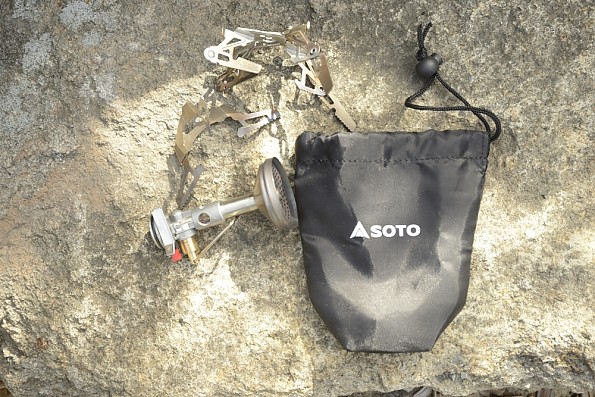
On receiving the small box from the US Postal Service, I opened it to find two boxes inside. One contained the stove top itself and the 3-pronged pot support. The other contained the optional 4Flex 4-pronged support with fold-out extensions for supporting larger pots. The instruction sheet is a large, double-sided single sheet with numerous clear illustrations.
Strangely, in this day of international product manufacturing and distribution, it is completely in English. This is quite unlike most instruction sheets these days which often have 5 or more languages (largest number I have encountered so far was 19). The stove itself is built in Japan.
Table of weights:
SOTO WindMaster stove top – 2 oz/60 gm
3-prong pot support – 1/8 oz /6 gm
4-prong pot support (extra) 7/8 oz/26 gm
Whole kit in carry bag (both pot supports) – 3.5 oz/109 gm
Full Primus 4-season medium gas canister – 13 3/8 oz/380 gm
Complete stove with 1 medium canister – 17 oz/483 gm
On the box, the instruction sheet, and on the SOTO website, the company makes a number of claims. A quick reading gives the impression that (a) there is a lot of misleading hype; or (b) somehow SOTO has found a way of modifying or at least defying the laws of physics. A more careful reading showed that neither is correct, though it made me wonder whether the person(s) who wrote the descriptions really understood how to convey the information clearly, or more likely, the translator was not fluent in English.
For example, the box seems to claim that the boil time for a liter of water is basically independent of ambient conditions from 20°C/68°F (4:02min) down to -5°C/23°F (4:16 min). There is a good possibility that your water source at the lower temperature is snow or ice. Basic physics dictates that starting with water at 0°C (barely liquid) will take 25% more energy, and therefore a longer time to reach a boil than water at 20°C, given constant heat from the stove (a bit over 5 min rather than SOTO's 4 min in this example).
A careful inspection of the fine print does reveal that the starting water temperature is specified as 20°C (room temperature) for all their test conditions, and that “ambient conditions” means the air temperature. Further careful examination also reveals that the two stoves being compared are one stove with a pressure regulator and wind-shielding “crown” (the WindMaster) and the other with a needle valve and no regulator.
The instruction sheet is also unusual in that it includes a detailed list of 31 Cautions and Warnings. They are all valid statements that everyone using backpacking stoves (and indeed any stove or appliance, including in the home) should already know. Some do seem a bit superfluous, such as “Be sure to remove appliance from carrier, pouch, or any other packing material.” The warning to “When outdoors, store fuel canisters in a well-ventilated area out of reach of children” seems to imply that if I am storing the canisters indoors, I need not worry about ventilation of canisters which contain a highly inflammable compressed gas. I do not think so.
Another claim seems to imply that the WindMaster is pretty much immune to wind, though the fine print reveals that the claim is only that it is outperforms its competitors. Neither the instruction sheet nor the packaging states how much wind the WindMaster will withstand without being affected. The website does have a chart of boil time vs wind speed comparing to 2 other unnamed stoves (as noted later, I found that 9 knots of 20°C wind was enough to significantly slow boil times, though not as much as other stoves, lacking a separate wind screen in both cases). The chart on the website shows that the 2 unnamed competitors’ stoves would blow out in breezes of 2.3 and 3.5 kts.
Three things contribute to the wind deflection of the WindMaster, according to SOTO – the burner is surrounded by a small “crown” which serves as a mini-wind shield; clearance between the pot bottom on the prongs and burner “crown” measures 0.2785 inch (by shim gauge = 7.07 mm) or 7mm by ruler; and the bottom of the burner head is concave to deflect that part of the windstream downward. A very close reading of the various materials and examining the chart on the website reveals that the real claim is only that the WindMaster is “better than most other stoves” in the wind.
Pressure regulators are relative newcomers for backpacking stoves, though they have been in use for at least a century. In other applications where I have experience with them (gas welding, for example), pressure regulators serve the purpose of maintaining constant flow. In an oxyacetylene torch, for example, the oxygen and acetylene gases are balanced to provide the correct proportions of the two gases, throughout the life of the tanks. In backpacking stoves, the idea is to maintain a fixed flow from full canister to nearly empty. This should maintain a constant heat output for the whole canister.
In reality, there is some basic physics that comes into play. As the liquefied butane/isobutane/propane mixture is depleted, the heat drawn from the liquefied fuel, the canister, and the surrounding air to vaporize the fuel cools the remaining liquefied fuel, reducing the rate of vaporization of the liquid. Further, as the fuel is burned off, the vapor pressure of the inside of the canister drops as the liquid is depleted. In accordance with the gas laws you learned in high school chemistry, the pressure drops inside the canister. So the pressure of the exiting gas drops and the flame shrinks. This is very noticeable with the usual needle-valve stoves, but is mitigated to a large extent when a pressure regulator is in place.
SOTO does not provide canister support. This is 3rd party.
Stability:
I noticed right away that the stove box did not include a stand or base for the canister. This means that there is a worry about the stability of the stove with a pot of water, especially with the smallest size canisters (about 100 gram fuel size) favored by backpackers seeking to go as light as possible. The website does not list a canister support, either.
However, several other companies do offer lightweight, foldable canister bases that clip easily onto all 3 common canister sizes that can be found at REI and other outdoor stores. Most backpackers will, of course, use the 100 gram or 230 gram gas canisters, with some taking advantage of the weight savings of the large 450 gram canisters during long treks (less total weight per fuel amount).
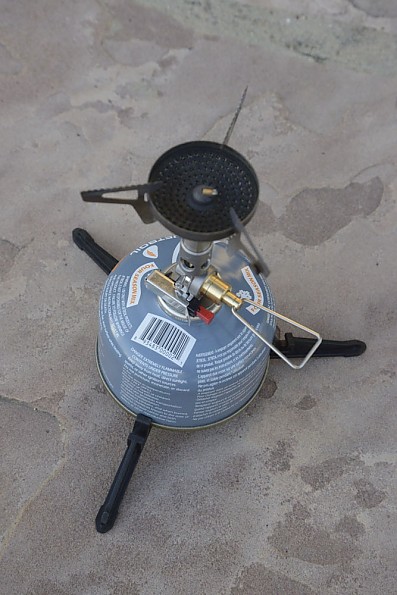
The instruction sheet specifies a maximum pot diameter of 5.5 inches when using the standard 3-prong pot support. After digging around on the SOTO website for a while, I found that they allow a maximum pot diameter of 7 inches with the optional 4Flex 4-prong pot support. In my testing I used a GSI 1 liter pot (7 inch) and a 1.5 liter from the same kit (8 inch), both with and without a tripod base. I used only the 230 gram canisters (the mid-size), which proved sufficiently stable for the 1 liter pot, even without the tripod base.
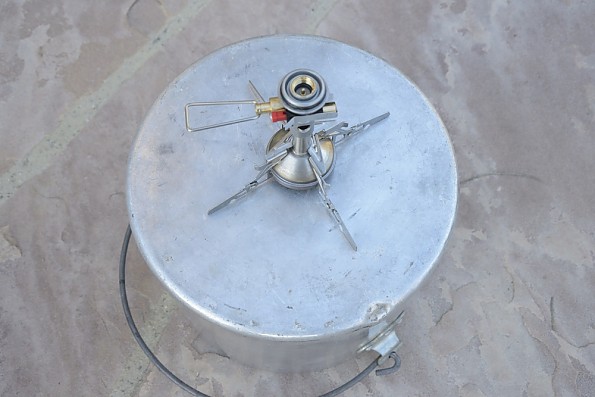
Although backpackers would only rarely carry pots larger than 1.5 liter, I have included photos of how the two pot supports fit onto an 8 quart pot. The photos below show the burner head with the standard 3 prong support and the optional 4Flex 4-pronged support with fold-out extensions, both placed on the bottom of a large pot of the type frequently used by large groups. As is clear from the photos, even the 4-prong fully extended is insufficient to properly support large pots, no matter the canister size. With the small canisters, you should use one of the tripod supports even for the 1 liter pot size. 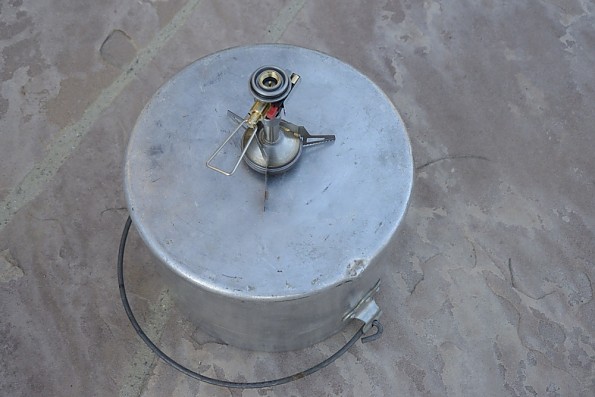
The other problem with large diameter pots is that they reflect radiant heat onto the canister, which potentially could cause overheating and potentially an explosion of the overheated canister.
Testing Details:
The initial static test setup was on my back patio on one of the very few rainy, windy days we have had this last year, as in the image above. Throughout the testing, I used the 1 liter pot from my GSI cook kit. This pot is made of black anodized aluminum, with circular grooves engraved in the bottom to improve heat transfer. Short of a pot with a built-in heat exchanger (like the MSR Reactor, JetBoil, or Primus EtaExpress) or attach a heat exchanger to the pot (such as the MSR heat exchanger), I have found the the GSI design to be very efficient at heat transfer.
I was pleased that the initial 1 liter of water boiled in a bit less than 3 minutes. Throughout the testing, I used the 230 gm/8.9 oz Primus Power Gas canisters. These contain a “4-season” mix of propane, isobutane, and butane. I find them far better in cold weather than the old pure butane or 70/30 butane/propane mixes we used to get, though not as efficient as MSR’s and Markill’s all-season canisters.
On a side note, while in my neighborhood REI to get some canisters for the testing, I noticed that the Primus 230gm canisters (the mid-size) were $4.95, while the JetBoil 100 gm canisters (smallest available) were the same price. The 500 gm canisters (largest size normally available) are harder to find, but are cheaper still per ounce/gram of fuel. Yeah, I know, the tiny canisters are nice and light. But you have to carry the empties out (here in Palo Alto, we recycle the compressed gas canisters in the regular “Blue” recycle bin, if you puncture them first, otherwise take them to the monthly hazardous waste day).
At Trailspace, we always test gear in the outdoor environment, and as far as possible, during a wide range of conditions. So Barbara and I hiked up Windy Hill, in one of our local regional parks, to get a boil time in the wind. Unfortunately, Windy Hill summit wasn't. There was a fellow up there, sitting forlornly under his Rogalo wing, waiting for the wind to pick up, so he could fly. The maximum gust I measured 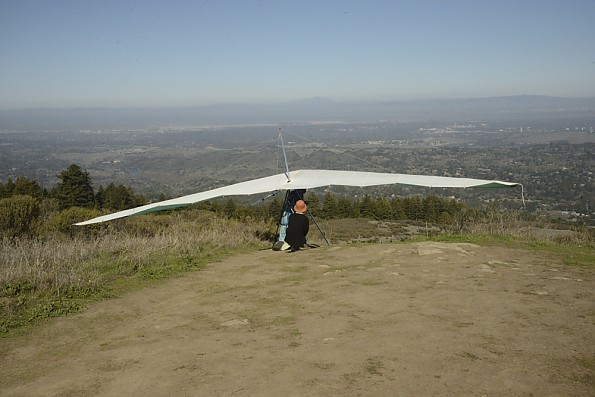 Hard to fly your wing on windless Windy Hill
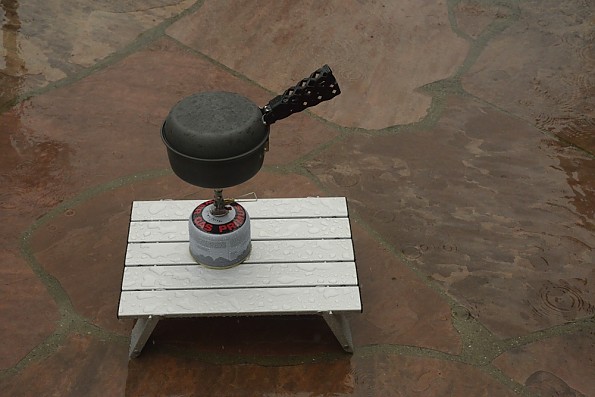
was 6.9 kts, which he allowed as how it was "not enough to fly". With the wind calm most of the time, the liter of water boiled in 3:10. During all of my calm air boil tests, the boil time remained in the 3 to 4 min range for 70°F water. I define “boil time” to be when the water gets to a full rolling boil, as in the photo. The canister I used for this preliminary test was a Markill 4-season mix.
 Windless Windy Hill
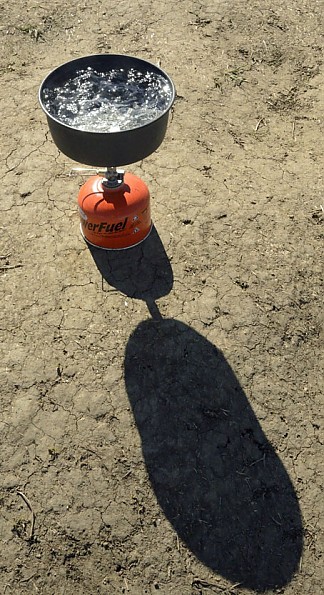 My definition of boiling
On their website, SOTO has a graph of boil times vs wind speed, giving a 5 minute boil time for ½ liter of water at 5.3 kts. Back at home, I set up a fan to get a more constant wind speed. Measured at the stove, the fan was producing 9.6 knots, still a fairly gentle breeze. The boil time was lengthened to 7 minutes for a full liter of water, starting at 70°F, consistent with SOTO’s time for a half-liter of water.
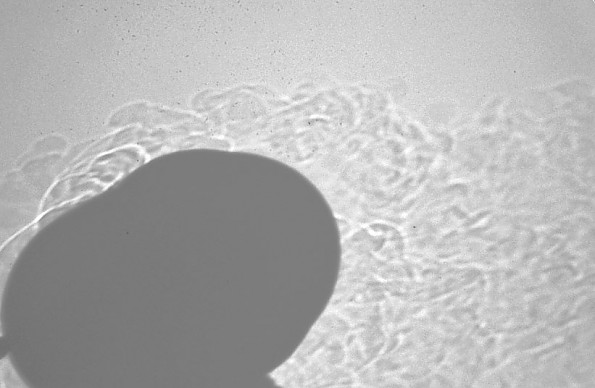
The problem is that, despite the “crown” and closeness of the pot to the burner, the breeze does deflect the rising hot air to some extent, as can be seen in the Schlieren-type photos I managed to shoot below. So although most of the heat from the burner is entering the bottom of the pot, there is a much reduced amount available to the sides of the pot. A full windscreen or the MSR heat exchanger would help confine the rising hot air close to the vertical surfaces of the cylindrical pot.
I took the two photos below of the SOTO WindMaster while conducting a boil test in a slight breeze within 2 minutes of each other. In the calm, the heat flow (as evident from the shadow patterns) should be pretty much directly straight up from the pot. Comparing the two images, you can see that even a slight breeze deflects a substantial amount of the flow to the side.
CAUTION!!! If you place a full windscreen so that it can reflect radiant heat or direct the heated air onto the butane canister, it is all too easy to overheat the canister to the point of explosion in a huge ball of flame. I have seen this happen several campsites away from me in a car-camping campground. Luckily no one was injured. If you decide to take the risk and place a windscreen around your compressed gas stove, be sure that the canister is well-ventilated and shielded from the direct radiation AND the flow of heated air.
Fuel consumption: Fuel canister manufacturers claim that the mid-size canisters will last from 1 to 2 hours. Obviously, this depends on whether you are running the stove at simmering or at maximum. Most of my uses of the stove during testing were timing a full boil in various conditions. The pressure regulator is intended to keep the flame at a constant rate (or nearly so, since the gas pressure at the burner also depends on the temperature of the fuel and amount remaining.).
The fuel burn rate during each boil run gradually dropped from 5 gm/min to 4 gm/min as fuel remaining in the canister diminished, with slightly more fuel used for the longer boil times, probably because there was more time to lose some heat to the surrounding air. This gives a total burn time at full power of 52 minutes for a medium canister (230 gm/8 oz).
Beating the laws of physics: We have been having quite warm weather, despite it being officially “winter”. As anyone knows who has used compressed gas stoves in cold weather (especially at temperatures below freezing), cold weather has 2 effects on canister stoves. Unlike liquid fuel stoves which often have pumps to pressurize the fuel bottle and thus send the fuel to the burner, canisters contain the fuel compressed to a high enough pressure that it becomes a liquid.
Liquids always have a certain amount of vapor coming from the liquid, which in a canister stove, then travels to the burner (inverted canister stoves depend on the pressure of this vapor to push the liquified butane/isobutane/propane mixture to the burner). At sea level, butane vaporizes at 31 °F, isobutane at 11°F, and propane at -44°F. So canister stoves behave well at temperatures above freezing, poorly at freezing, and not at all when you get too cold – there is insufficient pressure to push the vapor to the burner.
Since most of the time since I received the SOTO for reviewing, there has been no snow in the Sierra, I have not gotten to the hills for an in-snow test (I plan on doing this in the next few weeks). But since I wanted to get an idea of how cold would affect the boil times, I chilled a partial canister (46% full at the start of the run) in a 0°F freezer for 2 days, then did a boil test during the early morning (pre-dawn) hours (ok, so the air temperature wasn’t really cold at 64°).
The boil time lengthened to 5:00 min, the second slowest calm air boil time, but not much slower than the rate for a canister started at “room temperature”. This indicates that the pressure regulator is doing as it should in keeping the fuel flow fairly well steady.
The slowest boil time was early in the morning on another day when temperatures were dropping closer to normal, when the air temperature was 46°F, water temperature 62°, and the canister 25% full at the start. It was easy to tell by the sound that the gas flow was dropping fairly rapidly as the liquefied gas cooled from the evaporation of the mix (as well as the vapor temperature in the canister dropping – remember the gas laws from your high school chemistry class). With the dropping intensity of the flame, it took 13 minutes to reach a full rolling boil. The canister was reduced to 16% remaining when it reached the full boil.
About 10 years ago, Jim S (who used to be an active regular on Trailspace) and I did a number of experiments to overcome the canister cold problem, including the copper wire and braid “heat pipe” approaches. The often recommended method of sleeping with the canister helps only at the start. Then it only takes a minute or two for the canister temperature to drop and the flame to shrink in really cold conditions. The most controllable method is to place the canister in a pan of cool to luke-warm water, as in the photo. Water warmer than luke-warm increases the vapor pressure in the canister excessively.
See the accompanying photo of the SOTO in a Sea-to-Summit collapsible bowl. When using this method, remember that the bottom of the canister is concave. So, as you set the stove in the water, tip it to the side to allow some of the air to escape, and keep the full pot on the stove while the stove is lit. Otherwise, the stove will partially float, possibly tipping while the flame is still burning. Using a 16% full canister in an air temperature of 43°F, water temperature in the pot of 56°F, and water temperature in the warming pan of 68°F, the boil time for 1 liter was 3:15 minutes.
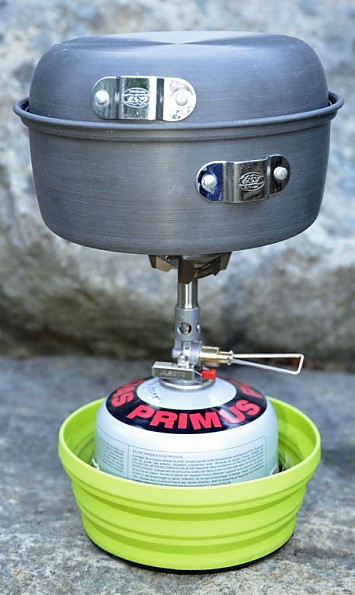 Placing the canister in a bowl with luke-warm water has the stove cooking, even in subfreezing conditions
Sound Level:
A concern for many backpackers and climbers is the noise level of stoves. Most liquid fuel stoves, particularly those with “roarer” burners, have sound levels in the 80-90 dBA range, leading to descriptions such as “747 takeoff” and “launch the Shuttle”. “Silent” burner stoves have sound levels in the 65 to 70 dBA range, much quieter, but hardly “silent”.
I measured the sound level of the SOTO with the same procedure as described in my review of the QuietStove cap. The result was that the SOTO produces a sound level of 67 dBA, slightly quieter than my MSR Whisperlite and Simmerlite stoves.
Fuel Consumption:
Throughout the tests, the fuel consumption rate started at 5 grams per minute for a 230 gram (8 ounce) canister at full power for the boil tests. As the fuel level dropped, the rate dropped gradually until reaching 4 grams per minute with 25% of the fuel left, reflecting the effect of the pressure regulator. Starting with cold water and 25% of fuel left, the rate on a 46°F morning dropped to 3.5 grams/min, with the flame cool enough to require 8 minutes to reach a slow boil and 13 to reach a full rolling boil, leaving 16% of the fuel remaining. Using the bowl of water as a heating source as described above boosted the pressure enough to bring the boil time down to a full rolling boil at 3:14 minutes, but with only 9% of the fuel left.
The tests give a burn time for a full canister of 12 to 13 liters of water, with 54 minutes total. The stove does simmer well and controllably at, of course, a much slower consumption rate of fuel than a full boil. It worked well for our "gourmet-style" meals, and could be kept at a reasonable level for an omelet without blackening the eggs or cheese.
Cold Weather Test:
As noted above, I headed for Carson Pass for some snow camping, and incidentally to do some testing for an update on the SOTO (and another gear item I am reviewing for Trailspace). There was plenty of snow, right from the trailhead, and I was glad I brought the snowshoes. For reasons noted in my trip report, I ended up at Frog Lake, a nice little tarn on the Pacific Crest Trail. Temperature while setting up camp was a pleasant warm 30°F.
As the sun was setting, I broke out the SOTO to cook dinner and melt some of the snow (more like ice). Starting with a new canister, I got the first liter melted in just over 3 minutes, filled the freezedry envelope (Mountain House, my preference in freezedry these days), and dumped enough ice into the pot to bring it up to a liter. The ice was melted and boiling before the freezedry was 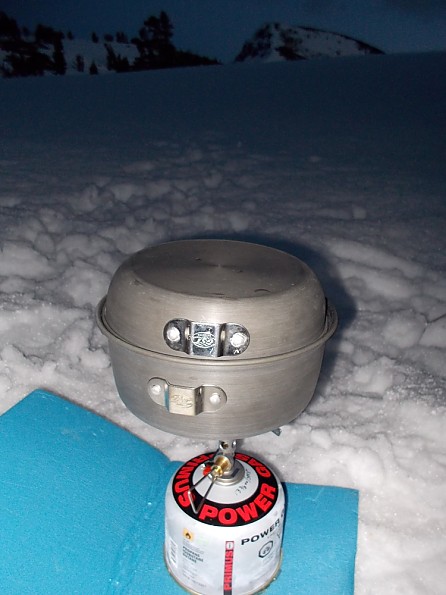
reconstituted, providing enough hot water for the huge cup of cocoa. Some ice had formed on the outside of the canister (result of vaporizing the liquified gas mixture). After dinner, I melted some more ice to fill my half-liter thermos for morning tea (Nissan, which I have found will keep water above 100°F for 24+ hours in zero-degree freezer), plus boiling water to fill my 2 Nalgenes.
I put the Nalgenes in cozies and into the sleeping bag to warm it up. For the "hot water bottles" and tea, I resorted to the magic trick shown above (set the canister in a bowl of luke warm water), so I had full power and a short melt and boil time. By the time I was boiling the water for the Nalgenes, the air temperature was in the upper 20s.
In the morning the temperature was 25°F. Usual routine - melt ice, boil water for oatmeal hot chocolate, etc. After a bit of exploring, lunch (with hot tea from the thermos), and breaking down camp, It was time to head back to the trailhead. Total fuel consumption for the roughly 1 full day trip was, interestingly enough, 75 gm/2.6 oz. I normally plan for 2 oz/day/person for petroleum fuels (gas canisters, white gas, kerosene). Yet in this case, I was melting ice for much of the water used. 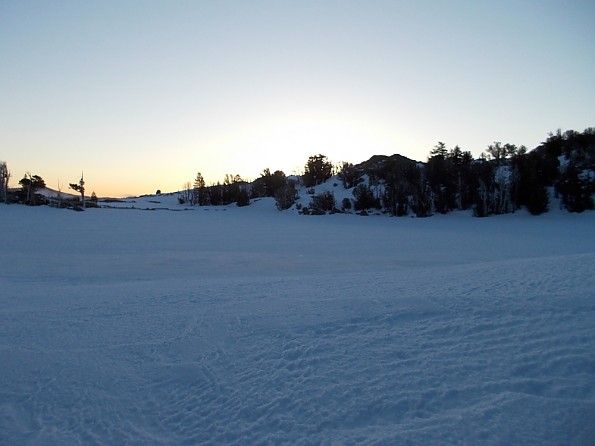 Sunrise over Frog Lake
Conclusions:
The SOTO WindMaster is a very lightweight stove top that screws onto gas canisters having the industry standard threaded coupling. In my tests, it performed very well in a range of windy conditions, with an intentionally chilled half-full fuel canister, and with cool environmental conditions. Fuel efficiency was very satisfactory.
I would recommend it for the lightweight backpacker who will be cooking for 1 or 2 people. As expected for a lightweight design, it is not suitable for large groups (4 or more).
Because of the warm weather we have had since I received the WindMaster for review, I have not been able to test its low temperature performance fully. My trials with a chilled canister and in cooler conditions indicates to me, however, that the WindMaster should perform well in mild winter conditions. I am expecting to make a trip to what little snow we have in the Sierra in the next couple of weeks to do more extensive cold weather conditions. I will add an addendum to this review following that test.
Source: received for testing via the Trailspace Review Corps
(Sample provided by Soto for testing and review)
 Reviewed by
mule
+95
March 13, 2014
This stove keeps a constant pressure until the canister is empty, as stated in their advertisement. It is very wind proof too. This stove is good for the backpacker who likes the convenience of a canister stove but also wants to use it in cold weather.
Most canister stoves do not perform well in weather below about 27 degrees, but this one will work down to 20 degrees with enough power to boil water or simmer, and the pressure is regulated even in cold conditions.
Pros
- Windproof, regulated flow of fuel, self lighting,
- Lightweight, very well made with a new
- regulated valve instead of a needle valve.
- The optional canister base works very well
Cons
- Pricey, should come with the four-arm pot
- holder as well as the lighter three arms.
- The universal canister base is a bit heavy.
I had given up using a canister stove for a very good wicked alcohol stove because at least the alcohol stove, a Fancy Feast design with a wick, would light and burn in cold weather. The wick allows it to light easily. But alcohol stoves are slow, not a lot of heat.
So I read up on the Soto Windmaster, bought it and have had it out in cold weather twice. It amazed me. Plenty of power at 18 to 20 degrees. Not as much as in warmer weather, but respectable nonetheless. The spring over ball regulates the pressure in the canister and the stove burns steadily until the gas is gone, though with less pressure than in warm weather.
I am glad I purchased the optional four-armed pot holder. It is way more stable than the three pronged one that comes standard with the stove. The four pronged one flips open to a larger diameter but works for smaller cups too. The pot holders both come off the stove for packing and are easily installed and removed. Just one more part to be sure you don't leave behind though.
I feel confident with this stove down to 20 degrees and happy that I will boil my liter or water in a few minutes rather than 8 or more with an alcohol stove. It has earned its place in my pack and was worth the price, which is half again more than a good canister stove on the market right now.
Source: bought it new
Price Paid: $70
 Reviewed by
Denis Evans
TOP 10 REVIEWER
+1,049
 May 30, 2024
Over 45 years of hiking and camping and many, many stoves, this is the best.
Pros
- Small
- Light
- Piezo ignition works
- Piezo ignition is reliable
Cons
- Not as windproof as the best HEAVY windproofs.
Over more than 45 years of hiking I have had many many stoves, starting with Trangia alcohol stoves, then MSR PocketRockets, and finally MSR Windburner.
The Windburner is the most windproof stove I have ever used, but it is heavy and bulky. I still recommend it if you need something for extremely windy locations. I have used two MSR piezo igniters but they both broke after 2 - 3 times. I bought a Jetboil Stash. The heat exchanging pot was fabulous—light and efficient. BUT the stove failed on a camping trip. Completely stopped working.
Enter the Soto WindMaster. Small, light, extremely well-designed and built, Japanese stove. The piezo igniter actually works reliably. Flame control is just as good as MSR—which is VERY good. I currently use it with the Jetboil Stash pot. Good in wind—not as good as the MSR Windburner of course, but good enough. And the combination is gas-efficient, light, and compact.
Background
Stove has been used about 20 times. Still works fine. Because of the Stash failure, I always carry an unregulated titanium BSR stove as backup. If your stove stops working, you are really stuck.
Source: bought it new
Price Paid: $80 USD
![]() Reviewed by
Reviewed by
Bob Takemura
+27
July 6, 2017
Great stove. Can simmer and cook eggs unlike JetBoil (great for boiling water only and the piezo igniter doesn't work after trying two different stoves).
Pros
- Able to control heat
- Easy to light and reliable igniter
- Light and compact
Cons
- Relatively expensive (I bought for about $80)
- Does not come with the pot support (need to buy separately)
I have used this stove over many camping trips. Very reliable, the igniter starts up every time. Can simmer and control the heat very well.
I used to use the JetBoil, but the piezo igniter never works and it burns everything.
Source: bought it new
Price Paid: $80
Your Review
Where to Buy
You May Like
Specs
| Price |
MSRP: $69.95 Current Retail: $69.95 Historic Range: $51.93-$74.95 Reviewers Paid: $70.00-$80.00 |
|||
| Output |
2800 kcal/h 3260w 11000 BTU |
|||
| Duration |
Burns approx.1.5 hours with 8 oz.(250g) canister |
|||
| Weight | 2.3 oz / 67g with the optional TriFlex pot support | 3 oz / 87g with the 4Flex pot support | 2.12 oz / 60g with no pot support | |
| Dimensions |
optional TriFlex only stowed 3.7 x 0.4 x 1.0 in / 94 x 10 x 33 mm / |
|||
|
4Flex only stowed 1.9 x 3.0 x 1.7 in / 47 x 77 x 44 mm |
||||