 by Kevin Da Silva
Dew, rain, or a sudden downpour—water potentially can find its way into any shelter through needle holes in the seams or an accidental pinhole or tear. Whether your tent or tarp arrives seam-sealed and fully waterproof, factory-taped, or unsealed, eventually you may need to treat your shelter to keep the elements at bay and your shelter in good condition.
Luckily, the seam-sealing process is straightforward and fairly simple.
Before starting, check with your tent or tarp manufacturer to see what specific products and practices they recommend or warn against. Always follow the manufacturer’s recommendation and your seam sealant’s directions.
McNett, Kenyon, and Aquaseal are among the seam sealant brands on the market. Many tent companies recommend the following McNett products:

- SeamGrip is for use on shelters made from nylon or other synthetic materials, as well as natural fabrics, waterproof laminates, leather, and vinyl. It also can be used to permanently repair pinholes and small tears.

- SilNet is for use on shelters made from silicone coated fabrics, like silnylon. It also can be used for minor in-field repairs.
The process of applying the two is essentially the same (follow the directions for your sealant).
Preparation
To seam seal, start with a clean, dry tent. Pay attention to the most exposed seams—the tent floor, fly, and bottom of the tent body—and attachment points, which are likeliest to let in water. You do not need to seam seal any mesh.
You’ll want to do this outside since prolonged exposure to seam sealant without adequate ventilation can be dangerous to your health. Also, pick a warm, dry day, since it will take a while for the sealant to fully cure.
- Thoroughly clean your tent and rain fly. Wash the tent with water and, if necessary, a very mild, non-detergent soap (check with your manufacturer for their recommendation). Do not use detergents, bleach, dishwashing, liquid, stain removers, or harsh soaps as they could eat through your tent’s fabric and any coatings.
- Rinse well.
- Let your tent dry thoroughly, preferably pitched or hung on a line in a shady spot. Never machine dry your tent.
- Proceed to the seam sealing once your tent is clean and dry and pitched tautly.
The Seam Sealing Process

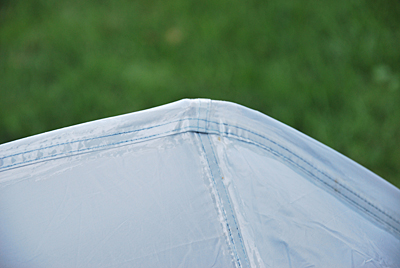
Make sure to pull the tent and fly taut when applying sealant.
Now comes the part where you apply the sealant.
If you’re sealing your shelter for the first time, and not in response to a specific leak, your best bet is to seal all the seams at once to ensure that your tent won’t fail when you’re in the midst of a downpour days away from a fix.
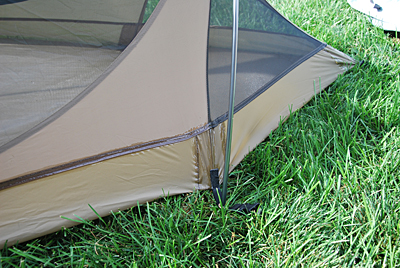
Pay particular attention to the most exposed seams—the tent floor, fly, and bottom of the tent body—and the webbing attachment points, which are most likely to let in water. Mesh areas do not need to be seam sealed. Your shelter’s manufacturer may recommend specific seams to seal or not seal.
Depending on the size of your tent or the area you are applying the seam sealant to, you may require an extra or larger brush to make it easier.
- On the interior walls, apply painter’s masking tape 1/4 of an inch from both sides of the seam. This will make it easier to apply the sealant and keep the sealant from spreading out too far. It also will give your job a professional look.
- Apply sealant to the interior wall seams of your tent, particularly the lower portion. Go all the way around leaving a thin layer of sealant extending approximately 1/4 of an inch past the seams. Pay attention to filling in all of those needle holes. Mesh areas do not require sealant, although it will provide extra strength in holding the stitching together. Avoid getting sealant in the zippers.
- Apply the same amount and width of sealant to any seams on the tent floor.
- Close the tent’s opening and apply another coating on the outside of the tent, making sure that all seams are taut. Many tents come with factory-taped seams. For these tents the outside seams can be sealed for maximum waterproofness. If the tape starts to peal the sealant can be used like a glue to close the seam and re-apply the tape.
- Leave the tent to dry.
- For one-piece tents, sealing is complete.
- For tents with a rain fly, put the rain fly on upside down to expose the inside seams. Follow the same process to seal the fly’s seams as explained above.
Afterward
-
Ensure that the tent is left taut to dry and that the rain fly is secured. Leave both pieces to dry fully for 12 to 24 hours or overnight, if conditions allow.
For added protection you can seal both sides of the rain fly here. - For an added level of protection you may want to apply seam sealant to the other side of your rain fly and tent bottom.
- After all the seams have dried comes the fun part. Set up the tent normally and turn on the sprinkler for an hour or so. Climb inside and marvel at your handiwork. Look for any leaks or gaps in the sealant. Thoroughly testing the seams now will ensure that there are no surprises out on the trail.
- If necessary, let your tent dry, then repeat the seam sealing process on any problem areas.
- Once fully cured and dry, loosely store your clean, dry tent out of direct sunlight and outside of its stuff sack. Your shelter is now ready to go.
Questions and Considerations
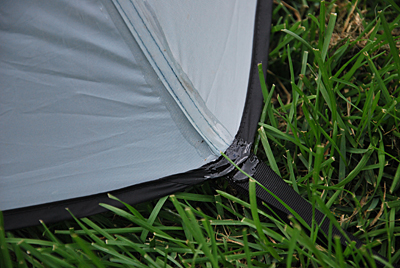
Pay close attention to sealing the tie-down points at corners.
Do factory-taped seams mean my tent is seam sealed?
No. Newer tents often come with factory-taped seams. This means a waterproof material has been double stitched between the tent’s seams. A factory-taped seam is usually very water-resistant and should hold up well in comparison to no seam sealing at all, but it is not the same as fully waterproof seam sealing.
The outside seams can be sealed for maximum waterproofness.
I just paid a lot of money. Why isn’t my tent already seam sealed or taped?
Some manufacturers seam seal their tents. Some do not, due to the cost and time involved. It can be far cheaper for you to seam seal your shelter yourself. A few smaller companies give you the option at an additional charge.
Shelters made from silicone treated nylon are not factory-taped since seam tape does not stick to the material.
So, do I need to seam seal my new tent?
First, always check with your tent’s manufacturer, since most have their own guidelines on how and where to add sealant based on the materials used and the shelter’s design.
- If your tent’s seams are neither sealed nor factory-taped you will need to seal them. Get started on a warm, dry day, before hitting the trails.
- If your tent has factory-taped seams you do not need to seal it. Your tent should be quite water-resistant, though you may want to test its waterproofness under the sprinkler before heading into the backcountry. If your tent will be used regularly, particularly in wet conditions, consider seam sealing. An added layer of sealant will give your shelter added protection and maximum waterproofness.
- If your tent comes seam-sealed you do not need to seam seal it immediately. However, you may want to test its waterproofing under the sprinkler. Even with seam sealing, regular inspections and maintenance are still important, especially with heavy use.
There are lots of seam sealant products on the market. Can I use any sealant on my tent?
No. Specific sealants are made to treat specific fabrics. Find out what materials your tent is made from (nylon versus silnylon, for example) and the manufacturer’s recommendation. The seam sealant you choose should be recommended for use with your tent’s fabric.
How often should I seam seal or spot treat my tent?
For most people seam sealing need only be done at the beginning of the season, unless you notice that your tent is starting to leak or wear in spots. Backpackers and campers that use their equipment particularly hard may want to apply a coating twice a year. The easiest way to tell when treatment is needed is with regular inspections. If the sealant is missing, leaking, or cracked in sections, apply another coat.
My seams feel sticky even after leaving my tent to dry for 24 hours. What should I do?
If the sealant is still sticky after ample drying time, apply a little talcum powder to the seams after the sealant dries, so the seams won’t stick to the rest of the tent.
I seam-sealed the floor. Do I still need a ground cloth or footprint?
Yes, it’s usually recommended. A ground cloth or footprint protects your tent from the ground, prolonging its life. Be sure the ground cloth is smaller all around than the tent and does not stick out from underneath, otherwise water can get funneled underneath the tent. You can make your own ground cloth or buy one.
Note: Always follow the cleaning, care, and repair recommendations of your gear’s manufacturer. Follow all directions and safety information for the seam sealant you choose to use.


