Six Moon Designs Lunar Solo


 Reviewed by
StoicFabian
TOP 10 REVIEWER
+2,982
 September 18, 2024 (original Sep 17, 2024)
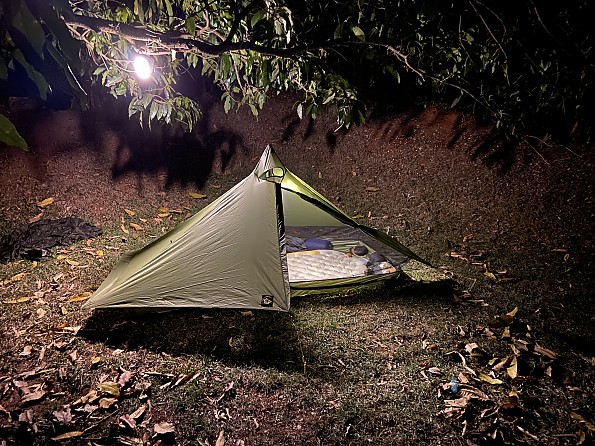
Could the Lunar Solo be the best single-wall one-person backpacking tent ever?
Tough question and that depends a lot on one’s needs and budget. In my experience, it’s a well designed and built, spacious, lightweight, and decently priced shelter with a great customer service. I’ve spent enough nights and days in the Lunar Solo in various conditions to attest to its capability and versatility. It has withstood the test of time with some great qualities and only a few niggles.
Pros
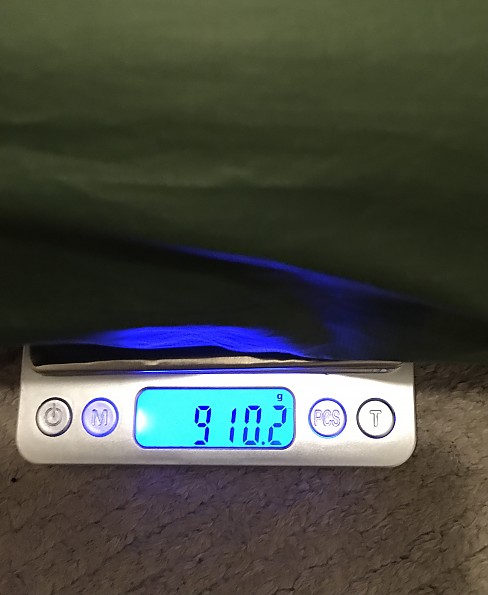
- Lightweight - 26oz / 740g (tent only) - 910g (with sack, pole and 8 alu stakes)
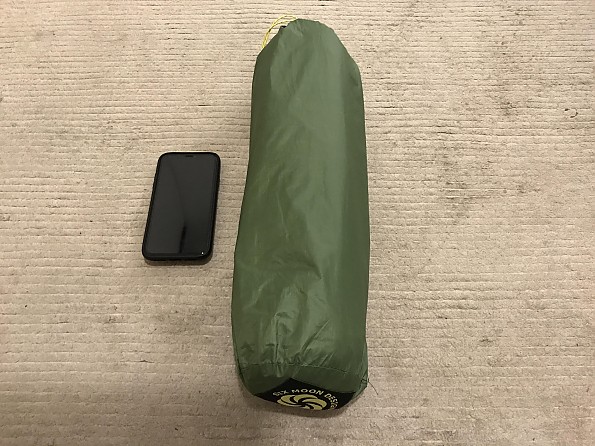
- Very compact
- Roomy
- Pleasant to stay inside
- Usable, adjustable vestibule
- Well ventilated
- Stormworthy
- Single pole
- Quick and easy pitch-in-one
- Time proven design and construction
- Easy to service and fix
- Top customer service
Cons
- Requires seam sealing
- Single layer more prone to condensation
- No modularity
- Near-perfect pitching required for best ventilation
- Still requires 6 stakes
- Not freestanding (More a feature than a con but still)
- Requires some acreage
I’ve owned and tested only a few solo tents during my outdoor life, so I can’t answer that question in a definitive or exhaustive manner. Keep that in mind as you read this review.
*******
The Lunar Solo was created in 2005 and has won multiple awards over the years. It’s seen small improvements done here and there to increase usability, durability, and cut weight which is expected as fabrics, materials and manufacturing techniques change over time. Also, SMD gets a lot of feedback from users and their ambassadors.
But the fact that it has changed little since its inception is evidence of a sound and effective original design. As an engineer and designer, I appreciate that in any product.
It’s highly appreciated by bikepackers because space and weight are even more important on a bike, and it’s compact and more than enough light for that. Also, the poles and stakes can be easily strapped to the bike´s down or top tube - just make sure you don’t lose it (poles and stakes can be improvised but it sucks to lose stuff during a trip anyway).
The Lunar Solo isn’t the lightest solo tent in the market, there are many others competing for ultralight king title. However, at 26oz / 740g it certainly fits well into the lightweight bracket (755g actual weight for the seam-sealed tent alone). Packed weight with alu pole and 8 alu stakes (6 for the tent plus 2 extras just in case) is 910g.
What it has in spades though is livable space.
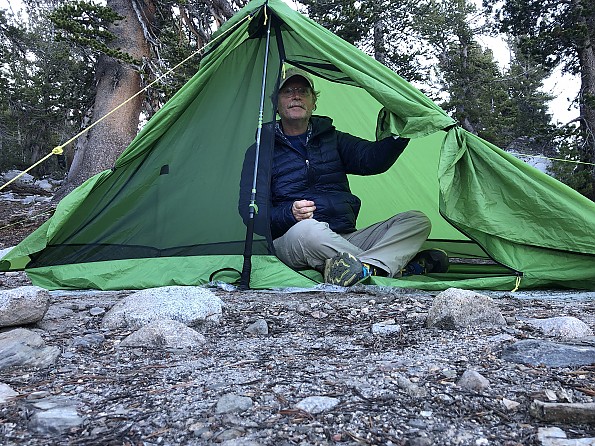
It’s the most spacious single-person tent I’ve ever stayed in, providing comfortable shelter for a person with all his or her gear inside, a medium dog, or even two + equipment in an emergency. Tall people are sure to find it comfortable enough.
Floor/bathtub and mesh/canopy are integrated and the Lunar Solo is pitched-in-one. This feature has pros (quick, easy, lightweight) and cons (no stargazing, requires good pitching, more condensation). In my opinion the pros outweighs the cons by a fair margin, at least for most situations. And I can always stargaze outside anyway.
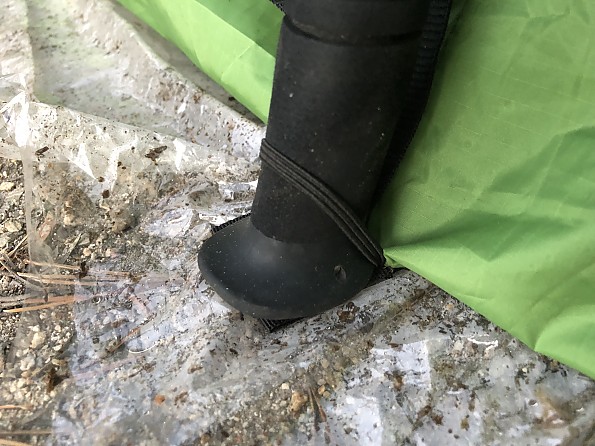
There’s a true, usable vestibule that can be adjusted in different ways, with enough space to keep boots and other items protected from weather. It’s perfectly possible to cook in the porch, provided you stay inside while handling the cookware and are careful with the heat source. I’ve done it countless times without issues, thankfully.
Ventilation is good thanks to the clever design and features that set it apart from most competitors, such as the top opening and perimeter mesh which I talk about in more detail in a moment.

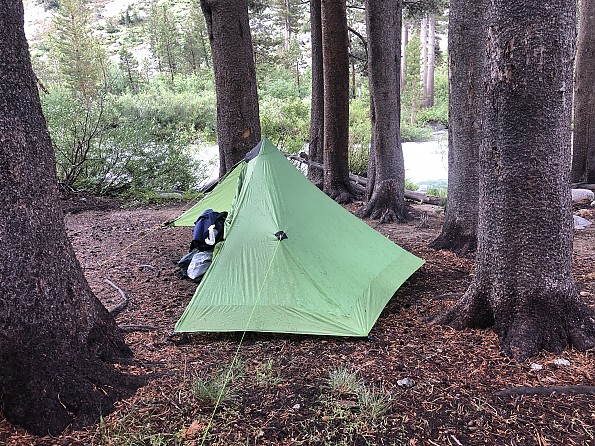
It’s also well-built, easy and quick to pitch, and will stand bad weather and strong winds with aplomb. When I first got it I thought it would get chewed by the really nasty tropical storms that are common here in the summer, but it stayed up and after small adjustments in the guylines it was back in perfect shape every time. Just make sure to stake it well.
I had water coming inside when it’s really wet and windy. Once it came from a small hole in the bathtub floor I wasn´t aware of, and a couple of times from very windy storms in which I got it slopy pitched. It was minor and not enough to cause damage but making sure it’s sitting on proper ground and correctly pitched is paramount to prevent water getting in in any way.
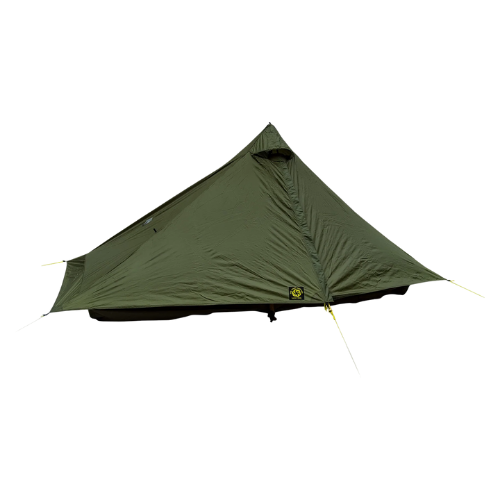
Specs.
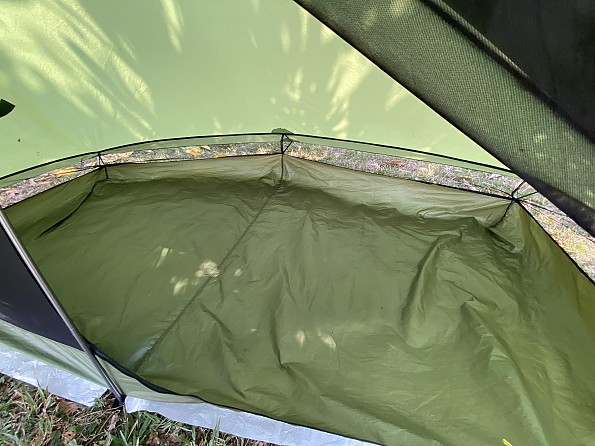
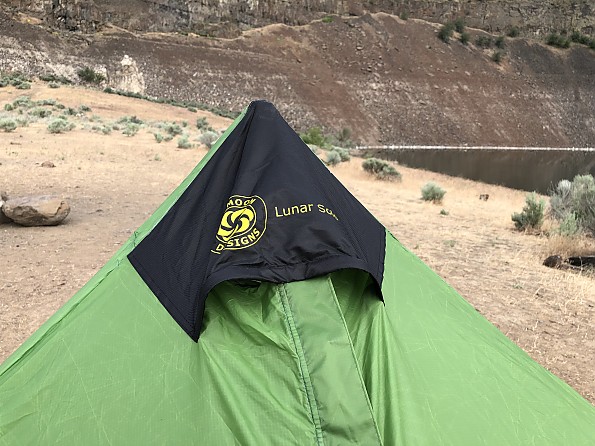
SMD makes the Lunar Solo from 100% Silicone-coated Polyester material to reduce fabric stretch when wet and reduce pack volume. Canopy is 20D and floor is 40D, with 6 in. deep bathtub floor and another 6 in. mesh lining between the floor and canopy for ventilation on the side and rear panels. There’s also an opening at the top to increase airflow, as shown above.
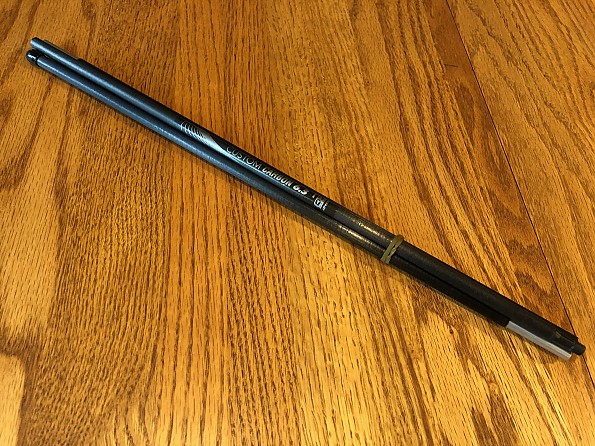
It only requires one 49" pole, which can be either a trekking pole set up to that height, or one of the 3-or-5 section poles sold separately by SMD in aluminum or carbon fiber. I have the 5-section alu and it’s pretty strong. Because I’m a sucker for CF I’ve ordered one for my second Lunar Solo. It’s only a couple of ounces lighter but honestly the alloy one is fine, more than enough strong and lightweight.
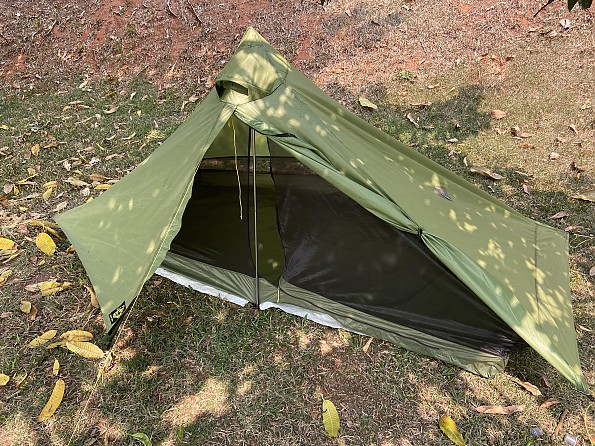
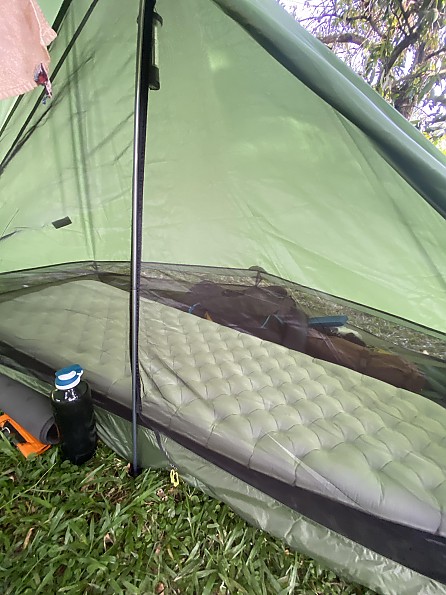
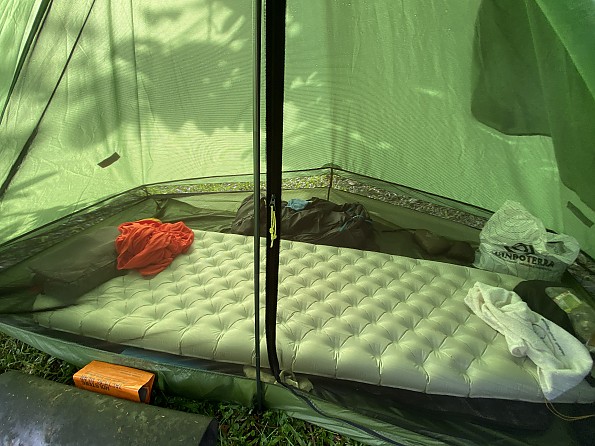
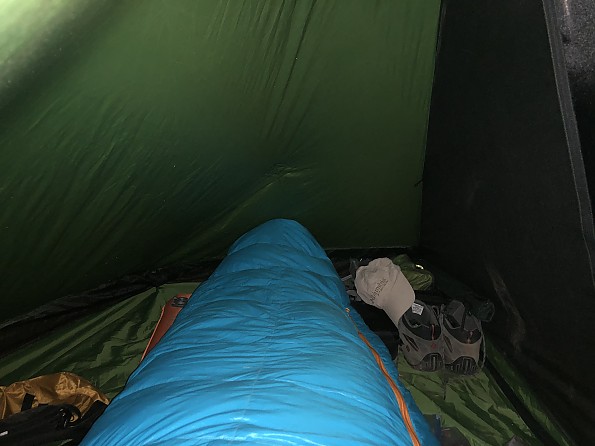
The tent is hex-shaped with the front vestibule taking about 1/4 of the total footprint. The habitacle is 26sq. ft. of space with 49 in. at the peak, providing ample headroom. I’m 6’and can sit and get changed comfortably in it. My summer sleeping pad (S2S Ether Light XT) is size L and 4” thick - it takes quite a bit of space in the tent, but looks smallish when spread on the Lunar Solo.
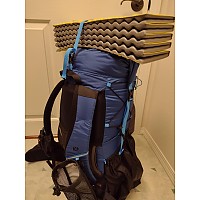
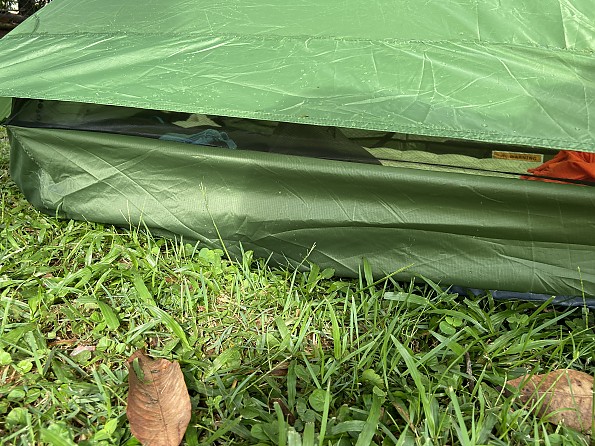
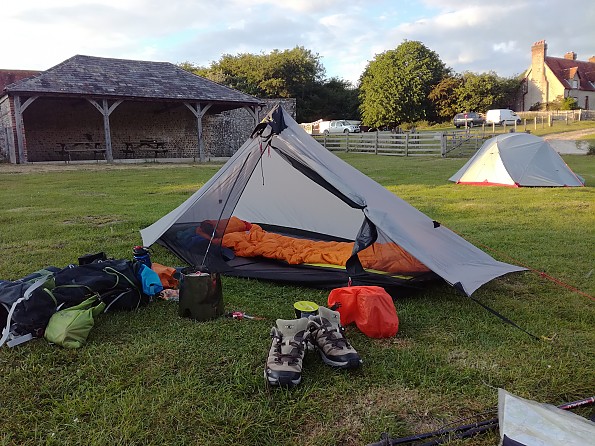
Numbers don’t tell everything though, the feel inside is very roomy and ample thanks to the steep slope. There’s a lot of extra space for my 55L backpack, my cooking gear, my food pack, my clothing, shoes, everything, as shown in the photo below. Space inside is quite impressive really.
It’s available in white (light grey?) and green colors, I always opt for the most stealth one to blend in well with the nature around. The green is also less bright inside, though it gets very hot inside even during the winter under the sun.
If I need further stealthiness (and visual comfort), I throw a piece of airsoft 3D cammo fabric over it, as I do with my Snugpack Ionosphere. That also helps with keeping the temperature inside more manageable, but I still prefer to find a campsite with a shadow because direct sunlight will get things hot inside in no time.
Pitching.
Though I usually prefer to wait until rain stops to set up camp, that’s not always possible (or I’m just too tired to wait). Being able to pitch the Lunar Solo “in-one” is a big plus when it’s starting to rain. Just get the pole and stakes out and throw the backpack inside and everything stays dry.
I recommend setting the Lunar Solo up a couple of times in your backyard or other training ground, following SMD’s instructions to staking order. After a few tries, it only takes a minute or two to get it pitched and adjusted. The guylines have micro lockers and reflective cords making it super easy to adjust.


Adjusting the tilt of the pole increases or decreases the height of the tent somewhat and also the inner bathtub arrangement, interfering with the ventilation mesh. Get that right after staking correctly is easy, though.
In use.
Usable space is a critical design aspect in a tent. Once pitched, the tent will require small adjustments after the fabric stretches, or if there’s too much wind or rain. The front vestibule has a two-piece canopy that can be used individually or zippered together. This part of the tent is raised above ground to increase ventilation.
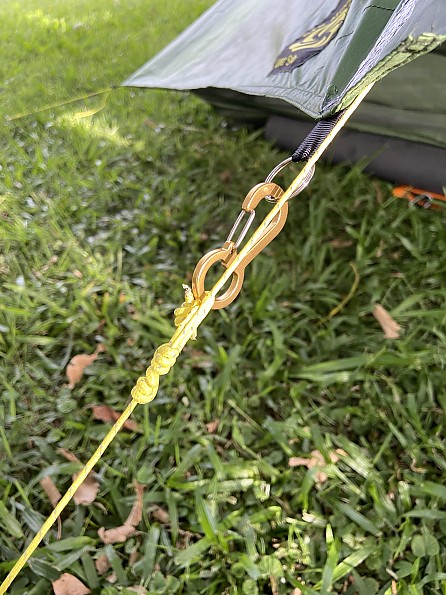
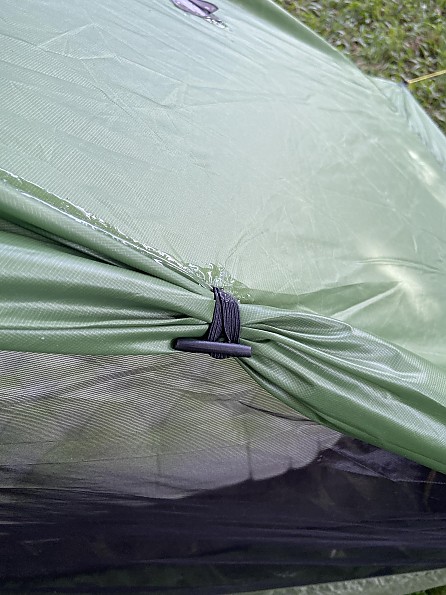
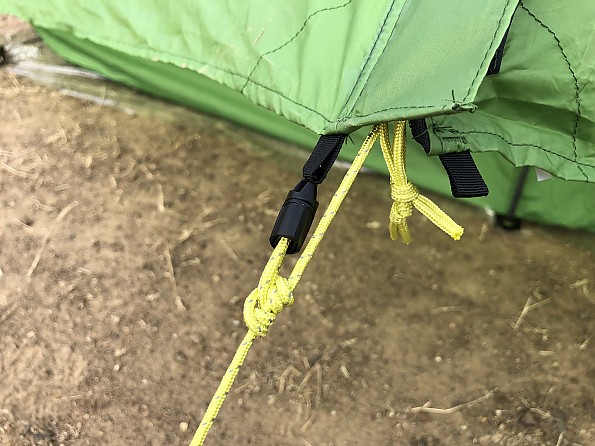
But that’s not all there’s to it: the design and features of the front cover are quite clever and add greatly to versatility. There’s a small prussik knot that connects the front panel to the ends of the canopy. It slides up or down along the pole guyline to allow for adjusting this part. Slide up for added ventilation/view, or down for more privacy and protection from rain and wind.
The entire front is made from bug mesh. The door is large and wide, and has two zippers.
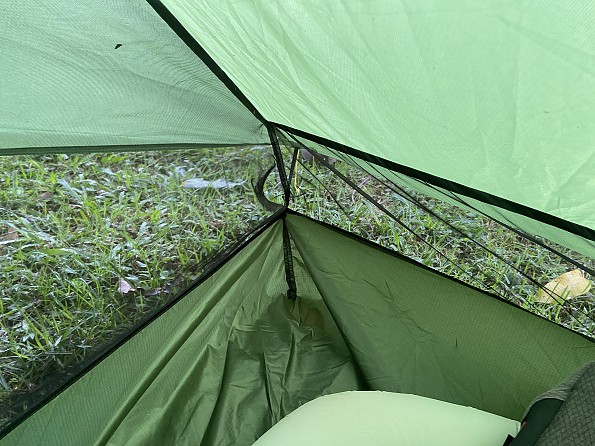
If even more headroom is required there are two pull-outs one on each side of the canopy. It does increase interior space though I handly ever bother because it´s just another pair of cords to tie around and there´s already enough space for me.
I’ve spent a week in the Lunar Solo in my backyard to test weatherproofness during rain season, and learn the best ways to set it up. It gets wet at one point in the border right above the netting, doesn't get water inside or anything but it's there. Maybe it's the constant rain, maybe it's a splash, maybe I need to double check my own sealing job. But since it's minor I just don’t bother much and keep using it.
Adjusting the tilt of the pole increases or decreases the height of the tent. Even in a low-profile “storm mode” it still has ample headroom. This is one comfortable backpacking tent.
I‘ve found that playing with different adjustments and angles, distances and heights of the anchoring points and also the pole tilt, I can adjust the height of the bathtub walls, the "floating" of the floor, the tension between the canopy and the floor, and so on. All that can affect the level of protection from wind, rain and splash, and also ventilation.
During the summer, it’s very pleasant and I often find myself sleeping with the front cover pulled up, or even open (there are elastics and toggles to secure it). It’s more comfortable and ventilated than my Ionosphere or even my Junglenest hammock (unless of course I sleep without a tarp, which is rare).
The condensation issue.
Single skin tents cause a lot of apprehension due to condensation issues. Indeed it’s not pleasing to wake up wet from the water forming inside a tent. Because it’s 90% single layer, condensation can be an issue with the Lunar Solo - particularly if camping near water sources or damp areas, or if wrongly pitched.
But it’s still far better than most others I’ve used with similar design, and condensation is manageable. I don’t remember having issues with excessive water accumulating on the inner fabric, not even after rainy or colder nights, and weather here where I live is quite humid (tropical climate).
It never came to dripping over me or my backpack, even with heavy wind shaking the tent. I keep a microfiber cloth at hand and got into the habit of wiping out the inside just for precaution, anyway.
Since it’s an all-in-one single skin tent there’s no option to pitch a mesh only protection to keep watching the stars in case of fair weather. I rarely do that to be honest, even with my Ionosphere because there’s always some humidity or cold coming in during the night around here.
Ventilation.
Ventilation is efficient, but this requires proper pitching. The design of the front cover and the full mesh front wall helps a lot with that. If it’s raining, too windy or chilly, pitching the tent with the back of against the wind is critical.
Extra insulation and protection are necessary during the winter. I’ve heard of folks using the Lunar Solo for snow camping during deep winter. Even though here where I live temps can drop do near or slightly bellow zero (Celsius degrees) in the wilderness, I can do away fine with a mildly insulated sleeping pad like and a decent sleeping bag.
During the summer, it’s very pleasant and I often find myself sleeping with the front cover pulled up to maximum, or even open (there are elastics and toggles to secure each side of the front panel open). It’s more comfortable and ventilated than my Ionosphere or even my Junglenest hammock (unless of course I sleep without a tarp, which is rare).
That slippery floor.
The slippery fabric coupled with the large floor size causes everything to slide and pile up on a corner. This can get the bathtub floor to get a bit out of whack due to weight pushing against the sidewalls. If the ground is anything less than perfectly level, and I’ll wake up with everything clumped in the lower part of the tent.
I use a cut-to-fit Tyvek sheet to protect the thin tent floor from debris, sticks, rocks, mud, etc. but that will happen regardless, so I’ve added strips of seam sealing silicon to the inner floor (I did the same to my Snugpack Ionosphere and other tents in the past). It doesn’t solve the problem but minimizes it.

But that’s only an issue when camping over tilted ground, and a perfect-as-possible pitch can help with that as well. Most tents I’ve used suffer from that, to be honest. The only times I can find a perfectly flat spot is when I’m in a campground or other are with decent, trimmed grass. When I’m wild or stealth camping, the thick vegetation and uneven ground mean I usually have to work the spot a bit for the tent to be decently pitched up.
Problems faced.
Though related to use and (lack of) care, I thought it would be worth to mention a couple of issues I run with the Lunar Solo during these years, so other owners might be able to avoid something similar and prolong the life of their tents.
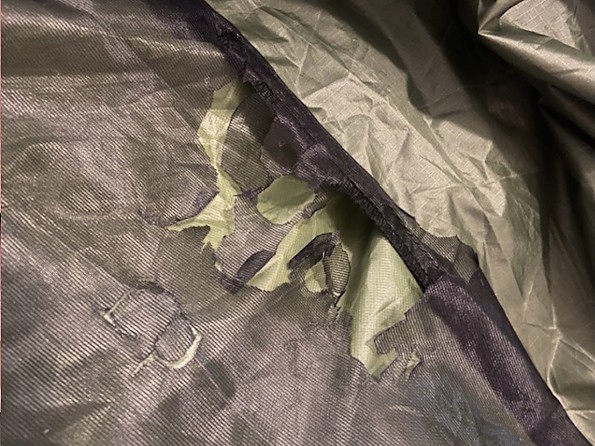
Once I forgot to pack up my cookware properly before leaving for a walk. When I returned, the side mesh had been completely chewed up by giant grass-cutting red ants trying to find any food inside. They ate thought it like butter really. Thankfully the food was protected, the ants got attracted by the smell of the cookware but the damage was done. Lesson learned.
Seam sealing.
The Lunar Solo doesn’t come seam sealed. SMD will do it for an extra charge, $35 or something. There are seams on the canopy and also on the floor, but it’s no big deal. I sealed my first LS and ordered the second seam-sealed from factory (excellent job), so I haven’t tried the tent without the sealing first to make comments, but sealing it before going out should be a no-brainer.
I suggest it gets done when the tent is new and clean. If you’re not familiar with the process, I suggest you pay SMD to do it. I pitched it in the middle of my living room and did it using Gear Aid’s Seam Grip, which I reviewed here elsewhere. Any polyester-compatible sealer will work, industrialized or homemade. Use your preferred method.
Conclusion.
I grew up very fond of the Lunar Solo. It´s touted as 1+ and indeed there’s more than enough room for a person with all his or her gear inside, a medium dog, or even two in an emergency. My wife is 5'3" and certainly fits in there with me.
It has a true, usable vestibule which is no small thing when it comes to a sub-kilo tent.
It’s single-layer but ventilates well, and has some clever features that stand out. SMD has a good reputation, and you can tell why, by the solid construction but above all the clever design and features.
Finally, it’s quick and easy to set up (pitch-in-one), and will stay strong and stable in bad weather or heavy winds. On top of that, it‘s reasonably priced.
Background
I keep constantly switching between tents and hammocks/tarps for my backpacking, wild camping and stealth camping trips, depending on weather and my mood. I’ve been using the Lunar Solo for a year or so now, in various seasons and weather conditions. So far it has proved the most comfortable and lightweight backpacking/camping tent, though not as stealth as the Snugpack Ionosphere. Highly recommend.
Source: bought it new
Price Paid: USD 303 + shipping
 Reviewed by
Mike Mineart
REVIEW CORPS
+4,912
 August 24, 2019
The Six Moon Designs Lunar Solo is a well thought out design that provides a lightweight, roomy, and reasonably priced shelter option for the solo hiker. The latest design of the Lunar Solo utilizes 100% Silicone coated Polyester material that is a marked improvement over the Silnylon that was used previously and is a reflection of Six Moon Designs' efforts to continually improve their product designs.
Pros
- Fast and easy setup
- Good headroom
- Just the right amount of floor space
- Angle of entry and large door opening makes it easy to get in and out of tent
- 100% Silicone coated Polyester material has minimal sag even after exposure to rainstorm
Cons
- Quality of the setup is a function of what you put into it or setting up the tent consistently takes a little practice
- Internal gear/storage pocket is poorly designed
- 100% Silicone coated Polyester floor is a slippery material
Overview
The Lunar Solo is a popular Six Moon Designs single-wall solo tent design that was upgraded recently to utilize a new 100 percent Silicone coated Polyester material. The tent is a non-freestanding single pole configuration made utilizing 20D weight material for the tent canopy and 40D for the tent floor, and 20D UL No-see-um netting for the door area and the venting that runs around the perimeter of the tent. The tent has a floating bathtub style floor construction. The seams that would be susceptible to leaking on the floor and tent body do not come sealed and you either have to seal the seams yourself or Six Moons does offer a service for $30 to seal all of the key seams when you order the tent from them. The tent provided to me for this review had all of the seams sealed by Six Moon Designs.
I have structured this review into the four main sections listed below followed by a summary at the end.
1. The Basics of what is included with the tent
2. Physical Characteristics of the Lunar Solo
3. Design and Construction
4. My Experience Actually Using the Lunar Solo

The Basics of What is Included
The Lunar Solo tent comes packaged in its primary stuff sack as shown in the picture below.
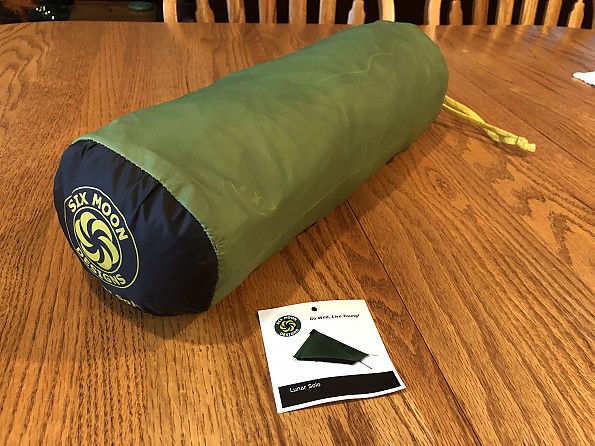
Within the basic package you get the tent, stuff sack, primary guy line that comes pre-attached to the tent, and a simple set of instructions for setting up your tent.
To actually be able to use the Lunar Solo you need to provide a trekking pole that is or can be adjusted to approximately 49 inches and six tent stakes (eight if you want to use the side pullouts), and while not required, a good ground cloth/footprint is always a smart thing to use and Six Moons recommends that one be used with the Lunar Solo.
Six Moons was also nice enough to include their 49-inch long carbon fiber pole, one of their single stake sets, and a Polycro footprint. With the exception of the carbon fiber pole, which I alternated use of with my trekking pole, I used the stake set and footprint provided by Six Moon Designs when I used this tent so that my review reflects the complete system that you could purchase from Six Moon Designs along with the Lunar Solo.
The tent includes a preinstalled reflective single guy line that is key to the overall design as it is what is used to tension the trekking or tent pole used to provide the primary structure for the tent. The guy line has a loop at the far end for attaching to a stake and a typical cord lock adjuster at the upper end where it attaches to the tent. There is also an adjustable attachment for one half of the vestibule that comes pre installed on the guy line and it consists of a short section of cord tied as a prusik knot with a plastic clip. In addition, preinstalled adjustable straps are included at each of the five corners of the tent that are staked out and tensioned during setup.
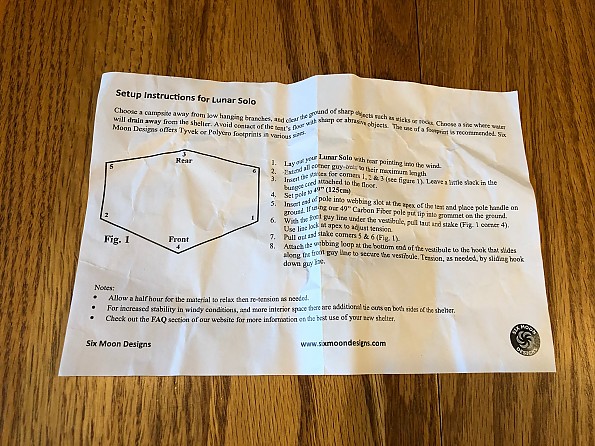
The printed setup instructions provided by Six Moon Designs are simple and straightforward, but more importantly someone new to the Lunar Solo should really take the time to read the instructions as the process you follow really makes a difference in getting the tent set up correctly. Six Moon Designs also has additional setup instructions on their website here at this link.
Physical Characteristics of the Lunar Solo
Weight
One of the primary selling points of the Lunar Solo is weight, so when I weighed the tent I found the measured weight to be right in line with the 26 ounces that Six Moon Designs advertises for the Lunar Solo. Listed below are the actual values I measured compared against the published weights from the Six Moon Designs website.
Tent weight:
- Six Moon Designs published: 26 ounces
- Actual Measured: 25.8 ounces (seam sealed tent, stuff bag, and included printed instructions)
Weight of the additional components provided by Six Moon Designs:
- Carbon Fiber Pole: Published: 1.8 ounces; actual 1.8 ounces
- Stakes Set: Published: 2.5 ounces; actual: 2.1 ounces
- Polycro footprint: Published: 1.2 ounces; actual: 1.6 ounces
- Total weight for Tent, pole, stakes and footprint:
- Based on published data: 31.5 ounces
- Based on my actual measured data: 31.3 ounces
Packed Physical Size
The advertized size for the Lunar Solo packed away in the included stuff sack is 11.0 inches long x 4.5 inches in diameter. I found that with the Lunar Solo stuffed in the included stuff sack and setting on a table in a free state that the physical size would be closer to 16.0 inches long x 4.5 inches in diameter, but that the tent is not tightly packed and can be crushed down to a smaller volume. From a real world perspective the tent would easily compress down without any problem to a volume of around 9.0 inches long and 4.5 inches in diameter.
In actual use I packed the stakes and footprint with the tent in the stuff sack include with the tent and that final package took up very little space stuffed down inside my pack. When I carried the carbon fiber pole I would pack it along with my fly rod on the outside of my pack, which is a ULA Circuit. When broken down like this, I found that the Lunar Solo took up very little space in my pack and would pack very quickly and easily, which I considered a big plus.
Assembled/Setup Size
The actual size of a tent when it is set up does not vary significantly as your primary interface when using the tent is the floating floor. Where I experienced variation with setting up the tent was with the height of the vent/mesh that runs along the four rear facets of the tent, which are directly impacted by how you set up the tent.
The basic dimensions Six Moon Designs publishes for the Lunar Solo floor are 90 inches by 48 inches at the widest points, and a peak interior height of 48 inches. Normally I would provided the actual measured dimensions when I evaluate a tent, but with the Lunar Solo how you set up the tent can have a direct impact on what I might measure, so trying to do a detail comparison is less relevant, but I can say that I did check the basic dimensions of the floor and peak height and found them right inline with the specifications published on the Six Moon Designs website.
From a more simplistic perspective, I feel that the generous size of the Lunar Solo should easily accommodate almost any hiker up to about 6'6" and still provide adequate room for sleeping and sitting up to change clothes, etc.
Design and Construction
I have owned a number of tents over the years from manufactures like North Face, Marmot, REI, Tarptent, and MSR, but this is my first experience with a Six Moon Designs product and I found that they take a slightly different approach with some design details when compared to other manufactures.
The Lunar Solo is somewhat unique in that it is a single pole, single wall tent with a modified hexagon footprint. Six Moon Designs has manufactured the Lunar Solo for a number of years and over time they have refined the Lunar Solo design with changes to the physical size of the tent, depth of the bathtub floor, etc., and their most recent design change was in 2018 when they switched to using a new 100 percent Silicone coated Polyester material for the floor and tent body.
The Lunar Solo utilizes a free floating bathtub floor made from a 40 Denier 100 percent Silicone coated Polyester material and the tent canopy is a 20 Denier 100 percent Silicone coated Polyester material. Both the tent canopy and the tent floor have a 3000 mm of waterproofness rating, which is a robust rating compared to a lot lightweight tents being manufactured today that are rated more along the lines of 1200 mm. If you are not familiar with waterproofness ratings, a 3000 mm rating means that the material will just start to allow water to pass through when it is subjected to the pressure of a one-inch square column of water, 3000 millimeters tall.
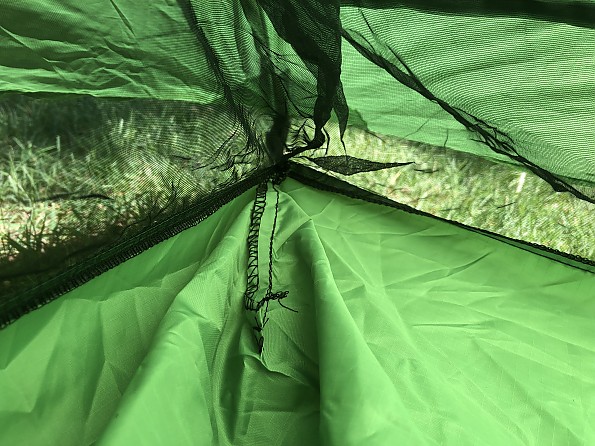
The floating bathtub floor is suspended from the canopy by large mesh panel in the front that contains the zippered door and also by a six and a half inch wide band of mesh that runs around the perimeter of the tent. In addition, there are elastic straps that go out from the bathtub floor to each corner of the tent that is staked out. All the mesh is of 20D UL No-see-um netting.
One unique characteristics of the Lunar Solo is that when you purchase the basic tent none of the seams are sealed to make them waterproof. To me this seems a little odd in this day and age when just about every outdoor tent, jacket, etc. comes with taped seams. Six Moon Designs has an option where you can have them seal the seams for an additional $30 or you can purchase a tube of Seam Grip +Sil and do it yourself. Many of the seams within the Lunar Solo do not look like they would lend themselves to be seam taped easily, but there is one typical felled seam running across the tent floor that looks to be the idea candidate for a taped seam.
I was able to ask the designers at Six Moon Designs why they didn’t consider tapping the seam across the floor and they shared with me that both sides of the of the polyester material they are using are treated with silicone and that there currently isn’t a commercially available silicone tape that would allow them to tape the seam. They also shared that with the materials used in other tents that are typically taped, only one side is coated with silicone and the side that is taped is coated with polyurethane, and that with the materials with the polyurethane coating are not near as durable or as long lasting as a silicone coating. So from a design perspective the Lunar Solo utilizes a more robust material with respect to durability and waterproofness with the tradeoff of a little less elegant, but adequate approach to waterproofing seams.
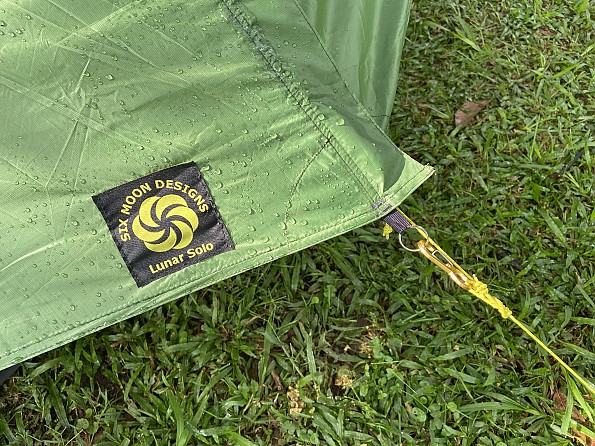
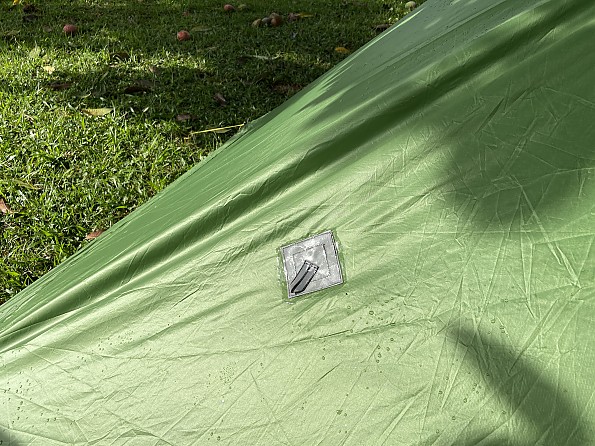
The Lunar Solo I received from Six Moon Designs for this evaluation had had the seams sealed by Six Moon Designs. Here are a couple of pictures showing what the seams sealed by Six Moon Designs look like (the dirt and grit are from recent trips...).
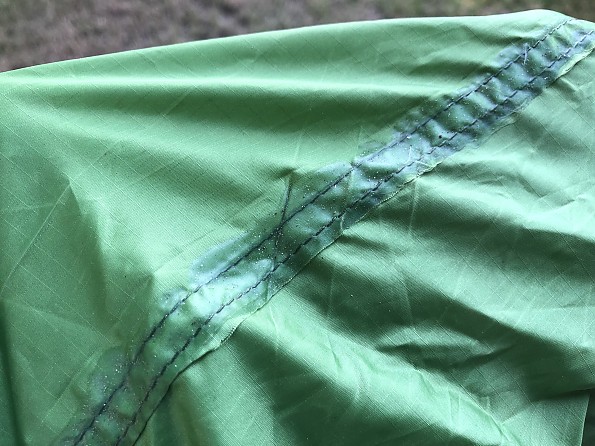
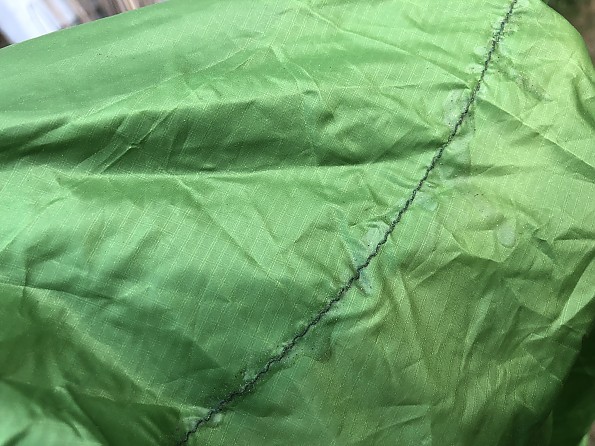
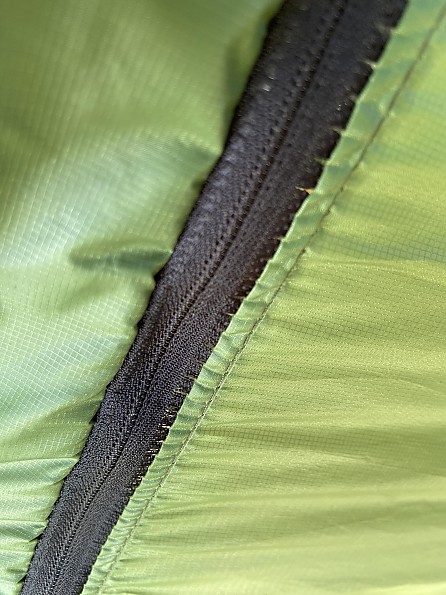
Another design detail I found different on the Lunar Solo compared to other tents I own is the seam construction method utilized. On most if not all of the other tents I own the primary method used to sew seams is a felled seam. With the Lunar Solo a majority of the seams are an overlock construction like shown in the picture below. While I prefer a felled seam due the way they lay flat and have fewer exposed threads compared to the overlock seams used in the Lunar Solo, it may not make much of a difference from a durability standpoint.
I was able to ask Six Moon Designs why they chose this seam construction method and they responded that they feel it is much lighter approach as it uses less material to help keep the weight of the tent down, but doesn’t take away from the performance of the seam. I thought it was a difference worth sharing from a design perspective only, as I haven’t nor do I expect to ever have any issues with the seams on the Lunar Solo.
My general impression of the overall construction of the Lunar Solo is that Six Moon Designs only does what is needed and nothing more, which probably supports the Lunar Solo being as light as it is. I have sewn my own gear in the past and I like layers of reinforcement and heavy bar tacking, but with the Lunar Solo what you will find is that the reinforcement and bar tacking are not excessive and are reflective of a design where the focus is on minimizing weight.
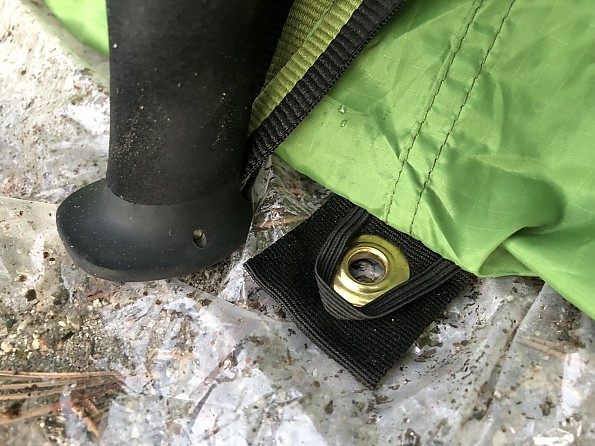
Another unique design characteristic of the Lunar Solo is that the main pole supporting the tent is designed to be cantilevered back about ten degrees as shown in the picture below. This combined with the large door opening has the added benefit of making it easier to get in and out of the tent due to the tent floor extending out beyond the peak of the tent.
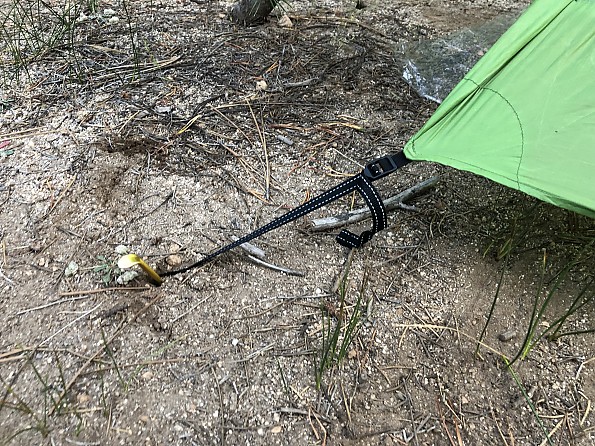
Because the pole is leaning back there could be a concern for the bottom end of the tent or trekking pole slipping outward, but Six Moon Designs included design features to help prevent that. The Lunar Solo includes a webbing tab where the base of the pole would be located and the tab contains a grommet that accepts the end of the tent pole Six Moon Designs sells for use with the Lunar Solo and also has an elastic loop to retain the grip of your trekking pole. The pictures below show the tab and also the handle of my trekking pole installed in the elastic loop. I have utilized both methods on various trips and each works equally well.
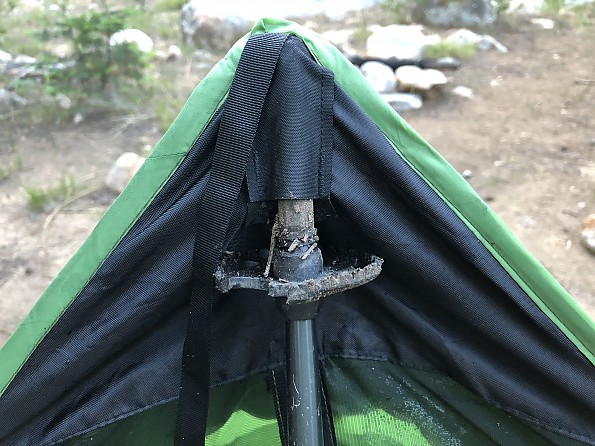
The interface for the upper end of the pole consists of a simple sewn pocket that you would insert a tent or trekking pole into, and the size is pretty generous and should be able to accept the tips of most trekking poles.
There are five corners that need to be staked out when setting up the Lunar Solo and each of those corners is adjusted through the use of a flat webbing strap that is also reflective. The loop at the end of the strap that the tent stake passes through is not very big and will accept a stake up to about a half an inch in diameter which covers the majority of stakes most people would be using, but if you were using large diameter stakes in sand for example you might have to girth hitch the strap around the stake.
Within the interior of the tent there is only a single clip for hanging gear that is located at the peak of the tent.
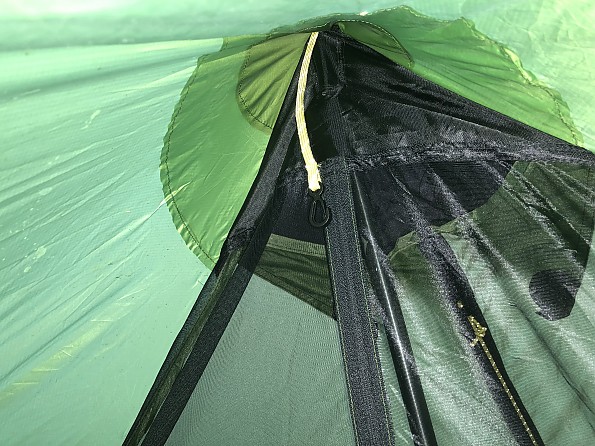
At the peak of the Lunar Solo there is also a hooded feature with a built-in support that is intended to be a vent, but from my experience in using the tent I didn’t find it very effective, but it does make a nice feature for displaying the Six Moon Designs logo.
The optional tent pole available from Six Moon Designs that I used as part of this review is a three-section, shock corded design made using Easton Custom Carbon 6.3 carbon fiber pole sections. The pole is a nice design that contains a tapered end for interfacing with the lower grommet and a protected tip that slides into the pocket at the peak of the tent. When the pole assembly is collapsed down into its three sections it has an overall length of approximately 17.25 inches.
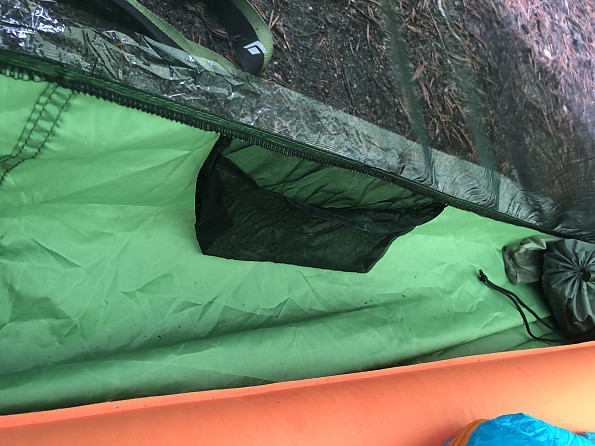
One weak element of the Lunar Solo design is the single mesh pocket attached at the base of the fixed mesh panel at the front of the tent. The mesh pocket is a “bag” style design that for the most part rests on the floor of the tent. Due to the open nature of the pocket and its location, it doesn’t securely hold items and is susceptible to being bumped, crushed, etc. I think with a little creativity a more useful mesh pocket could be integrated into the fixed mesh panel on the front of the tent that could be larger and more secure.
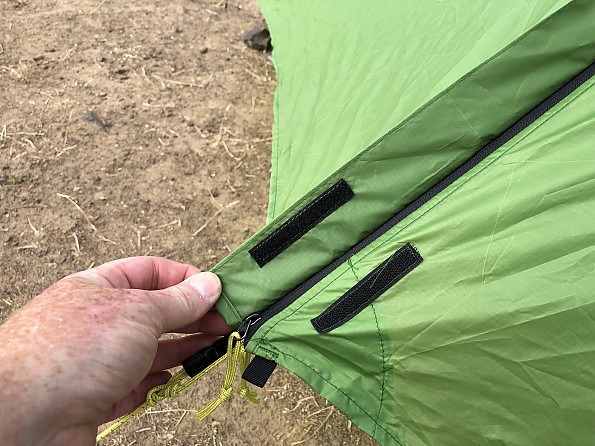
The flaps on the vestibule is similar to what you would see on the fly of other tents and utilizes a zipper running the length of the opening and two approximately three inch long Velcro strips to secure the storm flap where one is located at the end of the opening and the other midway along the opening.
Another feature unique to the Lunar Solo is that the flaps for the vestibule are tensioned by way of a small prusik knot and plastic hook that come preassembled to the main guy line of the tent. This feature is needed because the main guy line is tensioned by means of a cord adjuster located near the peak of the tent so whenever there is an adjustment in the guy line it causes the flaps of the vestibule to tighten up or get looser which is then addressed by sliding the prusik knot along the main guy line to get the correct tension of the vestibule.
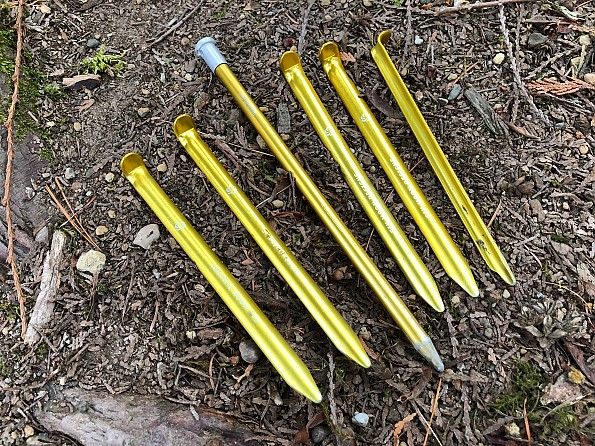
The stake set included with the Lunar Solo was the Six Moon Designs Single Stake Set that can be used with several of their shelters. The set includes a single 8-inch Easton nail stake for use with the main guy line and five 6-inch 7075 aluminum L stakes for staking out the remaining five corners of the tent.
My Experience Actually Using the Lunar Solo
I have known about the Lunar Solo for a long time and always had the impression that the design struck the right balance between cost, weight, floor space, and other features that it would make it an ideal tent for the solo hiker. Now that I have had a chance to use the Lunar Solo on a number of trips, I can say that my initial impression was correct and this really is a very well thought out design that I have enjoyed using on my extended hikes.
The number one feature of the Lunar Solo that initially captured my interest was the amount of interior space the design had for a single-person tent. I much prefer to bring all my gear into my tent instead of having to leave my pack out in a vestibule and the Lunar Solo allows me to do that with room to spare.
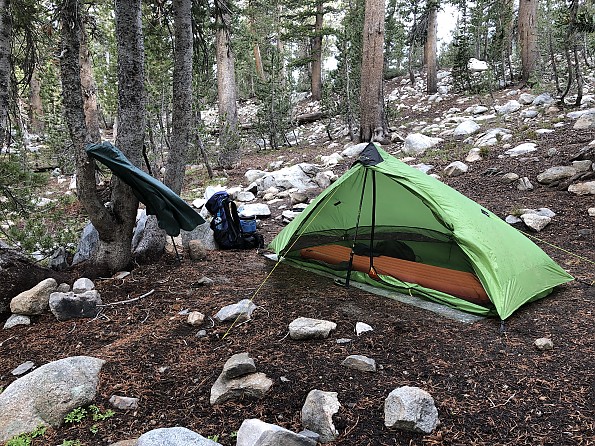
I currently use a Big Agnes Insulated Air Core Ultra mattress that is 78 inches by 20 inches and 3.5 inches thick, and as you can see in the pictures below I still have ample clearance at my head and feet from the wall of the tent. I do need to use the two optional pullouts on each side of the tent to get that clearance because of the thickness of my mattress, but probably wouldn’t need to use the pullouts if I was just sleeping on a foam pad. It's also worth mentioning that the Silicone coated Polyester material used for the tent floor is a bit on the slippery side as I found that it took very little movement on my part when I was sleeping to get my Big Agnes mattress to shift around on the tent floor.

Headroom in and around the main pole is also very good in the Lunar Solo and you have more then adequate room to change clothes, etc. I think that the interior space would be more then adequate for someone up to 6'6" in height.
Setting up the Lunar Solo is a pretty straightforward process and the instructions included from Six Moon Designs are helpful the first time you go through setting up the tent. Six Moon Designs also has additional instruction on there website here at this link.
While its not difficult to get the tent setup in its basic form, it does take a little practice and finesse to get a real nice setup of the tent where the canopy is nice and taut and the bathtub floor is hanging just right so you get the greatest amount of ventilation. If you're not very mechanically inclined and are they type of person that wears slip-on shoes because you struggle to tie your own laces, then this may not be the tent for you, but for everyone else you shouldn’t have too much of an issue, especially if you invest a little time to get familiar with setting up the tent a few times before you take it out on your first trip.
The use of an adjustable trekking pole gives you a little more flexibility in setting up the Lunar Solo over using the fixed 49-inch long pole available from Six Moon Designs. Six Moon Designs indicates the 49-inch long pole is the optimum height to give you a setup with good ventilation. With an adjustable trekking pole in good weather conditions you can use a longer length like 52 inches and have the straps at each corner at the longest length which will give you the maximum ventilation and deepest bathtub floor. If the weather looks more stormy then you can reduce the trekking pole length to something less the 49 inches which will enable you to get the back edges of the tent all the way down close to the ground and also reduce the gap between the vestibule and the ground.
Due to the guy lines and staking the Lunar Solo needs a reasonably sized area to set it up, but I never really found it to be an issue when looking for a campsite.
The lower edge of the flaps on the Lunar Solo that make up the vestibule don’t come down close to the ground and therefore make the tent more susceptible to winds and other storm related conditions that could act on that side of the tent. In the printed instructions included with the tent (but not with the instructions on their website), Six Moon Designs in step number one states that you should lay out your Lunar Solo so that the rear of the tent is pointing into the wind.
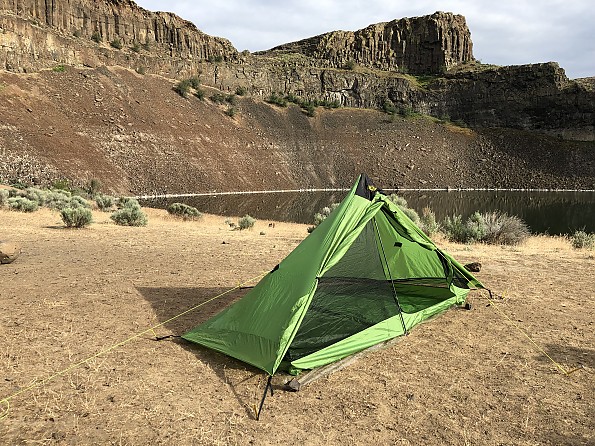
I am not always good at following directions and the picture below is of a camp I made at Sallie Keyes Lakes (California) during a section hike along the John Muir Trail where the front of the Lunar Solo faced the lake so that I could enjoy the view. As the afternoon wore on the winds picked up off the lake and my Lunar Solo took on an “inflated” look. If the winds had continued into the evening I would have rotated my tent 180 degrees away from the wind, but I got lucky and the winds died down before I called it a day.
While the description of the Lunar Solo on the Six Moon Designs website states that “The Lunar Solo’s distinctive low hexagonal shape easily spills the wind no matter the direction” the tent in reality is sensitive to wind directed at the front/vestibule side of the tent. This isn’t necessarily a design deficiency, but it is a characteristic of the design that needs to be taken into account when picking a site for the Lunar Solo.
On one trip I did experience a night where it rained heavily throughout most of the night and I didn’t experience any issues with leaks in the canopy or with the floor of the Lunar Solo. Also, the tent stretched very little as a result of the rain and much less then what I have experienced with tents I own made from Silnylon, so I think the change made by Six Moon Designs to use the 100 percent Silicone coated Polyester material for the Lunar Solo was a great decision.
I haven’t used the Lunar Solo in snowy conditions just yet, but I anticipate that the 100 percent Silicone coated Polyester material will perform well and that as long as you use the side pullouts and follow the Six Moon Designs recommendation to re-tension the tent a half an hour after setting it up, that the tent should do an adequate job of shedding snow.
My experience with condensation in the Lunar Solo was kind of a mixed bag as I had good nights and bad nights with respect to the buildup of condensation. Some of the issue may have been the lack of time I spent in setting up the tent after a long day where the venting around the perimeter may not have been at its full height or it could have also been related to camps I made out in the open versus ones where I had more cover from trees.
Another factor could have been that you need to keep the vents around the base of the tent clear for them to function. I am a little bit of a tent slob and gear can end up everywhere and anywhere in the tent, especially since the floor space is available to bring all my gear into the Lunar Solo and this could have played a part in blocking the vents on some of the nights I experienced more condensation.
In the end, I would say the Lunar Solo is really no better or worse then other tent designs I have used with respect to condensation. You tend to notice condensation more in a single-wall tent like the Lunar Solo compared to a double-wall tent because the inner wall of a double wall tent (which is typically mesh on most three-season tents designs available today) keeps you from contacting the outer waterproof wall of the tent that the condensation collects on as you move around inside the tent.

Price
The list price of the Lunar Solo is $200, which I think is a fair price for the basic tent given the weight and functionality of the design. This price needs to be put in perspective as you really need to seal many of the seams, which will cost you an additional $30 if you utilize the Six Moon Designs service (recommended), or around $10 if you do it yourself.
If you purchased everything you needed to set up the Lunar Solo from Six Moon Designs your total cost would be $280 ($200 for the tent, $30 for sealing, $30 for pole, $11 for stakes, and $9 for footprint) which still isn’t too bad, but considering most people use trekking poles and probably have stakes from a previous tent they own, the real price would be $230 for the tent and seam sealing, which is a fair price for a very lightweight spacious tent.
Summary and Recommendation
I really like the Lunar Solo and wouldn’t hesitate recommending it to someone looking for a reasonably priced, lightweight, three-season tent. While the Lunar Solo does require an upfront investment of time to get familiar with setting up the tent consistently, the overall design, excellent floor space, and the use of the new 100 percent Silicone coated Polyester material really make this a great choice for the solo backpacker.
Many thanks to both Trailspace and Six Moon Designs for the opportunity to evaluate and test the Lunar Solo for the Trailspace Gear Review Corps!
Background
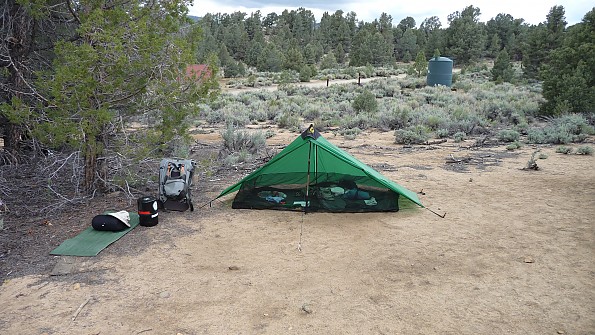
I have been using the Lunar Solo on a number of weekend and longer multi-day trips this past spring and summer in western and central Washington state and also down in the southern Sierras outside of Bishop and Mammoth in California. I have been backpacking since the mid 1970s and have had the opportunity to own and use a variety of tent designs from various outdoor tent manufactures.
Source: received for testing via the Trailspace Review Corps
(Sample for review and testing provided by Six Moon Designs)
![]() Reviewed by
Reviewed by
MuShim
+77
April 12, 2013
Excellent shelter for an extended backpacking trip. Simple, lightweight protection from the elements and bugs.
Pros
- Lightweight
- Excellent bug protection
- Waterproof floor (if seam sealed)
Cons
- Needs to be staked
- Steep learning curve
- Needs an adjustable hiking pole
Lunar Solo from Six Moon Designs
The Six Moon Designs Lunar Solo is a very well designed and lightweight tent for backpackers. It performs all the functions of a tent (shelter from weather, protection from insects, etc.), at the weight of a tarp.
I used a 2009 model Lunar Solo on my thru-hike of the Pacific Crest Trail (PCT) that year. It protected me from sun in the desert, snow in the Sierras, rain on occasion, and clouds of mosquitoes in Yosemite. Overall, I never regretted my shelter choice during my PCT hike.
I still use that same Lunar Solo these days (early 2013). Although it is showing its age, with a little repair from time to time, it is still a reliable solo shelter.
You can buy the Lunar Solo from Six Moon Designs (SMD) either seam sealed from the factory, or save a little cash by seam sealing it yourself. I like the opportunity to save a little by performing the simple stuff myself. I ordered mine not seam sealed and did the waterproofing (seams and floor). That way, if I'm sleeping in my Lunar Solo in the rain and wake up wet, it's my fault.
The engineering of the Lunar Solo looks fairly simple at first glance. A simple single pole teepee type shelter with a hanging tub floor and bug net. You will learn the first few times using it that simple it is not. The Lunar Solo has a steep learning curve and must be set up perfectly for it to function as intended. Putting it up a couple times before taking it to the woods is a mistake.
This shelter requires practice to master with its staked design. Once mastered, you will learn how to improve it even more every time you use it. I switched to longer stakes to get it higher off the ground and improve airflow. Also, the sides must be pulled very taut to maximize space inside. Once you get the hang of the shelter's setup, you will be impressed by its stability and weather resistance.
Condensation is an issue. There is no single wall shelter out there that is immune to condensation. We exhale moisture, and given the right conditions, the moisture will condense on the shelter material above us. The only way to minimize this condensation is through ventilation. The Lunar Solo does a very good job of this with its tarp like construction; however if there is little wind and the air is cool, you will wake up to some dripping.
The Lunar Solo has an amazing amount of room inside for a solo shelter that is supported by a single hiking pole. Staked out perfectly, I have even used it as a two person shelter. We place our packs in the vestibule and have enough room to sleep comfortably. The small pocket in the bug mesh is a nice little feature for storing your headlamp, keys, etc.
The small packed size of the Lunar Solo and lightweight feature makes it my go-to shelter for most of my outings. I use it for backpacking and on overnight kayak trips.
Like most lightweight hiking gear, you have to expect damage during heavy use. I find it funny when someone brags about their latest super ultralight backpack or tarp tent and how much they paid for it. Then, a few weeks later up the trail, I find out they had to go into town to get some of that gear replaced due to damage.
It's simple folks—ultralight gear means less material, less tough material, less stitching, and less reinforcement. It's a trade-off between weight, durability, and comfort. A decision that each person must make for him/herself.
My Lunar Solo has been going strong for four years now. I have had to sew up a few places, patch a few holes, and re-seam seal it on occasion. But given the use I have gotten out of it, I consider this shelter to be one of my better gear decisions.
Source: bought it new
Price Paid: List
 Reviewed by
Oliver Brotherton
+3,050
June 9, 2019 (original May 31, 2019)
A superb weight-saving tent that offers unprecedented head height and stability in high winds.
Pros
- Very lightweight
- Small pack size
- Headroom
- Side entrance (for generous view)
- Generous space for gear
- Compatible with trekking poles
Cons
- Fiddly to erect
- Single skin means you will get condensation
- Pole supplied not 49"
- Not free-standing
- The door does not have a double zip
Having put my doubts about single-skin tents aside, this is fast becoming my favoured tent for backpacking. Its combination of low weight, small pack size, and generous view thanks to the side entrance mean this is an excellent choice for lightweight backpacking.
The website says that it takes time to practise erecting the tent correctly—they are not wrong. I chose a short trip with fine weather to spend a warm lazy evening at the campsite taking it down and putting it up until I mastered it. I found it worked better with a trekking pole, as the carbon pole supplied was an inch too short, so the tent sagged. Using a trekking pole meant I could more precisely adjust how taut the fabric was. I can now erect it in a few minutes. I used my other pole to attach to the guy line above my head to improve the space between me and the tent wall.
Inside, the space is very generous. There is plenty of room for all my gear and sleeping kit. I really like the fact that unlike my Vaude Hogan UL1 I can tie back both sides of the entrance and enjoy a generous view sitting up or lying down. I enjoy the fact I can sit up comfortably or be able to lay back, relax, and enjoy the view. Taller people will find there is enough room to lay down without the need to sleep diagonally. The ground sheet is a little thicker (therefore heavier) than other lightweight tents on the market, but I feel it is worth it as it is more durable and means there is less need for a footprint. There is a handy pouch for essentials and a toggle for hanging things such as a head torch.
There are always trade-offs with lightweight gear and this tent is no exception. The absence of an inner tent means there will be condensation, especially on warm still cloudless nights in the UK once the air has cooled during the night. Add that to what is produced by the occupant and it can become quite wet. That said, in other weather conditions with more wind and cooler temperatures and less humidity, there will be less. Annoyingly the tent door does not have a double zip, so I could not make the vent at the top bigger by undoing the door.
Single skin tents are colder. There is no layer between the inner and fly sheet to trap air and there is a mesh all away around the base on which the fly sheet "floats" to aid ventilation so weight saved may be offset by the need for a warmer therefore heavier sleeping bag.
There was no wind the night I used it, but once erect and tightened the tent felt very solid. The shape of the tent will clearly allow wind to "spill" over it and it should cope with even the worst of conditions. My only concern is that here in the UK rain is often horizontal and driving rain could well enter the tent through the mesh ventilation.
Finally, I was lucky to find a pitch that would take my pegs on the thin chalky soil of the South Downs. This is a huge consideration because if it is not possible to get the pegs in the ground, tent will not stay up! Therefore, choice of pegs is critical in this respect.
Overall, this is a great tent. Whilst it will end up wet on the inside in some weather conditions, its strength, weight, generous space, and small pack size mean it is well worth considering.
Background
A few nights on the South Downs and Dorset Jurassic Coast in the summer. I have owned it for a year or so. This is my first experience of single skin tents.
Source: bought it used
Price Paid: £150
 Reviewed by
Randy Givens
TOP 10 REVIEWER
+704
 March 10, 2010
The space and function of this tent is impressive for its weight. Two people could squeeze in if truly hard up. I'm 5' 11" and can easily sit up tall without pressing my head into the ceiling (peak height is determined by your pole or hiking stick). There's room to scatter my gear along with my pack inside. Ventilation is surprisingly effective.
My last trip had temps into the low 20's and by morning the outside was coated in frozen dew but inside everything was bone dry—not even frost on the inside of the ceiling. I've not used it yet in "warm" wet weather, but expect ventilation to remain more than adequate since one can partially raise the vestibule without exposing the door to rain. And speaking of the vestibule—very simple, clever, adjustable, and huge.
I decided to get the standard floor, as opposed to the optional ultralite floor. I'd feel obligated to use a ground sheet with the ultralite floor and there goes my weight savings, so I'm not using a ground sheet, and have already accepted the inevitable wear spots on the floor. I went back and forth between the floorless Wild Oasis model and the Lunar Solo before settling on the Solo, so there is already part of me waiting for the day when I can cut the floor out without feeling guilty. I decided that having the option of sealing out flying bugs with the mesh door would probably trump the meager ounces saved in weight, so that's how I ended up with the Solo.
Regarding the workmanship I have to concede that there is inconsistency in the quality of Six Moon products. I suppose the owner takes a certain amount of pride in having these things made in the USA, but the flaws I've personally seen in the products strongly suggest at least one novice is let loose constructing these things.
Fortunately I was able to buy mine from an authorized retailer in Portland, Oregon, (The Mountain Shop) so I set it up and spent a long time checking every seam and stitch. My flaw was an errant snip of the scissor that created a 2-mm hole in a very non-critical corner of the bathtub floor—easy to fix with seam seal and the 5% price reduction clinched the deal.
Design: three-season, not free-standing
Sleeps: 1
Ease of Setup: It's not difficult to set up, but it does take repetition to learn to lean the support pole off-vertical away from the tent to get the proper ground clearance around the perimeter of the fly.
Weight: 26 oz, 28 oz with stakes
Price Paid: $195
![]() Reviewed by
Reviewed by
oaeaglescout69
+296
February 9, 2012
I owned an earlier version of this tent that used velcro down the side on the vestibule to close it. The newer one has a zipper in the middle, which would be a great improvement over mine.
Plenty of room, not the easiest to set up, but with a little practice that is resolved. Just like all single-wall tents you will have some condensation at different times.
Bottom line is for about a pound and a half this is fantastic and I tried over and over to get my wife to put a zipper in mine (she wouldn't let me touch her sewing machine), so in the end I sold mine.
Price Paid: $180
Your Review
Where to Buy
You May Like
The Lunar Solo replaced the Six Moon Designs Lunar Solo LE.
Specs
| Price |
MSRP: $260.00 Current Retail: $259.99-$260.00 Historic Range: $174.00-$260.00 Reviewers Paid: $180.00-$303.00 |
| Seasons |
3 |
| Sleeps |
1+ |
| Ships With |
Tent, Stuff Sacks, Guy Lines |
| Pack Size |
11 x 4.5 in |
| Weight |
26 oz / 740 g (not including stakes or poles) |
| Stakes |
6 (sold separately) |