Therm-a-Rest Slacker Hammock House


 Reviewed by
g00se
REVIEW CORPS
+13,274
 April 24, 2017
The Slacker Hammock House is the “grand slam” Therm-a-Rest needed to prove they are a worthy contender in the hammock market. The Hammock House is both a reliable all-in-one system and an exceptional value for the money. I came away from this test greatly impressed and eager to recommend this system to anyone looking to start backpacking with a hammock.
Pros
- Individual components work well together
- Individual components work well independent of the system
- Tarp is large
- Innovative suspension system keeps bug net off your face
- Quality stakes
- Easy to set up
- Spacious stuff sack
- Good price for everything included in the system
Cons
- Heavy
- Tarp intended only to be hung “high”
- Bungee cords on bug net suspension not adjustable
- Non-reflective tarp lines
- Made in China
Because I feel the need to discuss each component of the Hammock House in detail, this is a very long review. If you are not a detail-oriented person, then you can stop with this...
While there are little tweaks that could be done here and there, I found the Hammock House to be a quality system that gives you everything you need as a hammock camper. I went into testing with the assumption this was a “beginners” hammock setup and came out believing this is everything a hammock hanger ever really needs.
________________________________________________________
Testing Parameters:
The Hammock House was tested nine nights during April 2017. Two nights were car camping. One night was in the woods I manage for work. Six nights were backpacking on the Ozark Trail. Rain occurred three of the nine nights of testing. Most photographs were taken while car camping, but most nights of testing were on the trail.
About the Reviewer:
I’m 6'2" and weigh 160 lbs. I’ve been exclusively a hammock camper since 2010. During that time I have slept in and/or tested eight different hammocks, ranging in size from ENO’s tiny Sub7 to my massive DangerBird by DreamHammock.
Specifications:
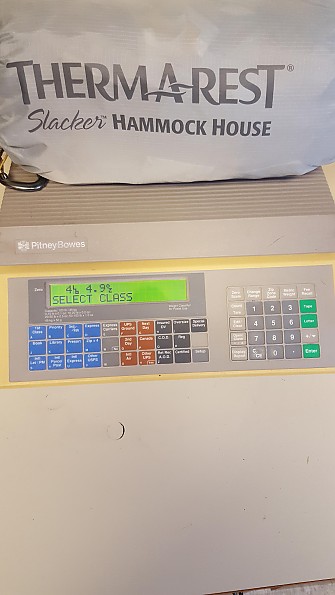
- Weight: (Advertised) 3lbs 10oz (On a postal scale) 4lbs 5oz
- Packed dimension: (Advertised) 9" x 15" (Using a ruler) 6.5" x 15"
- Weight Capacity 400 lbs 0 oz
- Material 100% polyester ripstop
- Country of Origin Made in China
- Hammock Width 64 in
- Hammock Length 124 in (This is a bit deceptive. The body of the hammock measures 112". The extra foot is from adding in the sewn loops and carabiners. For all intents and purposes, this is a 9' hammock.)
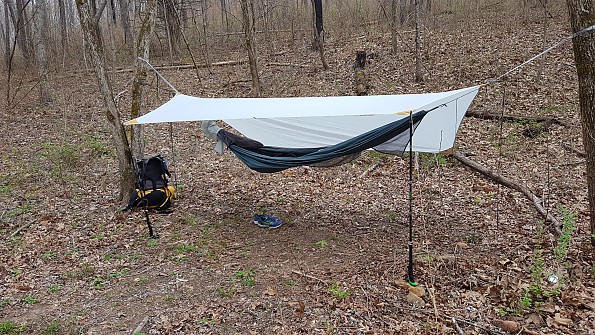
The Hammock House System
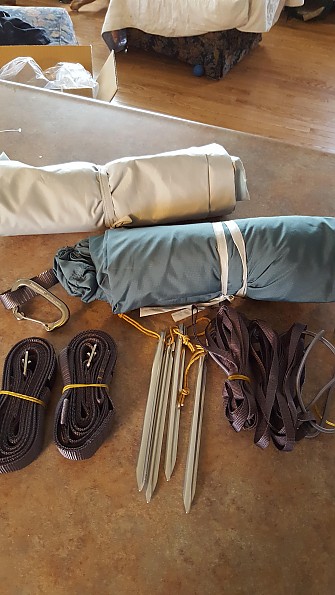
The entire set up arrived in a 6.5" by 15" stuff sack. Placed on an official postage scale the system weighed 4 lbs 4.9 oz, which is nearly 9 ounces heavier than advertised (I will discuss weight issues as they pertain to individual components).

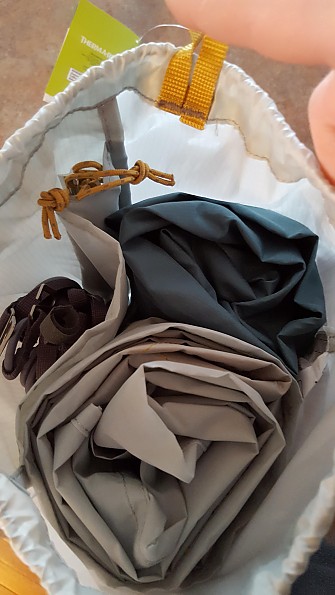
Inside the stuff sack, all the components of the system were neatly arranged. One of the pros to the Hammock House is that this stuff sack is large enough to stuff everything back in without fighting for space or trying to reproduce factory folding. The stakes and straps have their own separate compartments in the stuff sack. Although I was hesitant to carry the stakes with the hammock and tarp, I never had any wear issues in the bag.
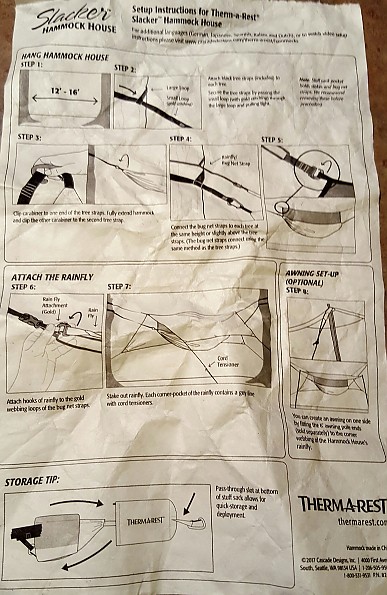
 Attached to the inside of the stuff sack are clear instructions on how to set up each component of the system. If you are new to hammock hanging, you will find these instructions helpful (also check my "Hammock Hanging 101" discussion at the bottom of this review). For the experienced hanger, there are a few parts of the system that will make more sense after a quick read through.
Another nice feature of the stuff sack is one of the carabiners feeds though a slot in the end. So, the sack never has to be completely removed from the hammock.
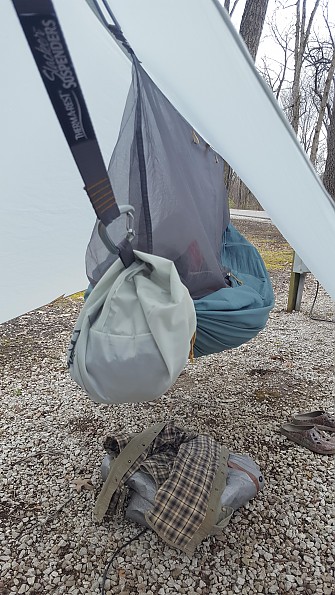
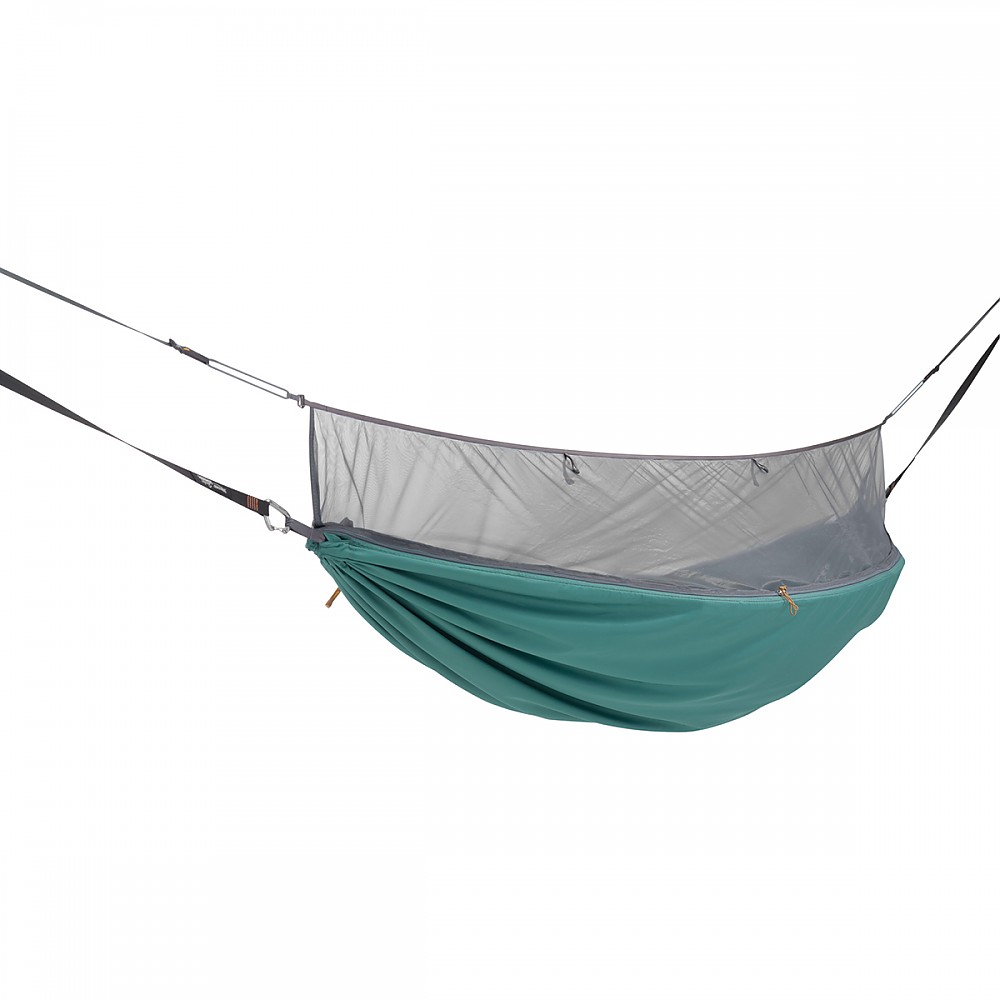
Out of the stuff sack the complete system can be viewed. At top is the tarp. The sage colored item with the carabiner is the hammock with integrated bug net. At bottom left are the two tree straps. Four stakes are in the middle, with the combination tarp/bug net straps on the right.
Component #1: The Hammock
I still get a lot of grief on YouTube for my mediocre review of TaR’s Slacker Hammock. I actually had to delete comments from folks. Who knew people would be so offended that I did not like that hammock!
The bug net version of the Slacker is much improved, and much more comfortable. However, it is the weak point of the system. I slept well in this hammock, but of the various bug net hammocks I have used, this is still my least favorite. The lay is simply not as comfortable as Dream Hammock, Clark, or Grand Trunk.
Some have asked me why the Slacker is less comfortable, and I do not have an answer for them. I’m not a manufacturer or designer. I just know other comparable hammocks are more comfortable.
Having said all that, if you told me this was the last hammock I could ever use, I would not have an issue with that. It is a good, decent hammock, and much better than the original Slacker I tested.
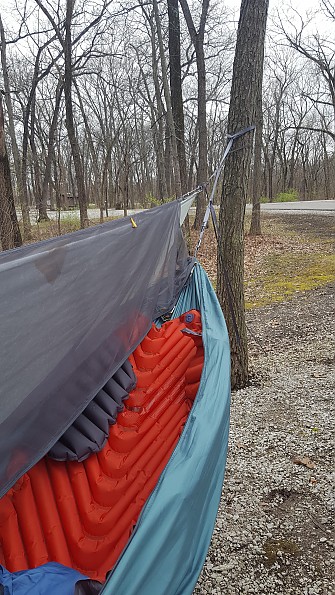
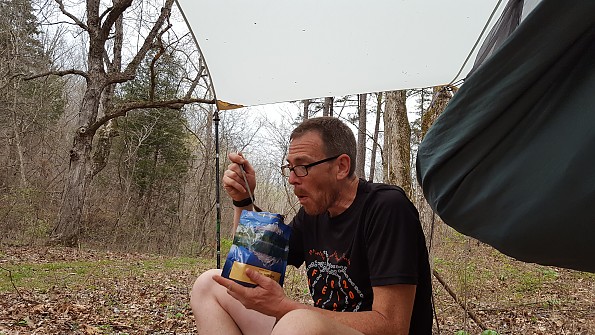
In lieu of an integrated ridgeline and organizer (proprietary ownership by Hennessy Hammocks), the hammock has a mesh pocket on each end of the hammock. These two pockets measured 6" deep by 12" wide, and were plenty large to hold everything I wanted with me at night—headlamp, phone, maps, hygiene kit, snacks, and etc.
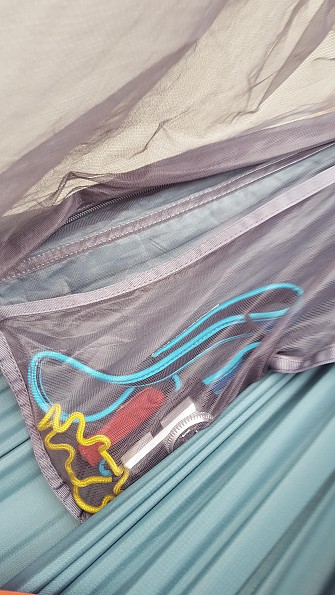
The bug net allows entry and exit from only one side of the hammock. However, the net can be rolled up and clipped out of the way when it is not needed or desired. This is a feature absent from Grand Trunk’s Skeeter Beeter Pro hammock. The zipper rarely snagged on me, and was easily fixed the couple of times that did occur.
A nice feature on the zipper is that the internal pulls are long, flat pieces of nylon. This translated into being easy to find and reach in the middle of the night, without the need to turn on my headlamp. The external pulls are smaller and typical to what you find on tent zippers.

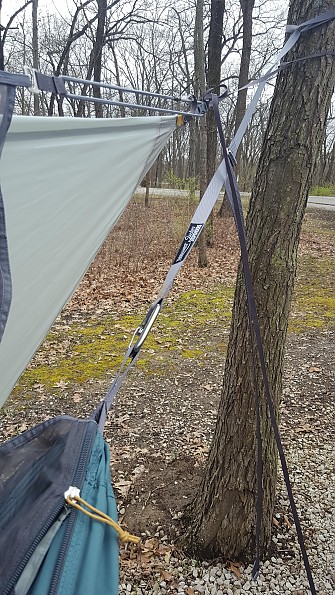
Component #2: Straps for Tarp & Bug Net
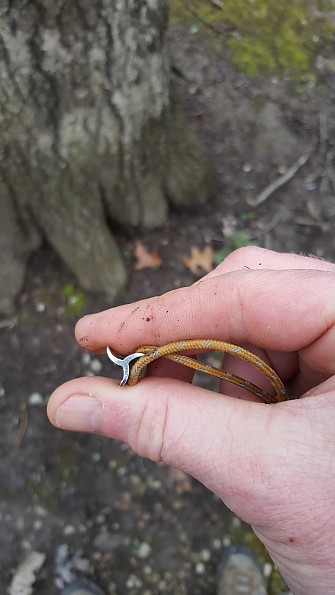
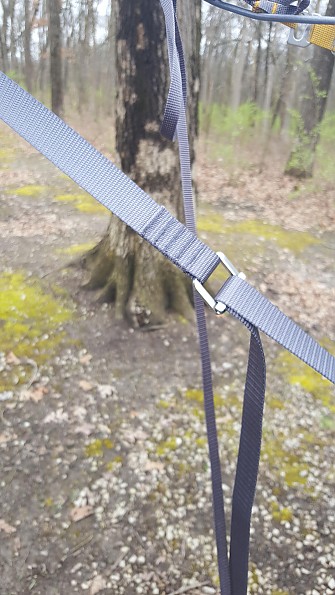
Before I jump to the tarp, I need to discuss how the bug net is hung, and this is an integrated component. Half inch flat webbing girth hitches around the tree through a sewn loop. A plastic buckle clips in and extends to both the tarp (via a second sewn loop) and the bug net (via a bungee cord). See the picture below.
Here is the tarp attached to the strap.
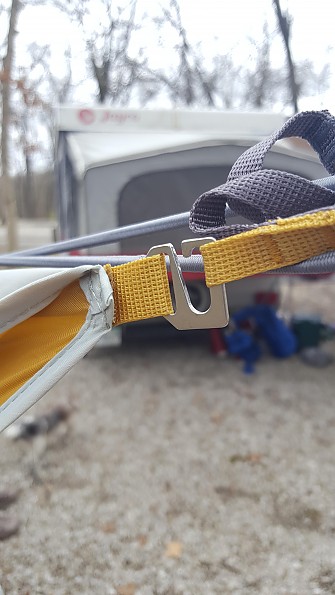
And here is the bug net attached to the bungee.

Overall, I really like this dual-purpose component. It allowed for a quick and easy setup of the tarp and bug net. I do question how long the plastic buckle will last, as there is a lot of tension when the tarp is drawn tight.
One con to this set up is Therm-a-Rest expects the user to always hang the tarp above the hammock’s tree straps. Hangers know that when weather is wet and windy, you want to hang the tarp lower than this. While that is an easy fix (strap the hammock off center of the tree), the bungee cords to the bug net are too long for this. I sidestepped this problem by pulling the bungees past the plastic buckle and using the leftover webbing to tie it off. It would have been nice to simply have an adjustable bungee.
Component #3: The Tarp
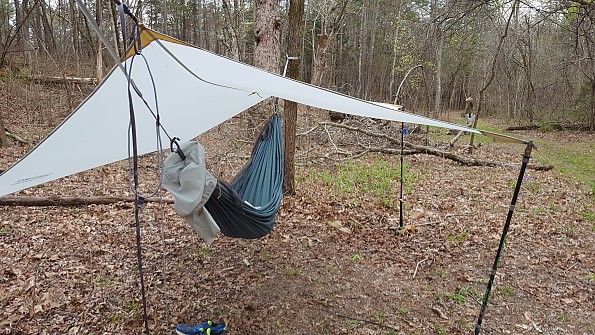
By far, my favorite component of the Hammock House system is the large 11' 6" x 6' 8" rain fly. At 15.5oz, the tarp is not overly heavy, and it provides generous coverage.
Material is 70D polyester ripstop with a polyurethane coating. I camped in three nights of rain. Two of those nights were "Oh crap! Am I going to need to build an Ark?" kind of rain. Yet I remained completely dry. [Side note: Regardless of how roomy the stuff sack is, you don't want to shove your wet tarp and tree straps in with your dry hammock!]
As shipped, the tarp has four tie outs on the corners. Two extra tie out points are sewn into the tarp, one in the middle of each side. So, in extra windy conditions, additional lines can be added.
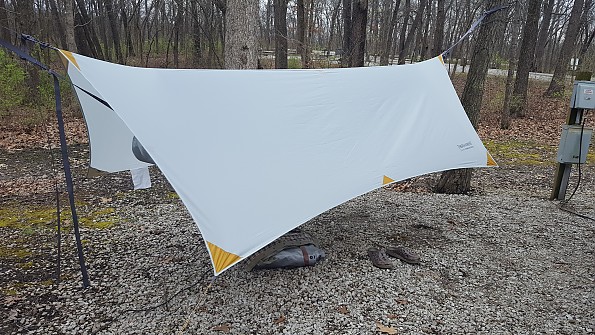
By using trekking poles at the corners (the pulls are intentionally sewn to accommodate your poles) you have plenty of room to raise the roof and sit under it while you cook your dinner in the rain.
 It’s raining. I’m dry.
An additional feature to the tarp are four pockets (one at each corner) to store the guy lines. This ensured I never had tangled lines when I went to deploy it.
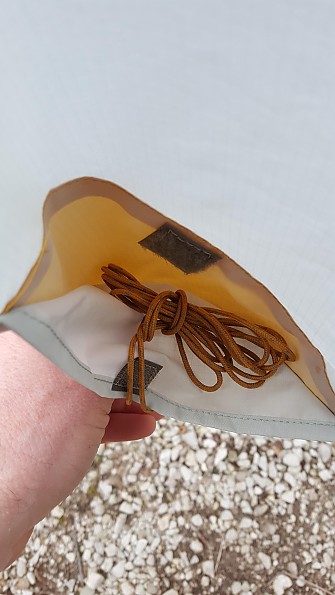
The lines themselves are tensioned with a metal buckle. These never slipped in hard winds, even when wet. The one thing I would like to see in these lines would be reflective material to keep from tripping over them in the dark. After two nights on the trail, I got into the habit of putting fallen branches beside the lines so that I didn’t walk into them.

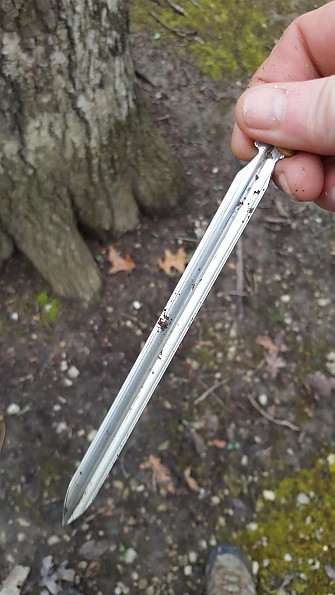
Component #4: The Stakes
Wow! I’m so use to getting cheap j-stakes (or NO stakes) with tarps and tents, I was not expecting four stakes that rival MSR Groundhogs. By rival, I mean there is a curve in these stakes (see pic below) that may hold the ground a bit better. In any case, these stakes held in some pretty gusty winds. Again, I would have liked the cords to be reflective (as the Groundhog stakes are).
Component #5: Hammock Suspension
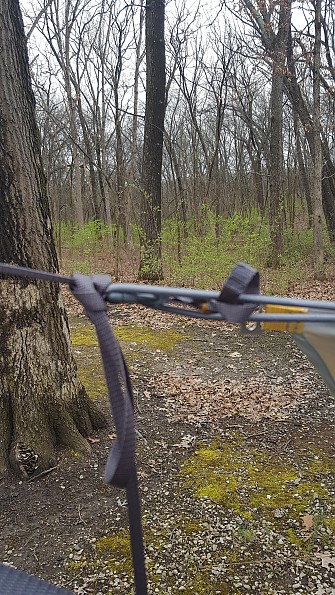
The Hammock House uses long webbing with an adjustable buckle for its suspension. The straps are wrapped around each tree, and the 1.1oz carabiners clip into the straps. Then the straps are pulled to the right amount of tension (most hammock hangers prefer a 30-degree angle on the straps).
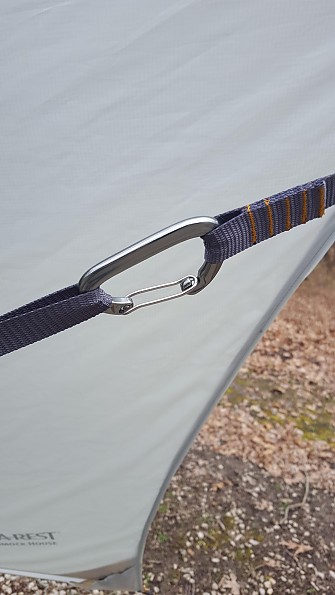
The suspension works very well. However, it strikes me as unnecessarily heavy. Carabiners and straps combine come to a whopping 13.45oz. That is 20% of the entire Hammock House's weight! While I was content to use the suspension when car camping, when it came time to hit the trail, I switched the straps with ENO’s Helios Suspension System and the carabiners from my Sub7 hammock (5.4oz total), and shaved a half pound off the weight.
I want to emphasize there was nothing to dislike about the Hammock House’s suspension. As soon as I returned from the Ozark Trail, I put the straps back with the system. When weight is not an issue, these are great straps to use.
Price & Value
If you read many of my reviews, you’ll note I often list the price of items as a con. We’ve just gotten used to paying ridiculously high prices for the names sewn on our gear (I’m looking at you, North Face!). But at $200, the Hammock House is a good value. Consider the following: GrandTrunk SkeeterBeater Pro-$95. ENO ProFly-$80. ENO Atlas Straps-$30. 4 Groundhog Stakes-$12. Total-$217.
However, even if you switched out components and got the price below $200, the entirety of the system makes the price a great value.
In Conclusion
There is a lot to like about SaR’s Hammock House. If you are looking to move into hammock camping, this is basically everything you need aside from bottom insulation. If you already have a hammock setup, keep this one in mind for when it is time to start replacing components.
________________________________________
Hammock Hanging 101
I regularly encounter folks who don't know the optimal way to lie in a hammock. Most new hangers climb into a hammock and hang folded like a banana. They put their head at one end and their feet at the other, lying in a straight line. This is how I started sleeping in a hammock, and I complained about my sore back.
The right way to sleep in a hammock is at a diagonal slant to the hammock. This lay flattens the hammock out, making for a comfortable night's rest. Hammock hangers call this the "Sweet Spot." During winter hiking, I have spent as much as 12 hours lying in a hammock (sleeping, reading, etc.) without any of the discomfort I find in lying in my bed too long.
Here's an illustration I made up for you visual folks:
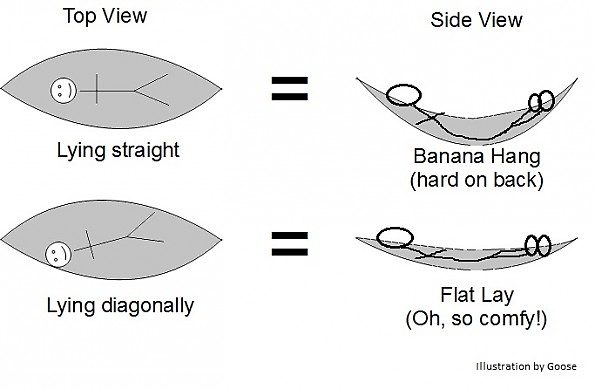
No, I'm not very artistic.
It is very difficult for a tall or wide person to achieve a flat hang in a small hammock. Some folk attempt to get a flatter lay by tightening the hammock so it is already hanging flat. However, this puts too much sheer force on the hammock, lines, and trees. I have read several accounts of folks ripping out an overly-tight hammock. Derek Hansen has a terrific tool to help you figure out the right angle for hanging your hammock over at his website: http://theultimatehang.com/hammock-hang-calculator.
Source: received for testing via the Trailspace Review Corps
(Sample provided by Therm-a-Rest for testing and review)