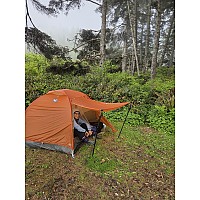
Hilleberg Nallo 3


 Reviewed by
Vladimir Gorbunov
TOP 25 REVIEWER
+3,273
 January 15, 2020
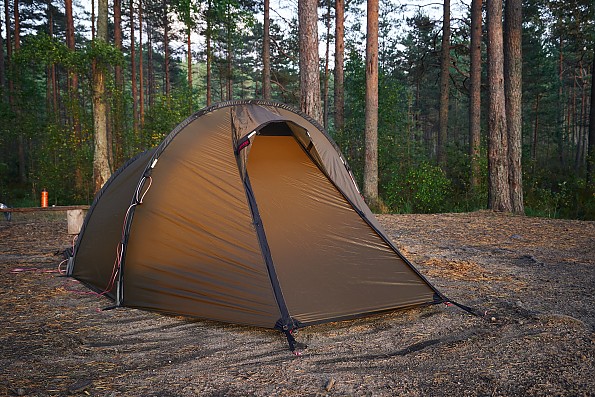
The Nallo 3 is a well suitable tent for weight-conscious trips in severe conditions, offering comfort, weather resistance, and durability in a reasonably lightweight package. It's probably the best “compact” tent for my personal tasks. But the best tent isn’t good enough—I cannot get to become friends with its entrance. Also the living space is rather limited for three occupants.
Pros
- One of the best combinations of weight, room, weather resistance, and durability
- Very strong fabrics
- Easy to pitch alone in all weather conditions, takes just 3 minutes in most cases
- Good attention to fine details
- Does not require more than 4 pegs in calm weather
- Fully adjustable and reasonably versatile ventilation
- Huge vestibule volume and area, tall entrance
- Various installation options, like single-layer tent or light weather shelter
Cons
- Over-engineered entrance is inconvenient, limiting the vestibule usefulness, zippers are somewhat difficult to reach
- Pitching on bare rock, snow and sand may be challenging
- Too little volume and width in the rear part of the tent — a bit tight for 3 people
- May require a mesh inner in very warm conditions
- Not great for tall people in wet weather
- Rain and snow are pooling on footprint with rear vent opened
Background
Me, my wife and son (he’s almost 5 at the moment of me writing this) enjoy year-round backcountry trips on bicycles. In warm period we spend almost every weekend in backcountry, also each year we make 1-2 longer bicycle trips abroad — usually for two weeks. Our primary tent since 2016 is a Hilleberg Kaitum 3 (there’s about 130 nights on its account), which is ideal for such a use case; it’s well covered in my long-time review, updated recently.
In cold period we continue our weekend trips — of course, considering the weather, we may or may not leave our son at home. We travel on foot mostly, and this makes necessary a lighter tent, which would better be small for additional warmth.
I purchased the Nallo 3 after over two years of using the roughly similar Fjallraven Abisko Lite 3, there's my review of this tent. Please consider those two reviews, as they may contain some useful information about tents of such design, which is omitted in this one.
In 2019 I decided that the Abisko tent, being nice and lightweight (2.4 kg measured weight — 5.3 lbs), is too specialized for me (Abisko-Kaitum usage ratio was around 1:10), and Nallo 3 (2.6 kg stated weight — 5.7 lbs) would serve me better in a variety of situations, where Abisko was less than optimal. With a bit of luck with discounts I got the Nallo 3 for about 30% cheaper than the European RRP of €945.
***
Overview and Materials
The tent comes in the bag of reasonable size (58x20 cm nominal). The actual packed size is 18x50 cm, or 7x20 in, which is well in line with size of pitched tent. The package looks neither small nor huge (unlike the Kaitum 3, which is huge). The actual measured weight was a bit bigger (by 100 grams or 3.8%) than stated 2600 g (5.7 lbs), which isn’t a big deal. There’s a good color instruction booklet included, which covers every step of tent setup and general usage. It can be also downloaded from the manufacturer’s website, and it’s also supported by tutorial video for this particular model. Considering the tent price, such a level of support is more than welcome.
This tent is made of top-of-the-line materials, which applies basically to every piece in the package. The Kerlon outer tent fabric is 10 times stronger than that found in most modern lightweight tents (10 kg vs. 1 kg tensile strength), yet it’s still lightweight at 30D density. The inner tent and mesh are also durable enough, but I’ve experienced the stretching of sewing holes in Kaitum inner tent here and there. The floor is durable too at 70D, with perfectly taped seams.
Because the outer tent is made of two-sided silicone-coated nylon, it’s impossible to have its seams taped on factory. Although they are pretty much watertight, our Kaitum started minor dripping into the vestibule after about 60 nights. Sealing the seams is quite easy, the sealant and instructions can be provided by Hilleberg Support. I’d recommend sealing the seams after the first couple of seasons, or before a trip with extremely wet weather expected, otherwise don’t bother with this.
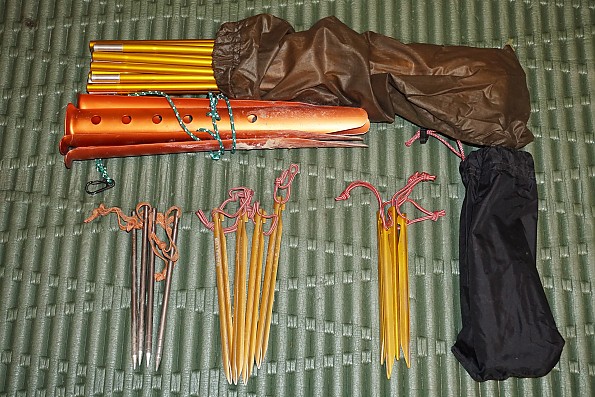
The poles are simply the best available—DAC Featherlite NSL, 9 mm. They are lightweight, strong, pre-bent on factory. The thickness of aluminum is just around 0.5 mm, so extra care shall be taken. There’s a spare pole section supplied with the tent.
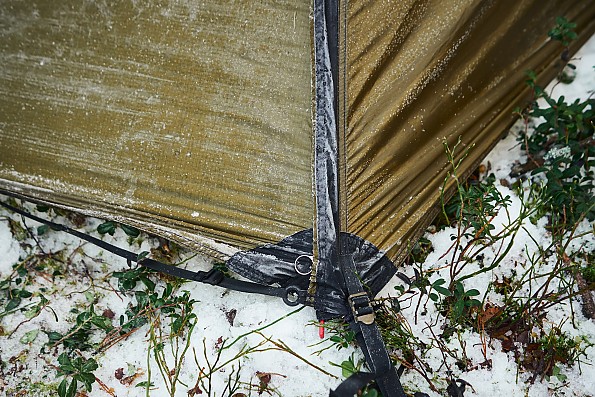
The tent comes with 16 pcs. of stakes. They are also really nice—DAC J-stakes (reviewed by me), they represent good combination of holding power and weight for smaller tents. Though for Nallo 3 they may feel a bit too small sometimes.
The tent is equipped with four dual guylines (with two tensioners on each—also reviewed by me) made of 3-mm nylon cord interwoven with Spectra thread, extremely strong. Also there’s a single short guyline on the back. No guylines on the front though.
All bags supplied with the tent are of great quality. Though the tent bag is made from thin fabric, which gets worn over time. Also the tent bag is somewhat oversized for the easiest possible packaging in frozen conditions, with attached footprint.
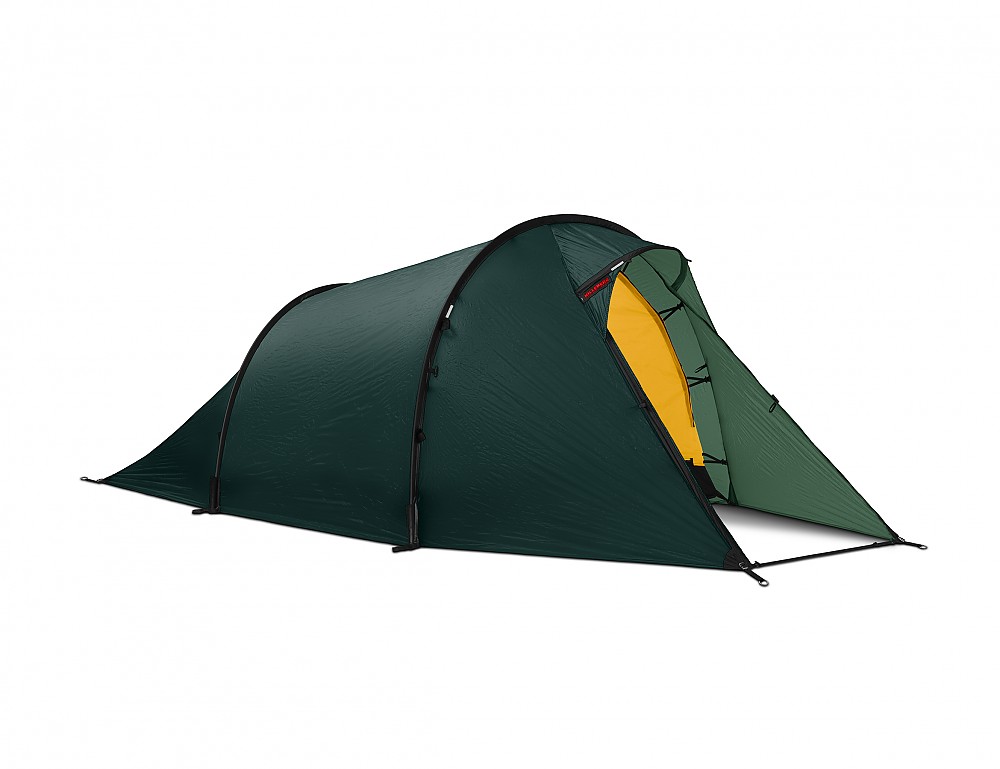
There are three possible color options:
-
Green — very dark one, almost black under some kinds of light. Good for those who need a really dark tent. Overall look may not be to everyone’s taste.
-
Sand — my preferred option for average user. It looks very nice, and at the same time it blends with surroundings very well.
-
Red — for those who need showing themselves, especially in remote areas and dangerous trips, where SAR may be required. Looks great on photos.
***
After purchase
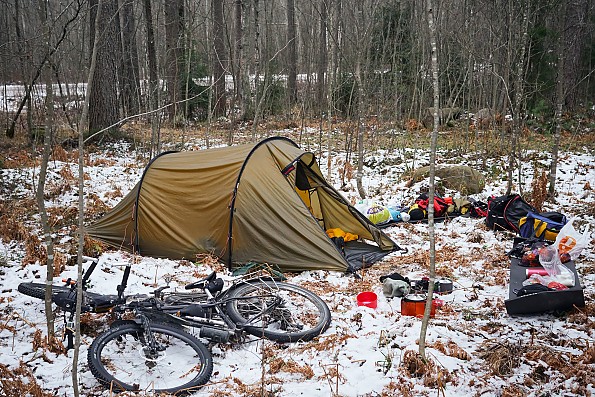
 Tent accessories: TiTo nails, bigger Y-pegs, stock J-stakes, snow pegs with carabiners, a bag of poles (borrowed from Kaitum)
The first thing I do with a new Hilleberg tent is adding the cord pullers to zippers—in this manner they are easier to grab, and also they don’t rattle. Inner vent zippers shall have a varied cord type to be recognizable in darkness. And also I add short cord loops to the side peg attachments to avoid abrasion and wear. In the Kaitum tent I also replaced the guylines to bright yellow 1.2 mm Dyneema cord (reviewed by me), which saves a lot of volume and is more visible, while retaining strength. Though I passed this in Nallo.
Also I purchased the footprint and smaller sized “XP” tent bag (made of two times heavier fabric), because in cycling trips the stock lightweight bag gets premature wear, and it also has a loose fit, which isn't good in cycling either. (But it’s good in winter, when there’s a lot of snow and ice inside the tent due to condensation, and the tent is difficult to pack.)
Finally, I’ve equipped the tent with four Hilleberg Y-pegs, which have better hold than stock J-stakes, and six titanium nails (6x165 mm) by TiTo for rocky/frozen ground. Sand/snow pegs are also ready to be used if I predict the conditions for them.
***
Pitching
 Right before raising of the tent
The tent is set up very quickly because of interconnected inner and outer parts—in favorable conditions it’s done in less than three minutes. Unfavorable conditions mean that you cannot use pegs easily, so it’s better to think about it in advance before the trip:
-
For pitching on rocky, hard-packed, or frozen ground I use titanium nails.
-
If expecting the setup on sand or snow, I take those big snow stakes with attached carabiners.
-
In really challenging conditions (like bare rock) I can use two bicycles as anchors, or some big boulders, depending on their availability.
The setup process is very easy after you learned the sequence:
-
Spread the tent on the ground.
-
Assemble the poles.
-
Insert each pole into the sleeve completely, then attach the cup on the free end of the pole and pull the tension strap.
-
Fix an end of the tent with two pegs.
-
Pull another end—the tent will stand upright. Fix it with two more pegs.
-
Tighten four adjustment straps on each peg, starting from the door (otherwise its doorband will be hanging in mid-air, acting as tripwire). In the end the tension shall be quite strong.
See my video with Kaitum 3 setup, which shares the same general design with Nallo, plus one more pole.
This takes three minutes on good ground. Then you may add more pegs and guylines, depending on expected conditions, starting from the peg in the middle of the back side. The tent is pitched quite tautly, there’s no sag at the roof, which is difficult to avoid in bigger Kaitum 3 tent.
Many people complain about the need for the stakes to pitch this tent, completely forgetting about the fact that their freestanding tents also require 2-4 or even more pegs for pitching (securing the vestibules, holding the outer fabric away from inner etc.). In my experience, Big Agnes Seedhouse SL2 holds the record with 11 pegs required for correct pitching. Also every tent shall be secured in place from flying away, which sometimes happens even in the middle of a forest, not mentioning wide open areas. So using the four pegs for pitching the Nallo (as well as every other tunnel Hilleberg tent) is definitely not a problem. I sold my last freestanding tent in January, 2017.
By design, there are several possible setup options:
-
Normal tent, pitched in single piece.
-
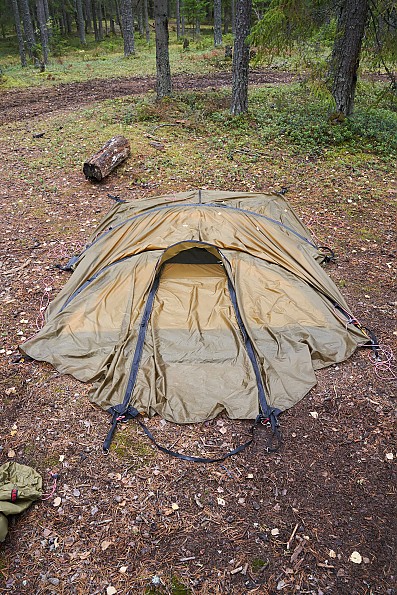
Rainfly only (aka floorless shelter). The ends of the poles are held together with permanently attached cord. It’s good for hiding from the rain in the middle of the day, or, for packing your gear before leaving the spot. There’s enough place for six people inside such a shelter.
-
Single-layer tent (advanced shelter with floor)—with separately purchased footprint. It’s drier and more comfortable than a floorless shelter.
-
Inner tent only—with separately purchased holders. Unlike traditional tents, it’s the least useful option, to my taste, as there’s no pitching time saving in comparison to normal tent, and also for attaching the rainfly you’ll need to disassemble and assemble everything completely.
For the most extreme scenarios you may purchase additional pole set (400 g weight—less than 1 lb) and install the tent on double poles—for such a case I can borrow the poles from my Kaitum 3, which are of similar length. If we travel to Iceland again, I’ll take these poles for extra security.
In summary, I really like the process of pitching and disassembling this tent, because even in strong wind it’s made very easily by one person, and unlike the traditional designs, there’s zero tendency of the tent flying away or breaking in the middle of pitching. Also most operations can be performed in thick gloves, save for operating tiny toggles and hooks securing the folded doors, vents, and so on. Generally the process is the same for all Hilleberg tunnel tents (the only difference is the number of poles), and Fjallraven too, but in our Abisko Lite the front pole was made too long, and its securing and tightening required enormous efforts.
***
Outside the tent
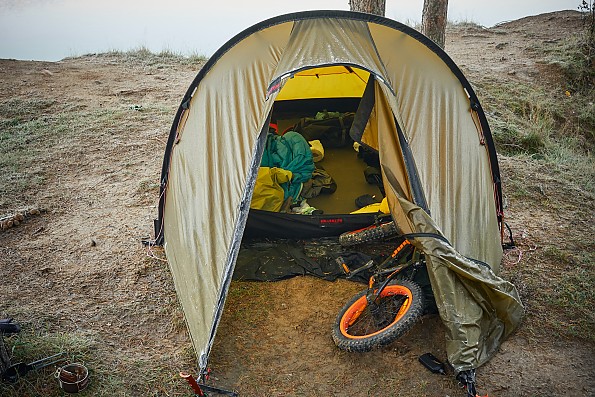 16" kids' bike fits inside the vestibule
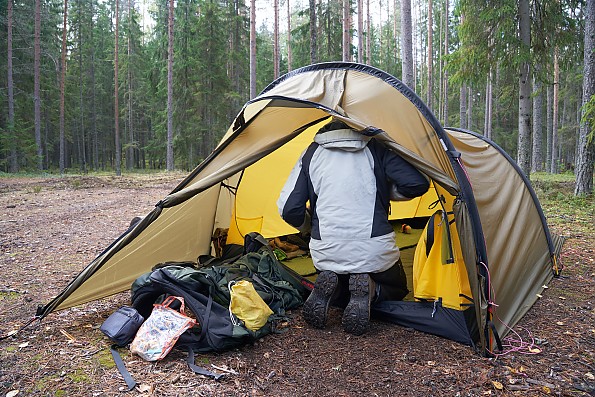
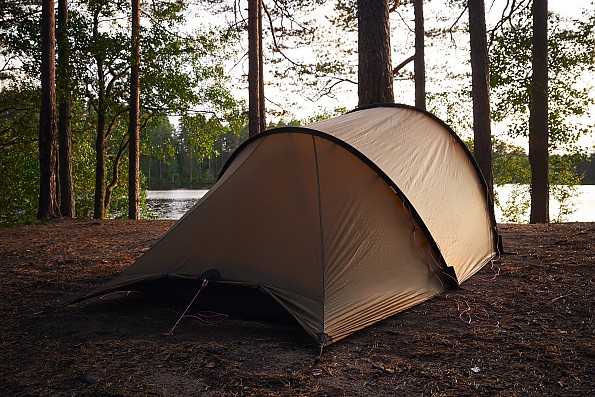
The tent entrance is made not like other Hilleberg tunnel tents (which benefit from side entrance and separate ventilation window, if applicable). Here the entrance is located right in the middle of vestibule under the hood and represents a huge and especially tall П-shaped door. Thanks to as much as FOUR sliders on single zipper, it can be opened from above, from below, from either side. An opening from above also serves as ventilation window. There’s a door band on the bottom, which keeps the entrance in proper shape, but it may serve as a trip-wire if the tent isn’t tensioned carefully.
 Side opening (works unsatisfactory)
After opening and securing the door with elastic loops (available on both sides too) there’s not much left of vestibule walls, and protection for the gear is rather limited. To avoid this, you can do a certain trick with front peg, and open the vestibule from either side. A nice idea, but there’s a caveat: in this case while closing the door from inside, the zipper chews the protective fabric flap (of black color) really badly! And this cannot be avoided easily. Such a thing also happened in my MSR Hoop tent, if trying to open the vestibule from “wrong” side. So after trying it once, we embraced the center opening.
Bicycle seat in vestibule
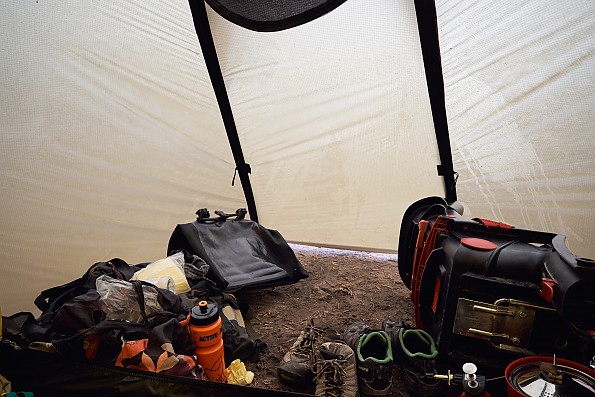
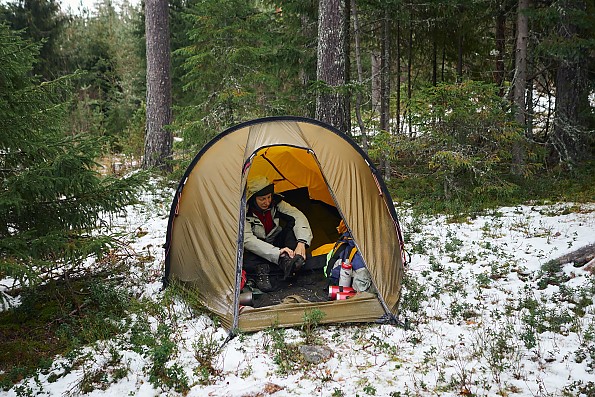
The vestibule itself is huge, it easily accommodates the 16-inch kids’ bike, plus two adult backpacks, plus some other gear, plus adult sitting inside the vestibule. With fully loaded vestibule there’s still enough area to exit and enter the tent. This is common for all tunnel tents with “regular” vestibules, and actually I don’t feel any need in GT vestibule. Even a single “regular” vestibule is more than enough for two people carrying the gear on their backs. The vestibule is tall enough to accommodate two adults sitting inside.
***
Center entrance
 An option for the easiest possible access
Actually, I’m not a huge fan of center entrance design in Nallo (as opposed to side entrance in Kaitum, Nammatj, Keron and Anjan since 2017, plus our old Fjallraven Abisko Lite) due to numerous reasons:
-
It limits the available area in vestibule for gear storage.
-
It allows too little protection from rain for everything which is stored in vestibule.
-
While opening the door from inside you need to crawl to the far corner of vestibule, wiping the condensate with your hair.
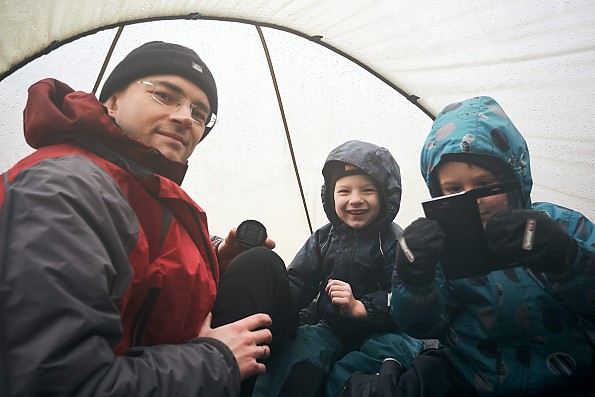
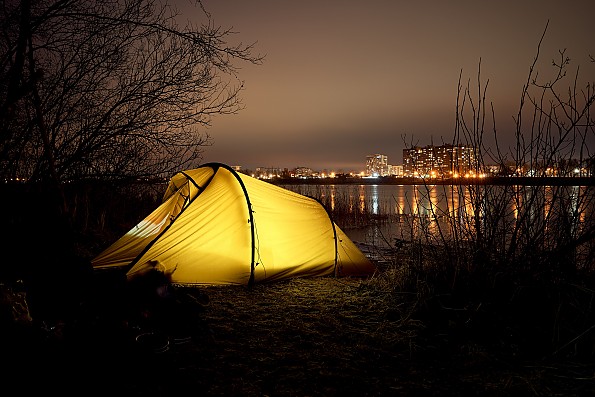
But! There’s a huge advantage of such a design in winter. In some conditions the bottom of the zipper may become covered by ice, or even freeze into snow. Thus the sliders become barely movable, and opening the door becomes tricky (and potentially damaging to the zippers). But in Nallo you simply open the door from the top. Quite clever! Also the entrance is very tall (110+ cm—see the first photo in this review), which is unusual for backcountry tents in general.
 We had to open from above after the zippers froze in place
Actually opening the door from above is also the preferred option if you don’t like crawling to the end of the vestibule, but there are two caveats: one can trip over the door strip (which also lies on the ground or footprint—not good for zippers!), and also opening-closing the door from the top is really inconvenient from outside.
Overall, in my opinion, the entrance design of Nallo is a single considerable inconsistency of this tent, and it’s better to have a side one, like in Keron, Nammatj, Kaitum, and even Anjan (which also had center entrance until 2017).
***
Ventilation
The ventilated part of outer door is clearly seen
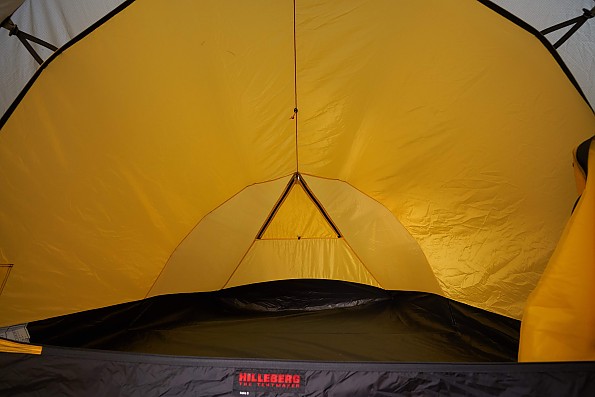
This tent has versatile ventilation, adequate for any conditions except for the warmest nights (for such cases you’d better get an optional mesh inner). The outer ventilation consists of hooded window, which doubles as an upper part of outer door. This window is covered with breathable fabric panel, and its hood is held by wire frame (after two years with Kaitum, I really like this little touch). Although the hood is not supported by guylines in stock tent, there’s a couple of loops for DIY guylines if someone really needs them. This window can be easily accessed from inside the tent.
On the back there’s another two-part window at the very bottom of outer tent, and it cannot be accessed from inside. On the photos it’s shown that the back vent is held in place by short guyline, but actually it’s not mandatory, and you may live with just four pegs on the tent corners. I’m not a fan of back vent, because it has a somewhat limited effectiveness, impossible to adjust from inside, and opening the vent causes water/snow pooling on the footprint, which extends from the inner tent. Obviously such a design was implemented for weight savings.
 A photo borrowed from Kaitum, which has similar inner entrance
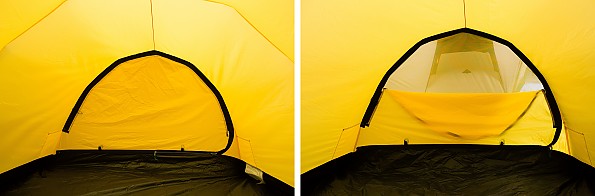
The inner tent is made of solid nylon. There’s a huge ventilation window in the door (almost as big as the door itself), and a smaller triangular window at the back. Both windows can be opened or closed completely, there are hooks and loops for securing the fabric.
Overall, I’m quite happy with the ventilation, but in Kaitum (or Nammatj, or Keron) it’s made a bit more effective. In very warm weather with three people inside you may feel the need for optional mesh inner. Though I haven’t had any warm nights so far in this tent, so I’ll update this section in summer 2020.
***
Inside the tent
The inner door is opened in the usual way from the left (if looking from outside), it’s not the debatable “rainbow” design, which falls on the floor. The opened door usually occupies the corner of the tent, as the pocket is not designed to bear such volume (forcing the door into pocket may over-stretch the sewing holes), and securing the door with elastics and hooks is a bit bothersome.
There’s not as much room inside as in two-sided tunnel tents, like Keron or Kaitum. Only the front half (actually, around 55%) of the tent has full sitting height and wide enough for three regular pads, while in the rear part the ceiling quickly drops to the ground, and the farthest part of the inner tent is good only for gear storage. Thus, the effective length of this tent (where you can lay without brushing the ceiling with footbox of sleeping bag) is shorter than stated — about 190 cm (6'3"). So taller persons, like me at 184 cm, shall lay with their heads directly near the door. Limited tent height may bother those with very thick pads (ours are just 15-25 mm).
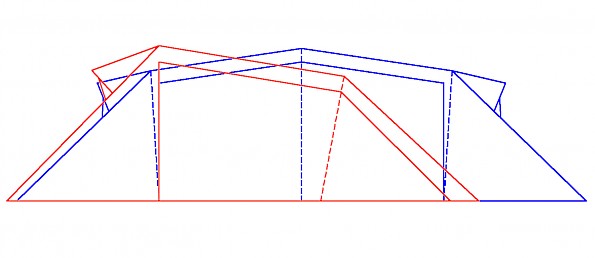
A sketch clearly shows the difference in inner volume between Nallo 3 and Kaitum 3
In the rear half of the tent the floor is tapered, so using the tapered pads is welcome (or in case with foam pads there’ll be some overlap, which is not as bothersome, as we feared back in 2016).
In real world use, this tent feels roomy for two persons sitting side-by-side in the front. It’s higher than Abisko Lite 3 by 10 cm, and that difference really matters in winter, when the more you touch the inner tent, the more water you collect. So overall, while this tent feels a bit tight for three persons, it’s OK for a couple even for long trips, and of course it a palace for single occupant. We’re absolutely happy with inner dimensions, as we needed the tent on the smaller side.
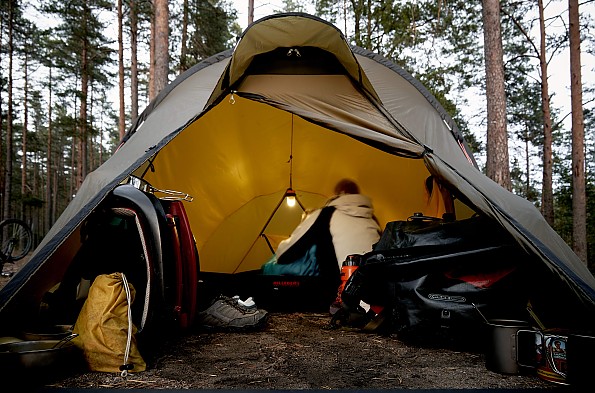
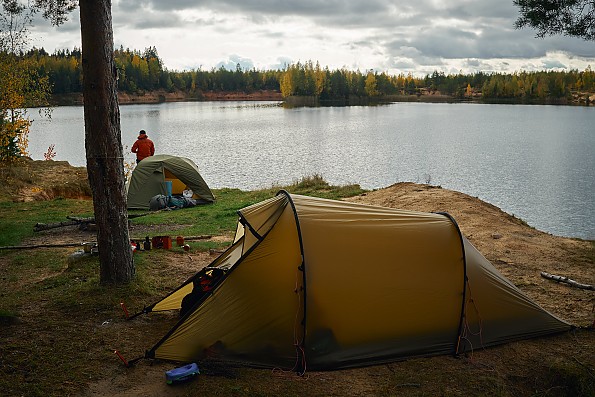
 Hiding from rain in shelter mode, there were five of us inside
Speaking of other features, inside the tent there are two mesh pockets near the door, and also the clothes-line on ceiling in the front part. It would be nice to see the number of pockets matching the designated number of occupants, but Hilleberg doesn’t work this way, unlike Fjallraven.
***
Weather resistance (in winter)
This tent is among the best of all, when talking about the weather resistance. The German Outdoor magazine measured the wind resistance from all sides, and according to their findings, this tent’s breaking wind force is 120 km/h (33 m/s or 75 mph). Though it’s very unlikely that we’ll ever expose this tent to winds of such force, because at 30 m/s the trees start falling, and no tent will save from them.
Throughout the 130 nights in our Kaitum 3 we were extremely satisfied by its weather resistance (after 60 nights I fixed the minor dripping in vestibule with sealant), so I expect no less from Nallo 3 in the long term. A possible issue with tunnel tents is their static strength, as they don’t handle the snow load well (e.g. over 15 cm of wet snowfall during the night). Though our region isn’t snowy, so not a great deal.
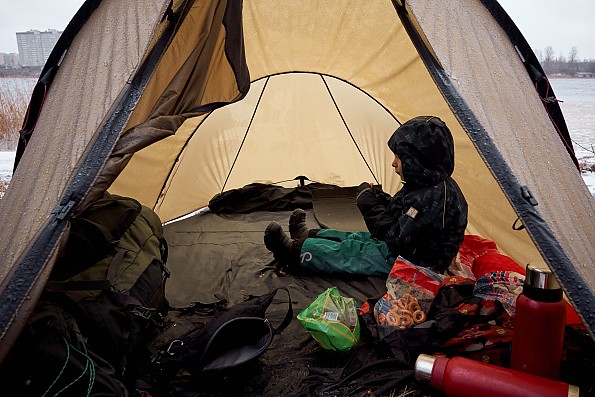
So far we’ve had only winter experience with Nallo 3, with temperatures down to minus 12°C (10 °F), some minor snow, and cold rains and winds. In our three-day winter trip to Finland with Nallo 3, unusually for us, we were opening the ventilation as much as possible to reduce humidity inside the tent. Nevertheless, we brought home 100 ml of water inside each of our down sleeping bags (about 7% of bag weight) after three nights. That’s not the tent’s fault—just pure physics. Notably, many people don’t know about potential condensation issues, and treat the water inside the tent as a leaking fabric. Especially after making the transition from a three-season to a four-season tent.
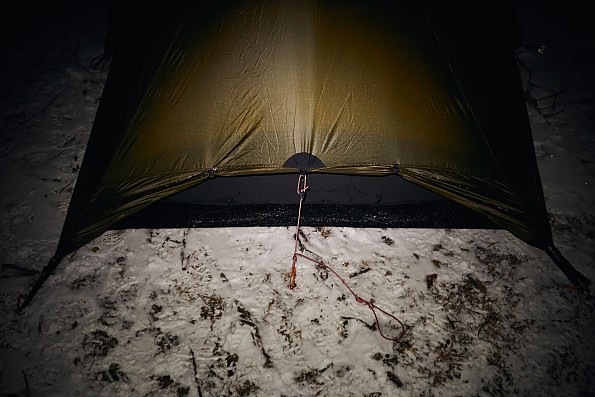
 The wind noticeably fills the tent with air, but still it was very easy to pack it down
On a freezing-cold night after a really wet weather I was lucky that the tent door can be opened from above, because everything has frozen, including the zippers in the bottom. This situation repeated after a night in minus 12°C (10 °F), which is a record for nights in the backcountry with our child. In such a low temperature three of us produced not enough warmth to keep the inside temperature above freezing, and snow layer appeared inside the inner and outer tents. Due to extremely low humidity in that night, we were REALLY warm and happy by the morning.
Generally this tent is very well suited for cold and severe weather, as expected from a four-season model.
***
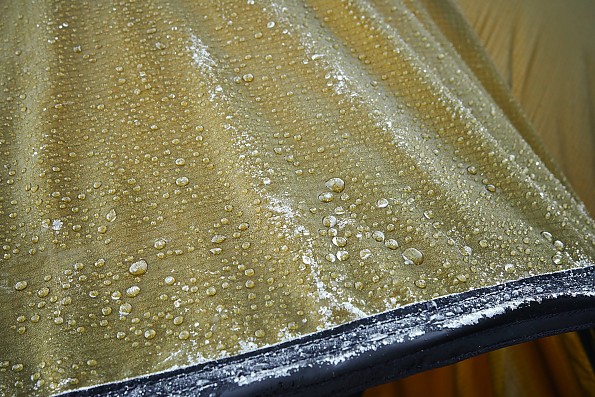
Footprint
The optional footprint covers the entire area under the tent, including the vestibule. I wrote about the Kaitum footprint there, and I do believe that it’s a good way of protecting your investment and ensuring a longer life of Hilleberg tent.
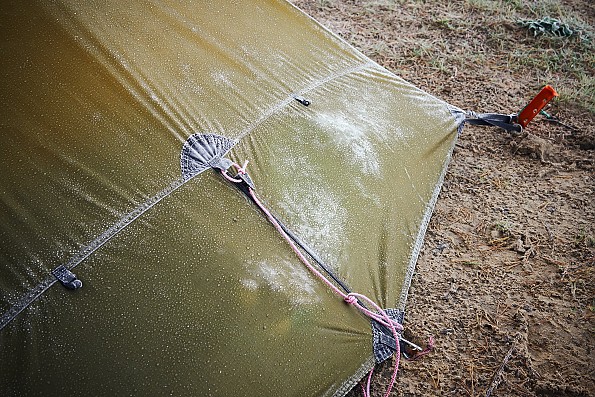
Unfortunately, the Nallo footprint isn't ideal, as could be expected from a 100-euro piece of fabric. After opening the bottom vents on the back, rain and snow are pooling on footprint (see photo above). It probably needs fixing in sewing workshop (by reducing its length, with appropriate change to the toggles). I’ve already alerted Hilleberg about this minor design flaw.
Also because of center entrance, the footprint collects rain and a lot of dirt from the shoes, while with side entrance most of vestibule area remains clean. In muddy or rainy weather it's advised to unbuckle two toggles at the front of footprint and fold it by half.
***
Conclusion
After a half-season of using this tent, I’m very satisfied with my purchase and my decision to replace the Fjallraven (more on that topic later). First of all, it’s a four-season tent, made for tough conditions, when you cannot escape bad weather, and sometimes that applies to our family trips with the child.
Within its usage scope Hilleberg Nallo 3 offers an excellent balance between weather resistance, strength, weight and inner volume. This applies to three people in shorter trips, as well as two people in long ones. As usual for tunnel tents, the storage is great for regular-sized vestibule—frankly, most people don’t need the GT version (it’ll be better to get Kaitum with MUCH bigger inner space).
After 3.5 years of experience with tunnel tents, I’m positively sure that the freestanding tent is really necessary only on bare rock and similar surfaces. On snow, sand and rocky ground you may simply use the special pegs (remember that EVERY tent must be anchored). So no problem at all from this side.
Of course, this tent is not for everyone—it’s too heavy for two people in mild weather (and also ventilation may be not enough), too small for three people in long trips, and it’s very expensive, if compared to various three-season models. It’s obvious that most of the money is invested into the best available fabric and poles which reduce the weight without compromising the strength and durability. The rest of the money goes to complicated and well-thought tent design which makes it strong and very easy to use.
There’s obviously a niche, where this tent’s qualities are just right. I only wished it had the side entrance, and I then would be absolutely happy.
***
Bonus. Abisko Lite 3 vs. Nallo
Here are my observations regarding the Fjallraven Abisko Lite 3 vs. Nallo 3 differences:
-
The Hilleberg pole tensioners operate extremely smoothly, even my wife sets the tent up without any problems. Abisko required an awful lot of effort to operate the front pole tensioner (the back one was OK). Such amount of force even damaged the fabric a bit. I had to insert the pole end into tensioner with great force, wait half an hour for the fabric stretching, then tighten the pole. I saw similar tent in Sweden with completely relaxed tensioner and door band operating like trip-wire. Ultimately I solved that problem using the tube cutter. :-)
-
In Nallo 3 the outer tent is taut and separated from inner with just four pegs. In Abisko the fifth rear peg was mandatory, otherwise the back of outer tent lacked the tension badly, and it brushed the inner tent.
-
Nallo 3 is higher inside (105 vs. 95 cm), I don’t polish the ceiling with my hair anymore (my height is 184 cm).
-
The walls of inner tent in Nallo don’t sag. In Abisko the inner walls sag noticeably, reducing the livable volume—both the headroom and room for legs in the back end of the tent.
-
Abisko has huge warning patches permanently bonded into the inner tent fabric right above the heads of sleeping people. These were the condensate collectors, which at some point began dripping on me. Hilleberg doesn’t have such a problem.
-
Nallo outer vents are fully functional without guylines. While in Abisko the outer vents are tiny, and their hoods don’t keep proper shape without guylines. So the vents were often blocked by flattened hoods.
-
On the other hand, you can remove the Abisko vestibule completely or roll the rear part of the fly (there’re special toggles for fixing everything), while Nallo wasn’t designed with these features in mind.
-
The Nallo fabric is tougher (70D floor + 30D fly vs. 40D floor + 20D fly), the tent is bigger, the measured weight is 2700 g vs. 2400 g (not counting the repair kit). But I always used the Abisko with 400-gram footprint because of 40D floor. Also the Abisko is smaller (much shorter) in packed size.
-
The tiny toggles/hooks for securing the tent doors and vent covers look nice in Hilleberg, but they are hard to operate with single hand. The Fjallraven uses another method (piece of webbing with cord lock and loop), which is more convenient and easier to operate single-handed.
-
The biggest questionable feature of Nallo is front entrance. Abisko has two side entrances (like in Anjan, Nammatj, or Kaitum, but on both sides of vestibule), which are very convenient in terms of protection, usable vestibule area, ease of zipper operation etc. It looks like Nallo lags behind here, but I didn’t have time to wait several years for an upgraded Nallo...
Overall, Hilleberg tent has a lot more well-rounded construction than Fjallraven.
***
Bonus. Kaitum vs. Nallo/GT
Sometimes people choose between Nallo GT and Kaitum tents (like myself back in 2016), and I can try to help them. These tents are looking very similar outside, and you simply trade the internal volume for vestibule volume (and minus 1 entrance).
Kaitum 3 is true 3-person tent, it has more than enough volume both inside and in vestibules. Normally we can load one vestibule with all of our gear, and use another one as an entrance (it's very convenient to exit at night into back vestibule, as no one else is disturbed) or simply fold it away for better ventilation.
Nallo 3 is less comfortable inside for three persons (I would avoid using it in longer trips as three-person tent). GT vestibule brings the ability to cook and rest in vestibule. Still, just a single entrance brings some inconvenience—worse ventilation, much less convenient getting outside at night (you'll wake your neighbors), 1,5x less the internal volume.
So, if you need a real three-person tent with large vestibules, pick Kaitum 3. If you need a tent with ridiculously big vestibule (e.g. for cooking or group gathering), pick Nallo 3 GT, but be advised that inside it's less comfortable and roomy, especially as a triple tent. I don’t see the group gathering ability in GT vestibule as a big plus, because in my region there are either many mosquitoes, or it’s quite cold for sitting in the vestibule. In both cases, it's better to be inside the inner tent.
Background
About a dozen nights with temperatures varying from -12 to +5 °C (10 to 40 °F). Most often in company with my wife and child. It's one of eight different tent models I ever owned personally, including those by MSR, Big Agnes, Marmot, Salewa, and Fjallraven.
Source: bought it new
Price Paid: 762 EUR + 91 EUR footprint
![]() Reviewed by
Reviewed by
Shavuotis
+58
 May 26, 2012
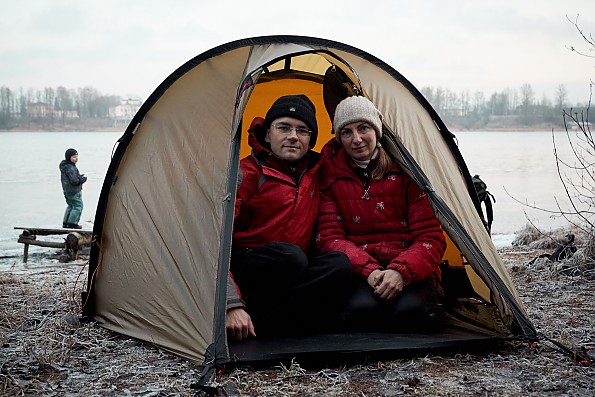
Great lightweight, versatile, four-season tent. It has good room for two and some gear in the vestibule.
Pros
- Weight-to-room ratio
- Good fabrics
- Easy setup
Cons
- Pricing
I bought this tent in 2003. It has been used in spring, summer, and fall. It has seen high winds and rain and no condensation. It has a bright yellow interior which keeps the atmosphere in the tent bright and cheery.
It has good headroom for me (5'7"). In my opinion it is roomy for its weight class. It will sleep three if you like cozy. It handles two well and is a palace for one.
With an extra set of poles, you can turn this tent into two shelters. If you like fast and light and prefer floor-less, you can use the poles with the rain fly only. It sets up really quick as the body is attached to the rain fly by a system of t-handles and loops. This is a real blessing if you need to set up in the rain.
I have never had any problems with condensation, and in hot weather it can get hot during the day as the only open screened area is in the front. I do not consider this to be a deal breaker however. Others may.
If I were to re-design this tent, I would probably put some more screen in the tent body, or a couple of screened zippered windows. This would no doubt increase the cost of what is already an expensive tent.
Overall, I would not hesitate to purchase another in a heartbeat. If you need a good, lightweight, and easy to set up shelter for camping or emergencies, it is hard to beat and Hilleberg customer service is awesome. There are cheaper tents out there, but in this weight class, I am not sure you would find a tougher tent.
Good Job, Hilleberg.
Source: bought it new
![]() Reviewed by
Reviewed by
T
 June 1, 2006
Okay, so I researched all of the lightweight four-season tents. Read the reviews, spoke with guides, talked to various companies and finally selected the Hilleberg Nallo 3 tent on not a drop of reservation from the above sources. The tent was supposed to be a lightweight four-season tent that was handcrafted to withstand whatever could be thrown at it. Well, I was excited with the tent when it first came, it was hand stitched with excellent attention to detail and amenities.
Well that is until I tried to put the Dac poles in to set it up. Now I have been pitching tents for some time so to my amazement when two sections snapped on the second pole, I was shocked and angered. I called the company and they were agreeable enough to send a new tent pole. Excellent customer service. Well, I get the new pole, set up the tent, and find the netting and stitching was torn on the inside zipper to the large front door. I promptly packed it up and sent it back for not one problem but two problems. My reasoning. Spend this amount of money and get a lemon? I think not.
Hilleberg is a great company, I am not disputing that. They were agreeable and and responsive to my needs before my trip to Alaska. They have excellent attention to detail in most of their tents from what I hear. My personal experience was greatly distorted by this flawed tent. I hope that the other Hilleberg users speak up because the ones I talked with loved their tents. I just caution those of you looking to spend good money on an expensive lightweight tent to make sure the Nallo is in working order. If I had it to do all over I would order the Nammatj that is supposedly a more heavy duty tent.
There are great features on the Hilleberg tents
1) Lightweight
2) Easy setup
3) Thoughtful design features:
a) rain fly attached for easy setup in rain
b) stitching
c) bright yellow inner tent color—cheery
d) pockets in inner tent
e) Lines easily secured
Disadvantages
a) little ventilation
b) some what difficult to remove fly—not too difficult just a bit time consuming
c) need to buy additional supports to make it free standing if pitching without rain fly
d) my particular tent had flaws as mentioned above
Summary: I would still consider Hilleberg for serious expedition or all-season tents. They are lightweight and the overall manufacturing appears to be second to none. That said I had problems—emphasis on problemS. A more well known company such as Black Diamond, Marmot, Sierra Designs, Bibler, etc...may help to avoid problems encountered with a smaller tent. Just a thought on this tnet experience, but one I felt needed to be shared.
Design: 4-season hoop style tent
Sleeps: 3
Ease of Setup: easy, 5 min
Weight: 5 lbs
Price Paid: 350
![]() Reviewed by
Reviewed by
anonymous
 June 22, 1999
I'm beginning to love this tent. I wanted a four-season tent that really would stand up to Scottish winter conditions, but I also wanted one that was large enough for extended use, and was not as heavy as the geodesics.
In terms of space-to-weight ratio it's among the very best. A comfortable three-person tent that weighs only 2.8 kg! Quality of construction and materials are as good as they get. You have to seal the seams, but this is a small price to pay for having top quality fabric. (If your seams are taped your material is not as strong as it might be.)
Pitching is simple, inner and outer going up together. It takes just 4 or 5 minutes and one person can do it in a gale. That is essential in our sometimes arctic climate. It's also easy to optimise ventilation; get it right and there's virtually no condensation. I've recently used it in windy and wet weather (force 7 gusting to 8) and it performed perfectly. We were warm, dry and secure that night, when a disturbingly high number of tents on the site were flooded, blown flat, and in several cases ripped to shreds. Guyed out, the Hilleberg was rock solid. I've not had a chance to try it in snow yet, but it's very taut and strong so it should shed snow well.
Disadvantages, well you do need to be able to get four pegs in, so you could not pitch it on rock as you can with a geodesic—but then sleeping on rock hurts! Tunnels are reputed to be a little more noisy in high wind, but I've not noticed this to be a problem. Just tension it properly! They are expensive, but good things often are. If my Hilleberg lasts as well as my cotton Vango Force Ten, now 25 years old and still going strong, then I will be pleased. (For friends across the pond, Hilleberg is a Swedish tentmaker of high repute.)
Design: 4-season tunnel
Sleeps: 3
Ease of Setup: 2 poles, 4 pegs, 4 minutes - very easy
Weight: 2.8 kg (gross)
Price Paid: £395
![]() Reviewed by
Reviewed by
Yuntao Li
+4
September 14, 2016
The tent is good for all kinds of trips—road trip, canoe camping, car camping, winter camping, backpacking. I'd highly recommend it. If the temperature isn't too cold, backpackers can only take the fly with two poles so the weight wouldn't be a problem.
Pros
- Easy to set up
- Good adjustable ventilation
- Very sturdy
Cons
- The whole tent is a little too heavy for backpacking
- Quite expensive
I attach the footprint to the tent all the time and I practice setting up at home. I'd say it's pretty easy to set up.
It's very stable in rainy/snowy weather. During a trip to Mt. Assiniboine of Canadian Rockies in September in 2015, we met an unexpected 38cm snowfall in the mountain. My tent did the job and the roof held the whole night.
And the last, but not the least, the custom service is awesome. When I first bought the tent, due to lack of experience, I wrongly reported condensation. They sent me a bottle of glues. But later, I found out it was me who caused it.
The storage is OK. Although it says three-person tent, it feels comfortable with 2.5 persons (LOL).
All in all, it really lives up to my expectations. It's expensive, but it's worth it.
Did I say my tent is red and it makes a wonderful touch in the photo?
Source: bought it new
Price Paid: $800 US Dollars online
![]() Reviewed by
Reviewed by
oaeaglescout69
+296
December 21, 2011 (original Jun 28, 2009)
After I purchased my Nallo 3 my hiking buddy went out and bought one. So far after three seasons of use we both could not be happier. The only time we had a problem it was because we didn't set them up correctly and had condensation.
Now I own about 30 different tents, so I can speak with a fair amount of experience when it comes to tent knowledge and the Nallo 3 is the tent I turn to when my wife joins me, knowing this is the one that will provide the most comfort and security for the weight.
My buddy bought the Hilleberg Reid shelter, but still prefers the Nallo when his wife comes along.
Update: December 21, 2011
Still very happy with this tent. My buddy took his and I had mine when we did the Chilkoot Trail in Alaska and the only problem we had was getting stakeout spots on the wooden platforms you had to pitch your tent on each night, but the wives were very happy we used the Nallo.
Design: 4 season use
Sleeps: 2
Ease of Setup: very easy
Weight: 5 lbs
Price Paid: $500
![]() Reviewed by
Reviewed by
walkerhiker1
+3
June 7, 2012
Best tent ever!!
Pros
- Low weight
- Easy to set up
- Robust
- Good air circulation
Cons
- Expensive
Used it on various occasions past four years and it never got me down.
Very light, so easy to set up and heaps of space for two or three people!!
Source: bought it new
Your Review
Where to Buy
You May Like
Specs
| Price |
MSRP: $855.00 Historic Range: $735.00-$1,065.00 Reviewers Paid: $500.00-$800.00 |
| Minimum Weight |
2.2 kg/4 lbs 14 oz |
| Packed Weight |
2.6 kg/5 lbs 12 oz |
| Outer tent fabric |
Kerlon 1200 |
| Poles (9 mm) |
1 x 328, 1 x 285 cm / 1 x 129.1, 1 x 112.2 in |
| Pegs |
16 V-Peg |