Cassin Piu 2


![]() Reviewed by
Reviewed by
Jelle S
+24
 January 28, 2013
It is a good belay device, with a modern and well designed look. It has all the features you may expect from a versatile piece of gear. The go-to item, for people trying to avoid the Petzl Reverso wave.
Pros
- Lightweight
- Versatile
Cons
- The printed logo and 'correct position' icon wear off easy
- The protective cover around the steal cable cracks
It is a good belay device, with a modern and well designed look. It has all the features you may expect from a versatile piece of gear. The go to item, for people trying to avoid the Petzl Reverso wave.
Positive aspects:
To take a head point start in this review, I would like to take up its primary advantages: It’s a Petzl Reverso copy, so you know it will do well. The design of the Piu 2 is just a bit different, and apart from the brand, you would not even notice the difference, Until you take a more closer look and make a side by side comparison.
This only adds up to the advantage of the Piu 2, just because you know it comes well equipped with all the features you would expect.
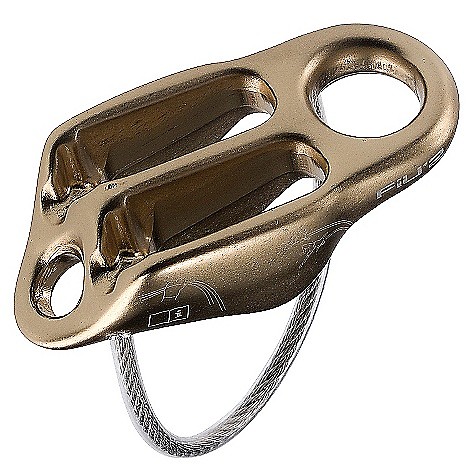
It can be used in the normal way as a standard belay device, threading a bite of climbing rope through one of the two shafts of this device, and clipping a locking karabiner to the cord, the steel cable, as well as the belay loop and securing it.
Doing so, you can benefit from the tapered sides on the hand-braking part. They are cunningly designed, accommodate for multiple sizes of rope, and make it possible to imply friction only when downward pulling the braking strand of rope. The upward pull of this strand of rope is in no way limited by these tapered sides, but they are there in order to optimize the braking strength to cope with the lead climber’s fall.
The next big thing to mention about this device is that it can be turned upside down in another climbing situation to create a self-braking (auto-locking) belay device. The reason why you would do a thing like that is in the event that you climbed as a lead climber to the top of a pitch and then it becomes your partner’s turn to start climbing and yours to start belaying from above. There are different ways to manage the belay from above, but the reversed mode makes it convenient and safe due to the auto-locking feature.
In order to set up the belay device properly, you will need a bombproof anchor (consisting of at least two connected and secured attachment points to the rock) that is located slightly above your waist for comfortable rope management. You will still feed a bite of rope through one of the two shafts and clipping the rope and the steel cable with a locking karabiner as you did previously. The only difference is that you do not attach yourself to the system, but instead, you will use a second locking karabiner to attach the device to the anchor point using its big rounded hole in front. This tilts the device in a vertical position with the strand leading back to the climber on top and the braking strand underneath. This jams the rope tight in the tapered slot to provide the friction to catch a fall. The big round hole in the device is big enough to comfortable be attached with any type of rated locking karabiner. As a belayer it remains your job to keep the slack out of the system.
To lower a climber in this setup you either use a piece of accessory cord or another locking karabiner and attach it to the smaller hole on the bottom to tilt the device back. This is operated with only one hand. Tilting the device backwards will reduce the amount of friction on the brake strand due to the fact that the loaded climbers strand isn’t pushing it directly down into those tapered friction grooves. It is only obvious that you need your other hand on the braking strand and it has to be backed up with some form of prusik or other friction knot and a stopper knot in the end. Note that, at all time you, as the belayer, will need to be double-clipped to the rock in one way or another in order to be safe, but that’s considered as mandatory.
Another feature of this product is that it can be used to rappel in a very efficient way. To set this up, you need to be on the top of a pitch (attached to a bombproof anchor while converting the system), using a rope that is long enough so it touched the ground and on the other end fixed to the anchor point in an appropriate manner. The next thing to do is to feed the rope, as if it were a normal belay, with your anchor point at the end of the lead strand and an additional prusik knot or other friction knot on the brake strand of the rope, attaching it to either your belay loop or even a leg strand of your harness will do. Then clip a locking karabiner to the steel cable, the rope and an additional 30-60cm sling which is attached to your belay loop. The point is to have your hand on the brake strand at all time, controlling your descend, with the Piu 2 situated a little bit higher than your belay loop, remaining well within reach. Depending on your rappel skills and the type of rope/friction knot, you will have a very smooth descend.
Next up, it is necessary to talk about the fact that it can manage two different ropes on the same time in of all these situations. It basically means you can climb with twin ropes or with half ropes in the first –normal- setup without any problem. It is only a bit more complicated for the belayer to keep the unnecessary slack out of each cord but still provide the extra bit that is needed to clip into the quickdraws. In the upside down setup you will have the same options, and in theory even one extra: you can bring two climbers up at the same time using single ropes.
Although I am not an big fan of this technique, it will work without any risk. The main drawback in using this setup is that, in the event the highest climber wanders off to one side, or if the two climbing ropes get crossed, it is very hard to take slack out properly. It is not a big deal on fairly easy pitches, but when you manage a belay from above with two simultaneous climbers and the route includes a spicy overhang, your belay talent gets tested upon.
About two simultaneous climbers in this one device: it is a hassle, although it is doable. In the normal setup, when belaying from below, it can become dangerous when the first lead climber1 takes a fall, he can hit the second lead climber, but also you might be pulled toward the first piece of protection. In normal scenarios this isn’t a problem, but here it might, because it may result in unwanted slack on the rope of the second climber.
Considering the two simultaneous climbers in the upside down position, your main restriction would be that you can not lower one climber without a whole lot of rope management to keep the second climber safe and secured
And now back to topic with its rope thickness. It can cope with ropes ranging from 8mm up to 11mm. For the narrow ropes, such as 8-9mm it doesn’t form any problem because the tapered sides are narrower at the bottom. Such skinny ropes are not the most comfortable to handle when belaying, but they just have their own specific characteristics. For the most common thicker ropes, they form no problem when using this device, even stiff rugged ropes are well manageable by the Piu 2.
When you get to the 11mm cords it will get a little bit tricky to jam those through the holes. One way to bypass this problem in the ordinary regular belay setup, is to feed the rope (coming from the climber) through the top of the big attachment hole and coming up from below, through one of the two shafts. Than you can clip you belay loop with a locking karabiner to the steel cable and the bite of rope to finish it off. The main reason for this is that the big attachment hole is way bigger than the two shafts, reducing the struggle with those thick ropes.
A cool feature is that the steel cable is placed diagonally instead of centered. Looking at the device upright with the big hole on top, and the steel cable coming out towards you, it runs from the right side of the big attachment hole down towards the left side of the small hole. This prevents the belay device being pulled sideways, when loaded. The advantage of this construction makes it a little bit easier to make your right hand the braking hand, since the rope comes out more to the right, then to the center.
The negative aspects:
One of the dislikes about this product is that the paint and finish wear off in time. On the side of the device there are some safety instructions printed on ‘how to feed the rope through properly’ and how to identify the braking strand. These are actually nothing more than two logos, one piece of cord in a hand, and next to it there is a miniature climber sketched. It is not a big deal at all that they become vague, but nevertheless they are still considered as safety instructions. I think that you will get the principle of using this device correct after about two times, so I don’t consider it to be a big problem, but nevertheless the finish and paint show some wear and scratches over time.
However, the only negative point about this product is that the material for the sheath of the steel cable is not as durable as the rest of the product. It is a hardened black plastic coating to prevent damage to the belay loop, and to make sure the steel cable never gets caught in the fibers of a climbing rope. After a wile of intensive use, the black plastic shows some little cracks. Once the sheath begins to crack further, it is only a matter of time before small bits and pieces of this plastic shell crumble off. It will in no case limit the safety or the strength of the product, but its clean and nice finish becomes tarnished. Most outdoor stores and equipment shops will not take the item back or give you a refund as for a broken pieces of equipment. It is just something the designers and developers of the Piu 2 might take up in their next revised edition of the Belay device.
Specifications:
It weighs 80gr, so you don’t even notice it on the side of your harness. It is 9cm (3.54”) long, 4cm (1.57”) wide, and with the steel cable, it rises up about 8cm (3.15”). It comes with an unlimited lifetime but only with a tree year warranty. The lifetime as well as the guarantee have specific restrictions in order to comply with EN safety standards.
Conclusion:
After all a great product. It does the job well, and you can be sure it will be a good value for your money. A nifty thing, opposed to the overwhelming load of Petzl gear on the market, and above all a multifunctional, decent and essential piece of equipment in your kit.
Source: bought it new
Price Paid: $25