Hill Zero Scarecrow Hot Tent


 Reviewed by
Wolverine
+62
 December 3, 2025
The Scarecrow hot tent from Hill Zero has a nice design and is very cool if used as a summer, spring, or fall tent, but needs some serious DIY mods to make it a good winter tent.
Pros
- Nice wide side panels that you can open wide.
- Very spacious
- No center pole
- Weight is OK for this type of tent and size
- Packs very small
Cons
- Strong and bad smell you need to get rid of
- A hot tent with no vent
- Flaps can't be laid flat on the ground
- Very weak guyline system
- Not very stable (unless fixed with DIY)
- The camo pattern is weird.
Hi everyone,
As promised in the forum, I'm going to post several gear reviews to share with you all. I'm a professional in the outdoor industry (Technical, Marketing and Sale Consultant, Bushcraft & Survival Master Instructor, Outdoor guide, etc... but before all; an Outdoor enthusiast for more than five decades).
As such, I buy lots of gear, either at full price, discounted price or even at thrifts stores! I also get free gear for review and also for technical evaluation during the product's development. The latter will never get shared with the public since it's highly confidential. Only gear released on the market, or about to, will be posted here.
Last, everything is 100% authentic so I'll post reviews about amazing, good and bad products so you guy get the information. And, as always, feel free to share your opinion and ask if you have a question."You can buy my time, but not my Integrity..."

SHIPPING
The shipping was fast (five days) and all components where in good shape.
BAD SMELL
There was a very strong chemical smell jumping at my face like a bunch of angry Gremlins who ate too much beans and couldn't let it go for a week, when I opened the carrying bag.
So I isolated everything separately in very large Ziploc bags, and far from each other. One would think it was the fabric, but no...it was the poles! But how can aluminum have THAT smell?? So I dismantled the poles and put the inner elastic shock cords in a hermetic container, and the poles in separate one. The final result? The bungee cords inside the poles were the ones smelling very bad. This was a first in over 50 years of experience so you can imagine my surprise... I washed them and the smell was gone after 48 hours drying outside.
WHAT'S INCLUDED
- Tent body
- Two poles (one at each ends leaving the center free)
- Straps for self-adjusting the tent during the setup (nice!)
- Guylines
- Roomy transportation bag
- 12 pegs, pencil style
- Instruction are sewed onto the transportation bag (nice!).
TENT BODY
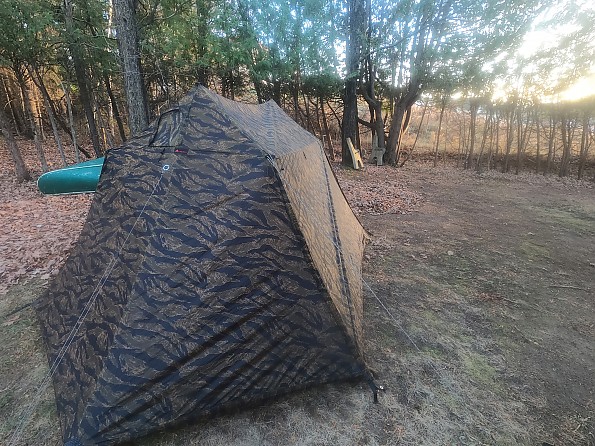
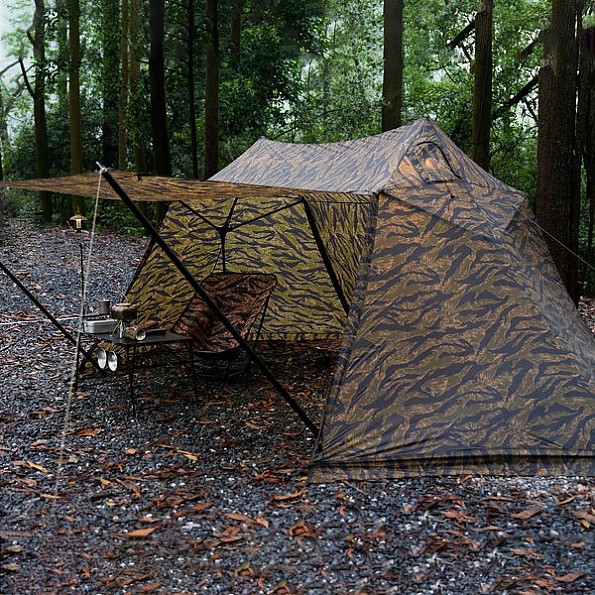
It's made of lightweight nylon so may not be the best during harsh winter condition. However it's very light and perfect if used as a three-season tent. The shape reminds of a baker tent and has a triangle space at each ends which is perfect to store your gear.
POLES
The Scarecrow uses two poles, one at each end instead of a central one which is great. The poles are very unique since they are like inverted chicken legs.
STAKES
The stakes are very nice and look very much like the Easton's ones. BUT, they're too thin and not long enough for a winter tent. Much bigger and stronger ones are highly recommended.
INNER MESH & FLOOR
There's no inner mesh and no floor. Not even as an option.
SIZE
The Scarecrow is roomy enough for two to sleep lengthwise with winter gear and there's plenty of space left at each end to store gear. You could even sleep three, also lengthwise if necessary (but it'll be tight!). And, in case of an emergency, you could sleep four side-wise, but you may have to bend your legs depending on how tall you are.
TENT SETUP
The Scarecrow is not using a central pole, but instead, one pole at each end leaving the center space wide open which is very nice. However, the poles (they are like upside down chicken legs) are not very stable and could easily collapse since the bottom is rounded. A little spike at the end, or a base plate to insert the poles would have made a huge difference.
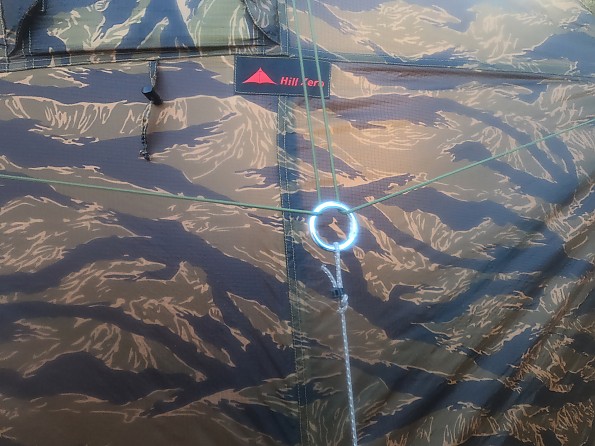
GUYLINES - PART I
The hot tent is not self supporting and uses 2 main guylines, one at each end, to setup the tent. The system is made with one guyline going from the left top corner to right top corner while going through a plastic ring in the middle. Then another guyline is attached to the plastic ring and goes to the ground. The plastic ring is a major failure point and I know that because I had the exact sames ones on a mesh shelter (the type to protect a picnic table) and it failed during high winds. This was a mesh tent, so imagine with a full fabric tent... it's a 100% fail guaranteed.
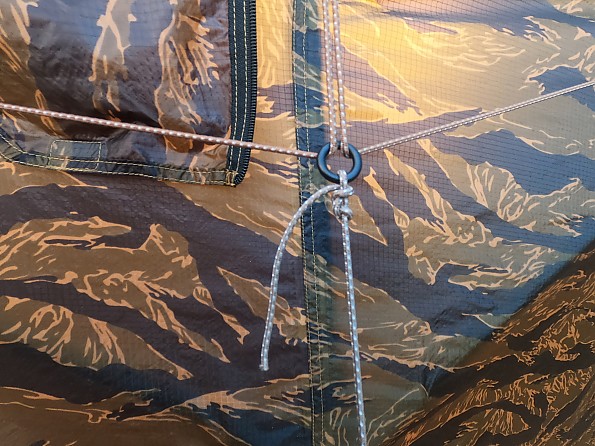
GUYLINES - PART II
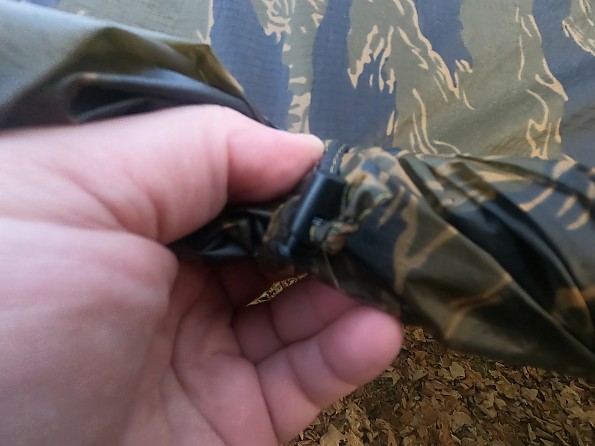
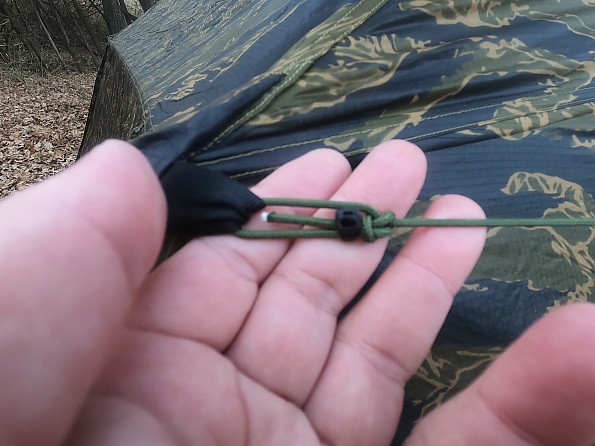
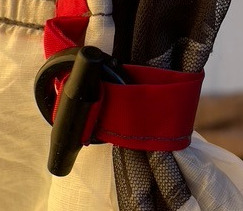
The guylines are already installed on the tent and secured to the loops with a bowline knot. However, all but one knot wasn't set properly with the left over tag either way to short or even cut right next to the knot itself. This is another failure point but can easily be fixed. Also, the knots being tied direct to the loop is not the best since the loops gets compressed, thus reducing the strength load on a much smaller portion of the loop. The best is to add either a triangular ring or a flat one to spread the load.
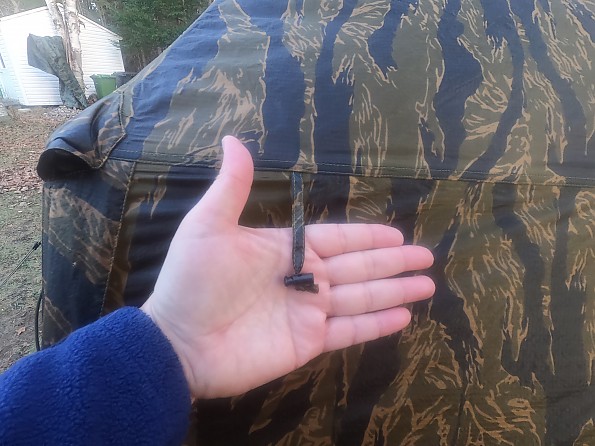
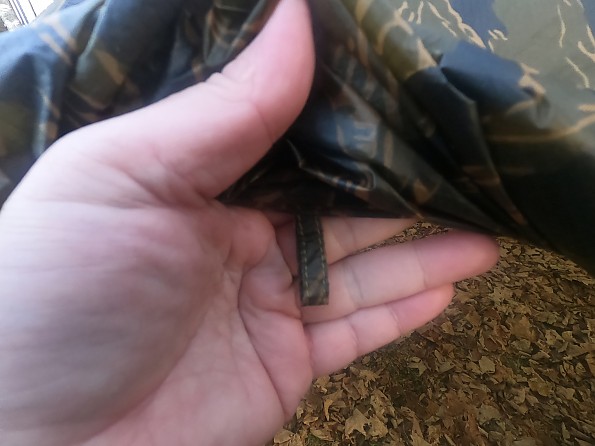
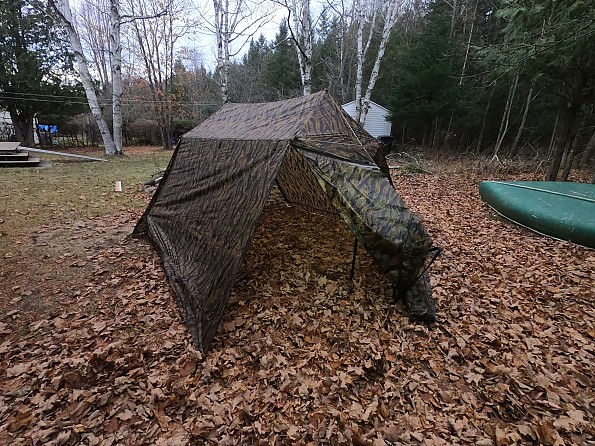
SIDE PANELS
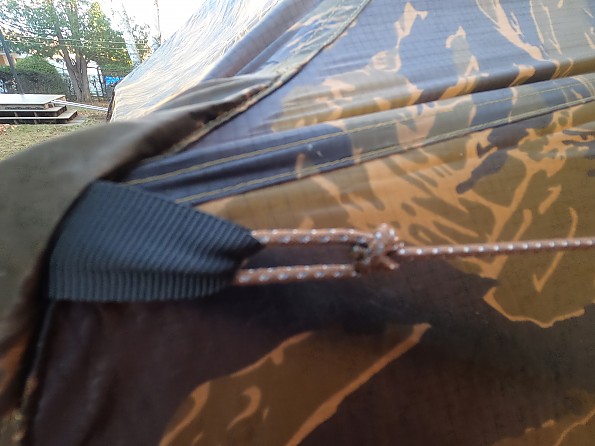
The two side panels (length-wise) can be lifted open independently, or both at the same time, which is very nice. However, the system to keep those open is not great and might prove to be very difficult to deal with during winter when having numb fingers because of the cold. The small loops are way too small as you can see on the pictures below. A fix is proposed at the end of the review in the DIY section.
BOTTOM FLAPS
The bottom flaps of a hot tent are to be laid flat so you can add snow on top to seal the tent from the wind. I tried everything but it was impossible to have those flat on the ground. Not even partially. I checked on their website, and the tent is set the same way, with the flaps vertical and not flat. So this is a major conception mistake right there. To fix this, you'd have to cut the poles to lower the tent so the flaps can lay flat on the ground like they should. I mentioned that (and everything else to the owner/designer) and he replied that he designed it as a jungle tent. Wait... a JUNGLE tent as a HOT tent??? I prefer not to comment on that one...
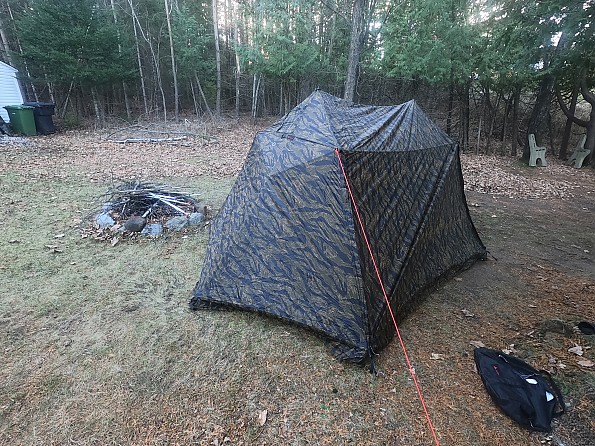
SETUP &..... CRASH
I've set up the Scarecrow in my backyard and made sure it was done exactly as showed in the instructions. It stood perfectly for three days but I woke up on the fourth one to see the tent flat on the ground after a night of moderate winds! (Good thing is that the bottom flaps were finally flat on the ground!)
I added four more guidelines (one at each corner) on top of the two supplied guylines and it made the Scarecrow bomb-proof. I told that to the designer (and even sent pictures) and he said he feels it would add unnecessary weight and the tent doesn't need additional support. I wonder what he couldn't understand when seeing the crashed tent...

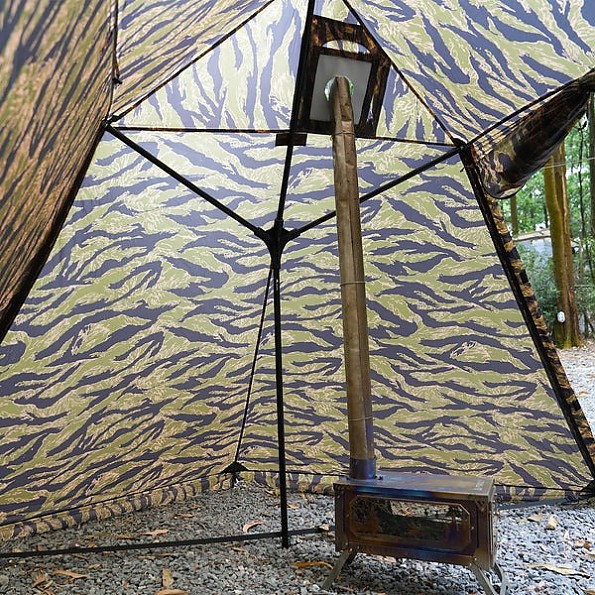
SIDE PANELS & ENTRANCE AT THE CORNERS
As seen on the previous pictures, the two side panels can be raised up (independently, or at same time) so it's very nice. The tent is rectangular with a triangle at each end and you can open each side of those triangle to make a smaller entrance (the manufacturer didn't even thought of that. I'm the one would told them about it).
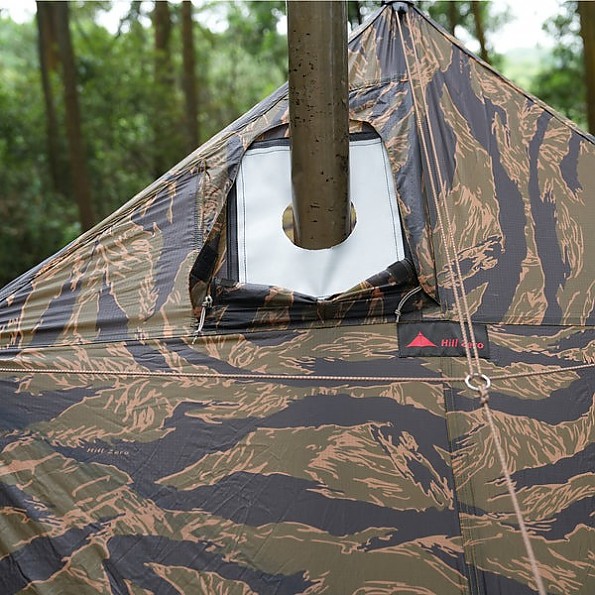
NO VENT
Yes.. you read that right. This is a winter hot tent and there is no vent! So this tent is dangerous if used with a stove. The zippers of the side panels have a flap secured with two small Velcros, so during the tests we unzipped the side panel on a few inches then inserted inserted a small twig to keep it open to make a vent. It's also very recommended to always have a CO detector when winter camping!
PRICE
This tent costs $329usd and I think it's a waste of money, but you could change that by doing a fun and interesting DIY project to fix it. If so, it'll be a really nice four-season tent!
DIY PROJECT
As said, this tent could be a very cool DIY project and you'll have a real nice tent. Here's what to do:
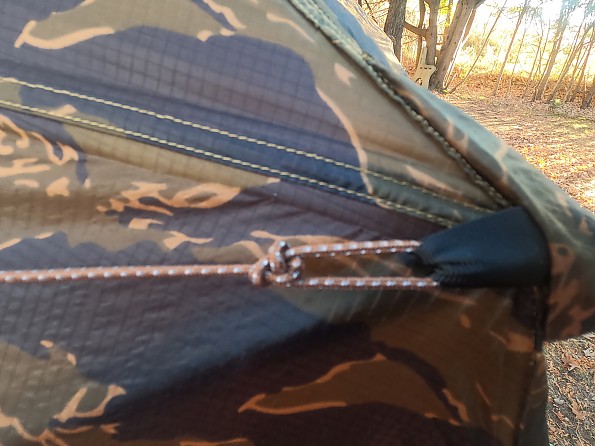
REPLACE THE GUYLINES
The little left over tab from the bowline knots is way too short and sometimes there's none. So remove the existing guylines and measure the length. Then make a new and longer guyline (paracord will do and the 30% stretch will help) and do the bowline properly. You can also add a small tie-wrap to make the knots bullet proof as shown in the picture below.
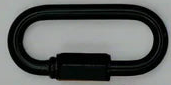
REPLACE THE PLASTIC RINGS
Also replace the plastic rings by aluminum ones
IMPROVE THE GUYLINES
Add a small Quick-link ("horizontal ring") to the loops, then attach the guylines to it. The very best would be a triangle but I don't know if there are some that you can slip in and if not, you'd have to do some sewing but a triangle one would be much better to avoid the loop to compress and increase the load on a smaller surface.

ADD DIAGONAL GUYLINES
Add one guyline at each corners. This, with the base for the poles will make the tent bomb proof! I used fluo-orange guylines to take the pictures so you can see them very clear.
SECURE THE POLES
I don't have the pictures, but go to a machine shop or somewhere where they work with metal and ask them to make two small stands with a tube larger than the pole welded to a base (round or square).
CUT THE POLES
It's time to get a metal saw if you don't have one already! Set the tent on perfectly flat ground and measure how much you have to lower it so the flaps can be 100% flat against the ground. Then cut the two main poles. Problem solved!
FLAPS SECURING
The small fabric loops are way too small and will be a problem during winter. Cut them in the middle and add a small strip the same width to fix this. Or just change for longer one and make sure they are twisted as in the example below. You could also use a ring and a pin like plastic piece.

VENTS
You either need to make vents, or to leave the zippers open on a few inches and make sure they stay that way. You can simply cut a square hole and add Velcro all around. Then use a piece of fabric a little larger to make the cover. This is a mod I'll do sometime next month.
I've done some of those mods and others not yet so I'll add more pictures once done. That's it! This is my first review here and please forgive me if it's not very good. I'll try to be better next time.
Background
I've been in love with the outdoors since I could walk (maybe even better) and kept learning and learning every day to improve my skills and to enjoy more each time. Today, it's my bread and butter and I can't remember the last time I had to wear a suit. I work with manufacturers, distributors, wholesalers, and retailers and lovin' it! I have tons of gear as you can imagine, but what I like the best is to go sit alone on the shore of any lake and enjoy the moment while eating my lunch. Simple life can be very enjoyable just like that :)
Source: tested or reviewed it for the manufacturer (I kept it and working on DIY mods at the moment.)
Your Review
Where to Buy
You May Like
Specs
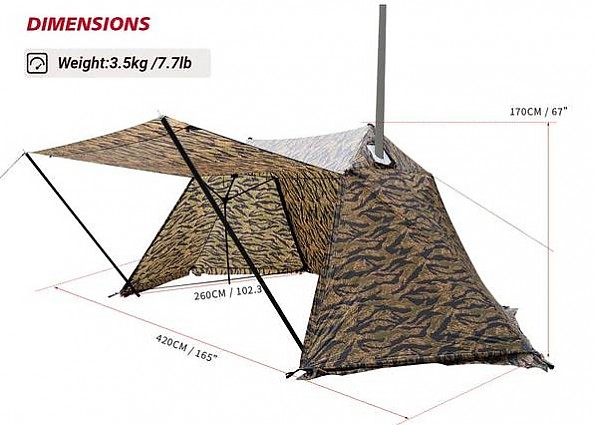
| Price |
MSRP: $329.00 |
| Length |
13'9" / 420cm) |
| Width |
8'6" / 260cm) |
| Height |
5'7" / 170cm) |
| Weight |
7.7lbs / 3.5kg) |