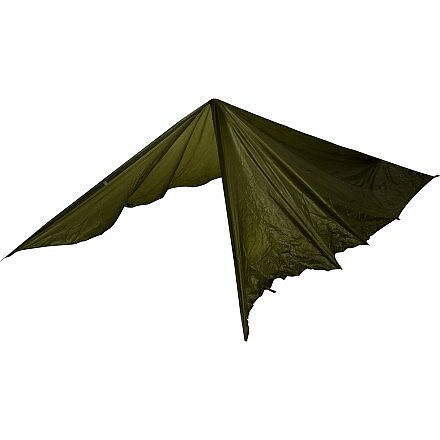
Integral Designs Silshelter
Integral Designs is no longer in business, and the Silshelter has been discontinued. If you're looking for something new, check out the best tarps and shelters for 2026.


![]() Reviewed by
Reviewed by
David Colllins
 July 29, 2009
I initially bought the Silshelter, as it fulfills three of my backcountry requirements.
1. Firstly I use it as a standalone shelter for my mountain bike and rucksack, and an all weather shelter for cooking in the inevitable downpour conditions that exist , when I am on one of my epic rides in the English Lake District, or Peak District, when I sleep in My Marmot EOS 1P tent.
2. When I am campsite based undertaking day walks the Silshelter is draped over my tent and staked out with one walking pole to provide an extended vestibule providing extra kit storage and cooking area.
3. When I venture off for a wild night camping the Silshelter is used in conjunction with the Bugliner or a bivvy bag depending on the Midge/Mosquito to rain ratio, to provide a well protected nights sleep.
I have only been using the shelter for two months now but I am reasonably impressed with the performance / weight / versatility ratio. The late spring and early summer weather so far has been quite mild but very wet, the Silshelter has coped with the conditions extremely well. It provides a surprising amount of internal space for such a light weight and is easily erected within 2 - 5 minutes. It can be a bit tricky in blowy conditions, but if you weight the bulk of the material down with your pack or a stone or log as you stake the shelter out it is easily manageable. Practice makes perfect.
When pitching, I stake the rear two loops of the tent out first leaving a little slack, as I then use a car engine valve grinding tool, (ie a wooden dowel approx 20 cm long with rubber cups at each end (cost approx 99p, weight 15 grams)), to support the rear of the tent by placing one end in the rear pole pocket and the other end on the ground. I aim to leave a 1 - 2 inch gap from the lower edge of the rear of the tent to the ground to aid ventilation.
I then adjust adjust the length of one of my walking poles to approximately 43 inches and secure the hand grip in the forward pole pocket, I then lift the apex of the tent up with the pole angled rearwards by approx 10 - 15 degrees and stake out the forward two corner loops so the tent sides form a perfect rectangular floor space shelter, I then use a further two pegs to stake out the door flaps and then adjust the six stakes so far to achieve a reasonable symmetrical structure.
I always carry a further six stakes and stake out the two mid point loops each side, or one mid point loop and using lightweight bungees one of the the flysheet loops. At the rear I use a second walking pole and the three loops with lightweight bungees attached (bungees supplied and retro fitted by myself), if required to help give clearance above my feet and improve stability in windier conditions.
The door system, with practice can be set up to be versatile, it can be staked in such a manner that it forms a tight weather seal, or it can be adjusted to allow a slight opening to aid ventilation, this takes a little practice but once mastered is second nature.
A further consideration, if you don't use trekking poles or are are reluctant to pay the hefty price for lightweight adjustable poles, consider using telescopic fishing rod bank support rods available from angling shops and screw top adapters at a fraction of the cost of trekking poles, aprox weight 250 grams, cost 5.99 to 14.99 depending on weight / material (IE steel, aluminum, carbon).
Design: tarpaulin tent pole supported and staked
Sleeps: 2
Ease of Setup: Simple after two practice pitches it became second nature, full shelter erected inside 5 minutes. Tarp shelter alone less than two minutes.
Weight: Tent 400 grams, Bug Shelter 545 grams, Poles 245 Grams, Pegs 200 Grams
Price Paid: CA $ 169.99 approx £ 90.00
![]() Reviewed by
Reviewed by
Phoenix
+34
 September 7, 2022
After 14 years of continuous service in the Cascades of Washington state, the Silshelter and matching Bugliner continue to be my front line shelter for A) Two people in any weather, or B) One person expecting bad weather.
Pros
- Extremely lightweight, and compact in a pack
- Few things to go wrong
- Strong, waterproof, and a small footprint or an airy environment depending on how you pitch it
- Vestibule area protects a lot of gear
Cons
- Takes some thought to pitch. Not free-standing, so you need to be able to drive in stakes.
- The most severe winds may make poles shift in pole sleeves. Good for two people, but small—think good friends and couples.
- Sadly, the biggest con at this time is that Integral Designs is long gone.
This shelter will take some thinking and perhaps your own system and strategy to pitch, but for it you'll get a shelter lighter than your other hiking partner/alpinists, yet more resilient.
I've weathered severe thunderstorms at altitude and wind with gusts over 40mph. Using trekking poles, and good staking, the shelter faithfully holds up.
Typical use is three-season with the bug liner, but I also use it along with some snow work (partial snow cave, etc) and a bivy sack as a four-season solution.
Unlike a lot of other users, I use this for two people regularly, and only for one person if I'm expecting bad weather. For two people, the trick is that you should pitch it wide enough that a lot of gear can stay outside under cover of the vestibule, with only people and sensitive gear inside. That said, I'm over 6' tall, and have no problem with length. Even in 2022, you would have to look very hard and spend a lot of money to find something weighing this little to house two people.
Sadly, this shelter can't be bought new, but it looks like folks are selling theirs on the used market.
Background
It's been used for 14 years of mountaineering, section hiking, and overnight backpacking. Probably 100 pitches in total.
I can attest that silnylon has a good service life.
Source: bought it new
![]() Reviewed by
Reviewed by
Bruce Darling
+34
September 14, 2022
I have used it on multiple trans-Sierra Nevada and Sierra Crest ski mountaineering trips up to 13,000 feet lasting 5-8 days in the late spring. I have also used it for Sierra ice climbing trips. It provides shelter for two people and gear. It works well in snow and rain storms.
Pros
- It is extremely lightweight.
- It sets up quickly.
- And it provides shelter from rain and snow storms. In snow, we set it up using skis, ski poles, ice axes, and Snow Claw snow shovels.
Cons
- None if you use it correctly and thoughtfully.
I have used this shelter on many ski mountaineering traverses of the Sierra Nevada. I have been using it for nearly 20 years as a replacement for a Black Diamond SilNylon Megamid to reduce pack weight for two skiers/climbers.
It is lightweight, which makes it useful for 5-8 day ski trips. Setting it up with skis and ski poles is a breeze. No stakes are needed. If one sets it up with the lower edges 12 inches above the snow so air flows through the shelter, no condensation occurs.
When there is no snow, one can use stakes or tie 2mm utility cord to rocks. One ski pole or trekking pole at the head of the shelter provides sufficient headroom. A thin plastic painter’s drop cloth, cut to the sleeping bag’s dimensions, provides protection from the snow.
Background
It is perfect for a 5-8 day ski mountaineering traverse across the Sierra Nevada or along the Sierra Crest. I have also used it in the fall for Sierra couloir ice climbs and in the spring and summer for Sierra backcountry rock climbs and scrambles.
Source: bought it new
Price Paid: The retail price
![]() Reviewed by
Reviewed by
RUSTY SHELTON
July 30, 2008
I do a lot of solo high country archery hunting for elk and deer in Idaho and Utah. Approx 30-40 nights in it so far. Indispensible shelter for my use. I go 3-5 miles a day and never know where I will end up.
I use an OR bivy and light ground cloth also. Have been in heavy rain and light snow with no major problems. You should stake a least one end to vent or will condense by morning. Weight is a premium for me the less gear the more food and longer I can stay in the field.
As others have said I am not overly enthused with the door flaps but the design works if you know how to adjust it. I can store my pack, gear, bow etc and still have room for sleeping bag but it's tight. You also need to tie the top loop to pull up the center if you can. Use a stick and lever back to the bottom of the shelter, works great.
If bulk and weight are an issue is a good product.
Design: three season
Sleeps: 1
Ease of Setup: average 5-10 minutes
Weight: one-half pund
Price Paid: $120
![]() Reviewed by
Reviewed by
calamitybrook
+12
 October 18, 2006
I've used this for at least a dozen nights in three seasons; not winter. It's very light and might fit two people in a pinch. I would recommend using a bivvy or sleeping bag cover and either dispense with ground sheet or use very small one.
Lately in colder weather I think I could use more interior height and can't really say I'm enthused by door arrangement. A zipper would be better. I'm ambivalent but can't enthusiastically recommend.
Design: shaped tarp
Sleeps: 1
Ease of Setup: take getting used to but easy
Weight: 1 lb
Price Paid: ?
Your Review
You May Like
Specs
| Price |
Historic Range: $71.97-$144.95 Reviewers Paid: $120.00 |
| Capacity |
2 person |
| Weight |
14 oz / 340 g (tarp and stuff sack) |
| Floor area (as flat tarp) |
70 sq ft / 6.5 sq m |
| Floor area (as shelter) |
40 sq ft / 3.7 sq m |
| Packed size |
8 x 4 in / 20 x 10 cm |
| Fabric |
1.1 oz ripstop nylon impregnated with .25 oz silicone |