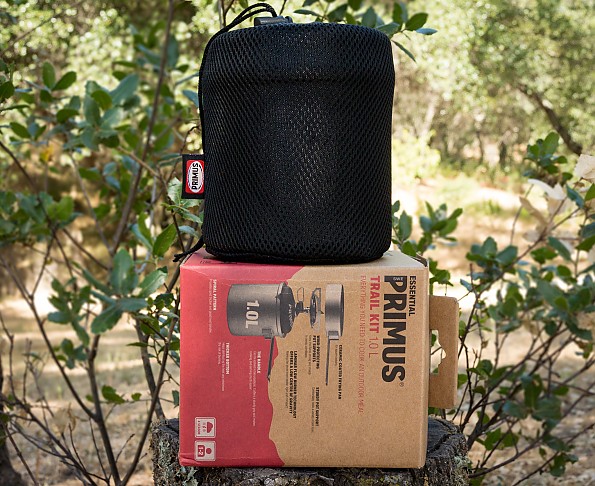
Primus Essential Trail Kit


 Reviewed by
Wade in the Water
REVIEW CORPS
+1,724
 June 3, 2021 (original May 31, 2021)
The Primus Essential Trail Kit is an inexpensive, lightweight, and versatile stove kit from a renowned manufacturer.
Pros
- Lightweight
- Packs small
- Quality build
- Exceptional design
Cons
- No built-In igniter
- Handles can get hot
- QC—scrape in ceramic coating
- Can require shielding from wind
I received this Primus Essential Trail Kit in the winter of 2020-2021 for the purpose of reviewing it. Winter weather, Covid, and major surgery have all done their best to keep me indoors, but I have managed to sneak out on a few occasions. So without further ado….
Primus is a Swedish company known for producing top quality stoves since 1892 (!). They balance out carbon emissions from the use of their fuel by helping reduce emissions elsewhere, claiming the industry’s only carbon neutral fuel canisters. Their stated goal is to ensure every Primus product is reliable and becomes a trusted, life-long companion. Learn more about their interesting story here https://primus.us/pages/history.
Primus Fuel Canisters
Speaking of fuel canisters, the instructions clearly state, “This appliance shall be used exclusively with Primus Propane/Butane/Isobutane mix cartridges 2206, 2202, 2207.” They list no other options.
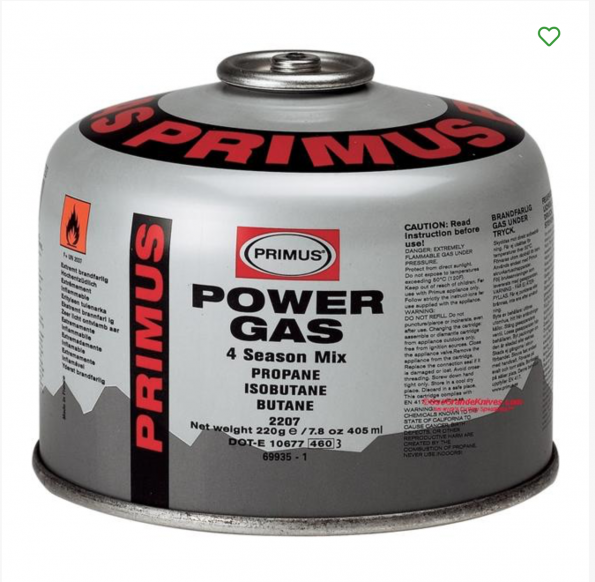
When I first received the stove, I attempted to find one of these cartridges. I visited every major big box sporting goods retailer and a few small shops with no luck. Looking online, I found but one source that actually wanted almost $200 for a single canister. The proper canisters were readily available at European outlets for a reasonable price, but none offered shipping to the US.
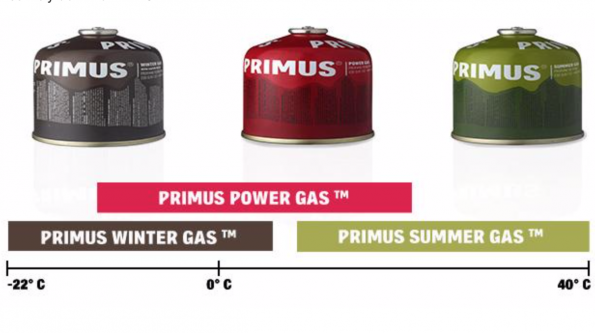
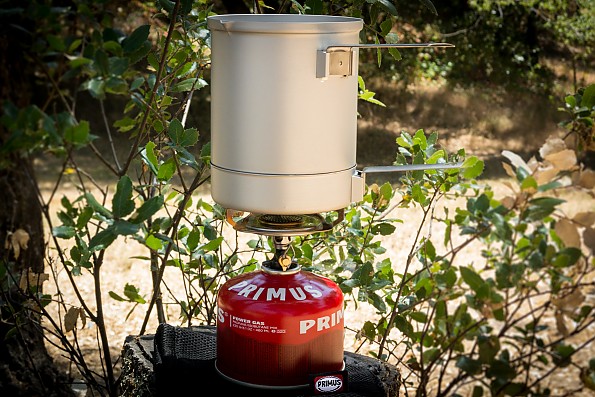
I went to the Primus website and found only a little more information. In all my searching on line, I did notice that most photos of the stove showed it sitting on top of a red canister of Primus Power Gas instead of the recommended canister. Per Primus, “Power Gas is our most versatile blend, delivering excellent power even around zero degrees Celsius.”
The red Power Gas canisters were available at almost every shop I visited and were also readily available on line. As such, this is the fuel I’ve been using for the stove. I do not know if the ratio of gases is the same for the two cartridges, because I could not find the ratio for the recommended fuel.
I’ve experienced no problems using the red Power Gas; in fact it works great. Since that time I’ve noticed that the recommended fuel has become available online for a reasonable cost. When I finish using up the fuel I purchased, I’ll try the recommended fuel and let you know in a follow-up if I notice any difference.
Essential Trail Kit
True to form the stove arrived in a plain cardboard box appropriate for the job without any excess. The padding inside was brown paper and the product packaging itself simple brown cardboard and minimalist; which is not to imply insufficient. There was exactly enough packaging to do an appropriate job of containing and protecting the product without excess, plastic, or styrenes. I wish all companies would follow this example.
Opening the product box I found the stove protected inside its storage pouch as it would be assembled for packing, along with the instructions. The instructions are given in over 20 languages. This is a pet peeve of mine as eight pages instead of one seems wasteful to me. There was also a silica gel desiccant pouch inside the smaller storage bag with the burner, which seemed unnecessary, but what do I know. I’ll leave it there where perhaps it will do some good. Overall, I’d say that Primus has done a good job balancing protecting the environment with protecting the product.
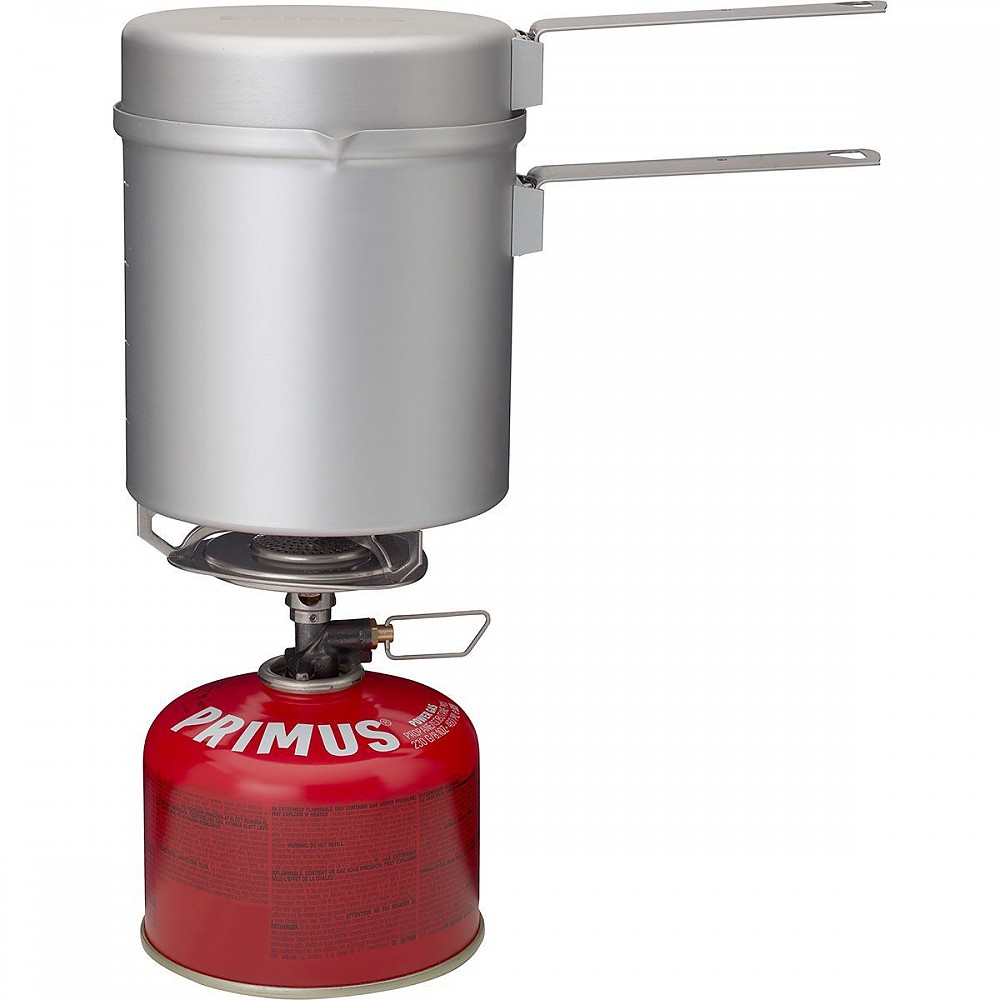
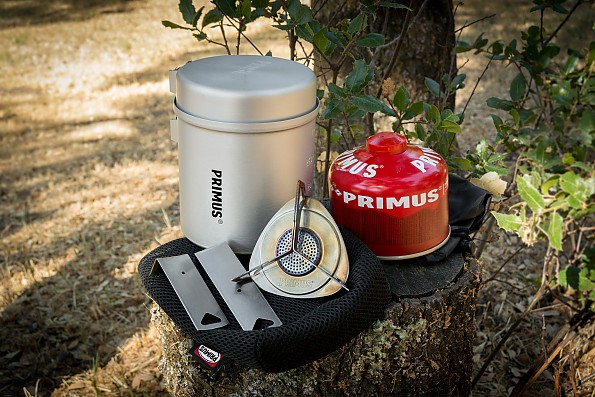
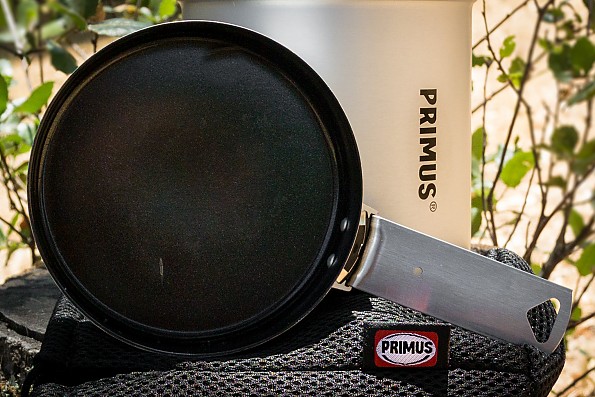
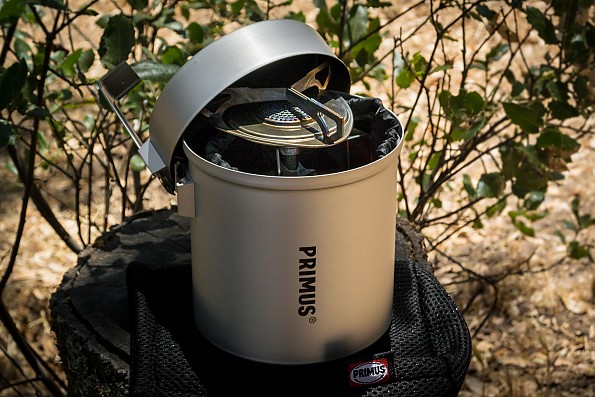
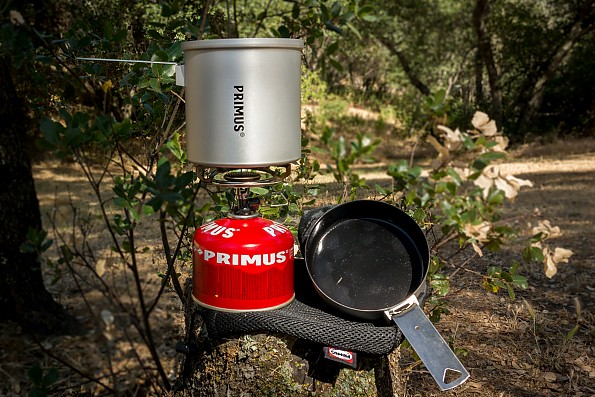
The kit consists of a burner, a 1-liter aluminum pot with removable handle, and a small ceramic coated aluminum frying pan also with a removable handle. The frying pan also functions as a lid for the pot and its removable handle functions as a lock to keep it all together when packed. Genius.
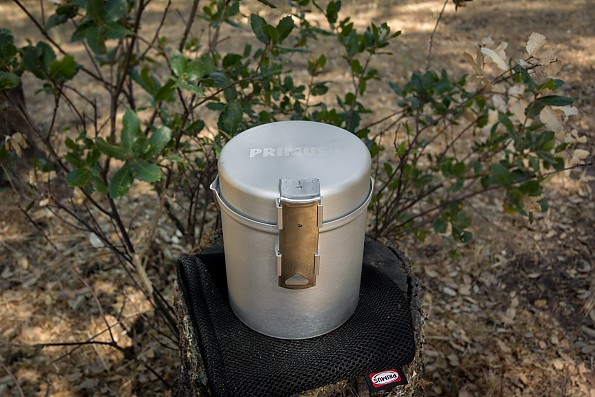
Finally, there are two storage pouches. A small inner pouch serves to house the burner and pot's handle, while offering protection for the inside of the pot during transport. A larger, mesh pouch, protects the whole exterior of the kit. The outer pouch is made of heavier material that seems like it will hold up well over time. The entire kit fits inside the 1-liter pot (fry lid on top) and comes in at 14.4 ounces according to my postal scale; not too shabby.
Pot and Pan
The removable handles are easy to use. Simply push the handle into the slots until it locks into place to install. To remove, just push in on the dimple and pull it back out. They do hold the pot and pan securely, even though it may not initially seem so. There is a bit of wiggle to them when attached, but I attempted to shake the pot off of its handle when full with water on more than one occasion and could not.
The handles can however get hot when cooking, so do be careful when using them. They do cool off quickly. All in all, they work very well, and replacing the spring clip that keeps them in place would be easy if ever needed. The design is both simple and effective. What more could you ask for?
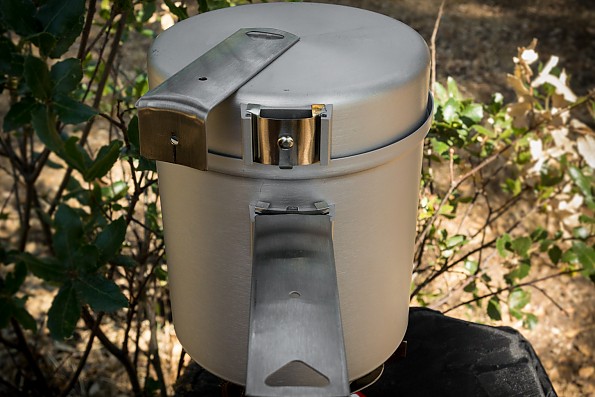
Well, how about a non-stick frying pan? That’s right, the aluminum frying pan has a ceramic non-stick coating. The pan I received did have a nice sized scrape in the coating, shown in the photos below, but it still works well despite it. I'm sure if I'd purchased the kit, the retailer would've exchange it.

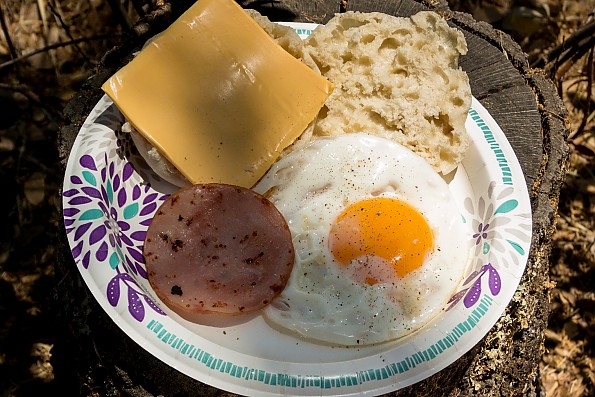
I've used it to fry eggs and Canadian bacon for breakfast and it works out wonderfully, requiring only a quick wiping to clean it when done. I even burned a piece of bacon in it once as a test (at least that's my story) and it still cleaned easily, though it did require a bit more than just a simple wiping out.
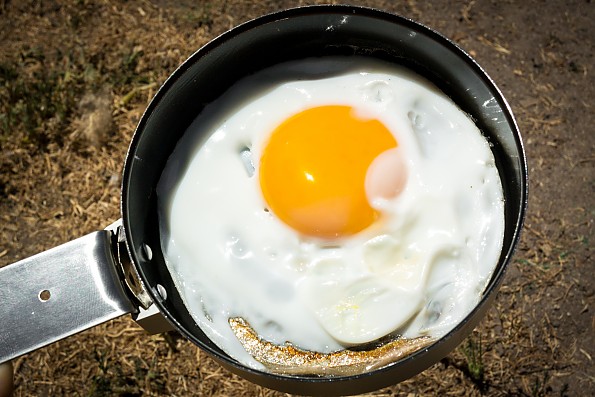
The pot actually fits perfectly on top of the fry pan and will suffice as a lid for it, though some care is required. Using it so, I'm able to produce perfect eggs with runny yokes and fully cooked egg whites; without ever having to flip the eggs.
Though the pan is small, two eggs will fit in it at once. Do be careful, they cook quickly. Unfortunately I have to cook the bacon separately, leaving half of my breakfast less than hot.
To be honest, my friends and I eat dehydrated meals when trail camping (or kayak camping in my case), so I’m not sure what I would carry in a backpack or dry bag on an extended trip that would warrant a tiny fry pan, and when car camping there’s ample room for a full-size camp stove/grill. It is however a nice touch and really doesn’t add any weight since it also functions as a lid for the pot; and the detachable handles make it all very convenient to use.
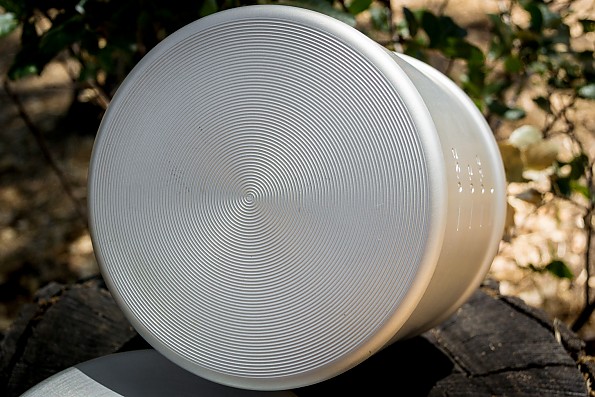
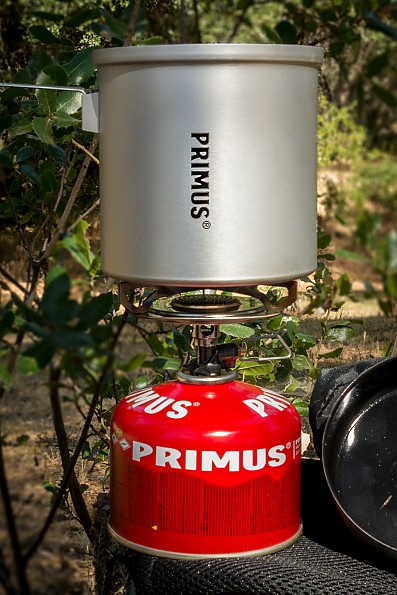
As for the pot, like the fry pan it's made of lightweight aluminum and has a detachable handle. The circles etched on the bottom likely aid in even heat transfer and also give the teeth on the pot stand, at the burner top, something to grip on, making the pot less likely to slip off the burner if bumped.
This pot is shorter than the 1-liter pot on my usual trail stove in addition to the flat, low profile burner design. This makes it much more stable than that and many other stoves, which is a good thing. In use I find it to be quite stable for what it is. Still, as with all trail stoves, care should be exercised when using it.
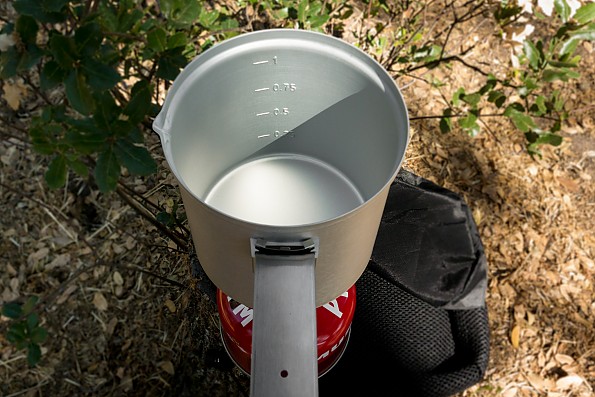
Inside the pot are stamped measures (metric only) and it has a formed spout on the rim for pouring. For me the pot is the real workhorse of the kit. Boiling water for dehydrated meals, coffee, and tea is all I normally use a trail stove for and this one does not disappoint. It sets up quick, holds enough water for multi-person meals, gets the water to a boil in just a few minutes, with the convenient handle and spout absolutely being the proverbial icing on the cake.
Finally, the pot is large enough to fit a gas canister with burner attached, inside of it, for transport. The small inner pouch fits around the gas canister to hold the handle and protect the inside of the pot from abrasion. This makes for a very compact kit.
That said, I'm not a fan of leaving the burner on the canister while packed. If it were to loosen due to vibration from walking, etc. you could lose all of your gas not to mention create a hazards situation. The canister will not fit with the burner detached. If you do choose to carry your gas in the pot with the burner attached, you may want to consider a small circular pad to protect the ceramic coating on the fry pan from the teeth on the burner stand.
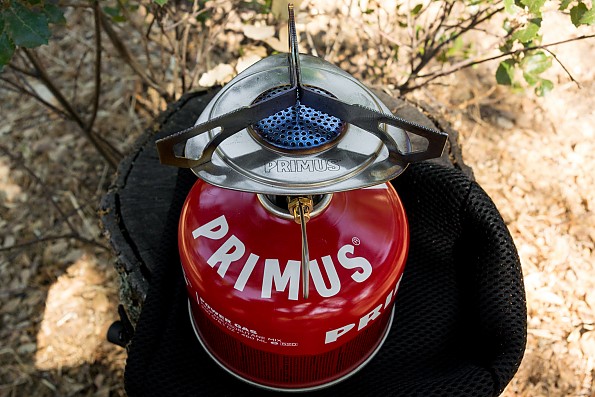
Burner
OK, so much for the pot and pan, how about the burner? How does it perform?
Well, as for the burner, I’m happy to report it works far better than I expected. I often wind up in windy locations and the stove I usually take along is designed to work effectively and efficiently in the wind. So first time out I decided to use the Primus stove the same way; as it came, in the open, without a wind screen, despite windy conditions. I didn’t expect the Primus to work well this way in the wind due to its open design, but it did.
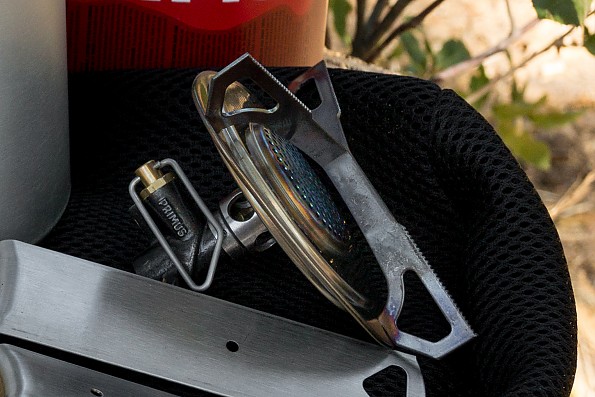
The burner is designed very flat which reduces the overall center of gravity making the whole thing more stable; Primus refers to this as Laminar Flow Technology. It does not feature a built-in igniter, though after screwing it onto the canister it's easy enough to light using a windproof lighter. I'm able to fully boil a liter of water in just under five minutes in the wind, with occasional gusts of say 15MPH or so. The flame has never blown out on me when doing so.
That said, sitting a few feet downwind I can feel wasted heat blowing on me. My MSR WindBurner does perform better in this regard, boiling the same amount of water a little faster in these conditions, likely due to not wasting nearly as much heat. Less time burning translates to less fuel used, which can yield a little more pack space on longer trips. Then again, my old standby does not include a fry pan, those handy handles, or a spout for pouring. Did I mention that I really like the handles and the spout? I really do.
My usual trail stove basically has two settings; on and off. It’s great for boiling water, but not much else. Unlike my WindBurner, the heat is easily adjusted on this little Primus stove, making it much more versatile. For those times you’d like to fry or simmer something, you’ll find simple and precise control. The lower settings are at the very end of valve travel just before full shut-off, but are still easy to achieve. In the open, the wind can blow out the flame when set on low, but a little shielding can easily prevent it in all but severe conditions.
I found the burner easy to use, compact, and well made; the entire assembly looks built to last a very long time with minimal care. It is however only fairly efficient on fuel even when protected from the wind, with a stated burn time of 75 minutes form a single 8.1oz canister. By contrast, my WindBurner states 95 minutes from an 8oz canister.
Conclusion
In conclusion, I really like this stove kit. While there are slightly better options if all you want to do is boil water, the Primus Essential Trail Kit offers more versatility in a package of similar size and weight, at a fantastic price point; even if it does use a little more fuel. It’s a joy to use and though very lightweight, seems built to last.
I look forward to using it more. I’ll post a follow-up to this review come winter and let you guys know how it holds up to the summer/fall season's use.
Background
I'm just a regular guy who loves the outdoors. I've enjoyed camping my entire life and hope to continue to do so for a long time to come. My reviews come from that simple perspective.
Source: received for testing via the Trailspace Review Corps
(Sample for testing and review supplied by Primus)
Your Review
Where to Buy
You May Like
Specs
| Essential Trail Stove | Essential Trail Kit | ||
|---|---|---|---|
| Price |
MSRP: $59.95 Current Retail: $62.99-$74.99 Historic Range: $52.46-$74.99 |
||
| Weight | 4 oz | 13.5 oz | |
| Dimensions | 4.3 x 2.4 in | 4.6 x 5.7 in | |
| Output |
8600 BTU |
||
| Feeds |
1-2 |
||