Sierra Designs Zeta 3
The Zeta 3 has been discontinued. If you're looking for something new, check out the best three-season tents for 2025.


![]() Reviewed by
Reviewed by
Rusty Shackelford
+36
 May 4, 2009
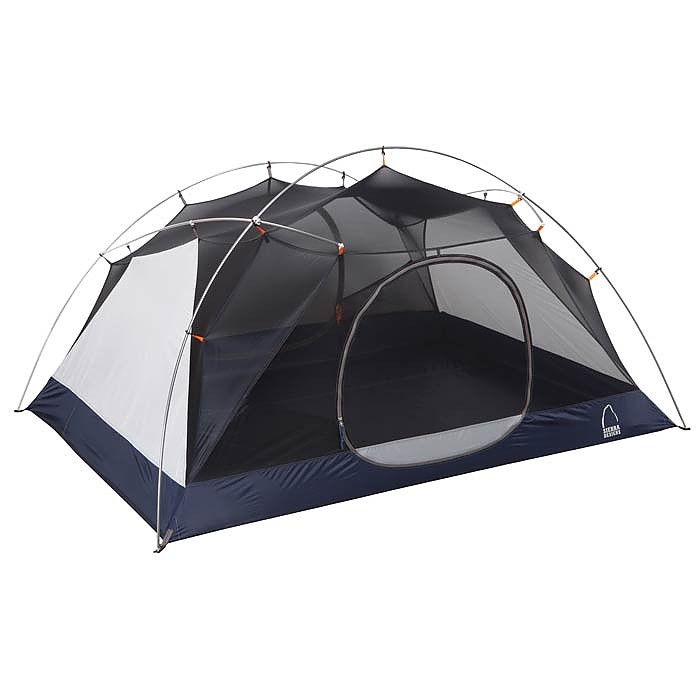
Sierra Designs Zeta 3 Tent and Foot Print Review
The background:
This tent was used on the Central CA Coast while over-nighting the interesting coastal prairies of Cambria. The coast was surprisingly warm, around the mid 70s in the late evening as the sun was setting and in the mid 50s at night. The humidity was a little high and there was a near-constant mist of sea water from the ocean, and a thick layer of fog hugged the ground. I arrived on a Saturday and the ground was wet but not sloshing from a previous day’s rain.
For the record, I got this tent at a retail price of $250 and got the additional footprint for $35ish. I did a trial run with pitching the tent since the pole configuration was new to me and I strongly recommend this, otherwise you’ll be left out in the cold (at least for a few minutes) while you try to figure things out as you pitch it your first time.
The set up:
I started pitching the tent by first laying out the foot print, then laying out the tent over it. I staked out the four corners of the tent, with each stake at a 45 degree angle to the normal of the ground (for added stability). Next, I assembled the poles, connected them to the “Jake’s Foot” connectors on the tent. Then I snapped on the hooks to secure the tent. Lastly, I laid the rain fly over the tent, staked the back part (using one medial stake) and snapped each corner of the rain fly onto a connector located on the Jake’s foot at each corner of the tent. Then I staked out the two front pegs of the rain fly and stopped for a break before cinching everything down and making minor adjustments.
Some general notes and comments:
I won’t bore you with the details about the tent since they’re clearly listed on Sierra Designs website, but the tent itself is mostly mesh and has a decently thick bathtub polyester floor. There are a few mesh pockets inside the tent and a few loops in the ceiling so you can hang something from it; there loops are just fabric loops, nothing like d-rings or the like, but they are useful if you happen to hang a carabineer on it and use that to hang other things to make it easier to take on/off. The floor area is nice and spacey with significantly vertical walls; this made the impression that the tent was larger then it seemed and made things nice and roomy. A friend’s Velox 3 seemed to be dwarfed by my tent (it probably is physically smaller, but the 2-crossed-pole design, otherwise known as the traditional X pole configuration didn’t maximize on the height of the tent like the Zeta 3’s 4-pole hubbed design. The tent is nice and sturdy, the zippers worked well most of the time, snagging a few times. The doors are situated on opposite walls along with the openings for the vestibules. Overall, a good quality tent for a killer price. The weight seems to be the biggest downsize, as its not an ultra-light tent by any means, but it’s still a decent weight when you factor in the price and features.
More specific comments:
The pole set up is a double-edged sword; it creates nice and vertical walls for ample space, but the design takes a little practice to get. It’s basically amounts to a pole configuration that looks a lot like #. Three of the poles are connected; the longest horizontal pole (represented by dashed lines) holds the two shorter poles so that it looks like -|-|- and the top part points TOWARDS the front of the tent. There are ball end connectors at the front of the tent, which you insert the ends of the short poles into. On the rain-fly are loops that are looped through the pole to hold it in place. The fourth pole is the same pole length as the longest pole in the hubbed configuration and closes up the back by setting into the two rear corners; the two short poles are inserted into connectors on this pole. This probably sounds complicated but it’s not too bad if you practice once or twice. I can set everything up by myself in about 5 minutes. Lastly, on the underside of the rain fly are Velcro straps so you can secure it to the pole. There are also loops for you to roll the flap up and keep it open, say, for ventilation purposes or just to keep a view open.
The corners of the tent are designed so that the tent’s foot print will snap on from under, and remain behind the end of the pole, while the rain fly snaps on in front and over it. You’ll have to wiggle it a bit to get it out, but it works fine and is secure. The plus side is that you get cinch straps on the rain fly so you can loosen it to get the fly hooks onto the corner easily, and then cinch it to tighten things up.
Sierra Design’s proprietary RCT Swift Clip hooks are basically just normal hooks that you used to secure the tent body to the poles. They work fine, are easy to handle and I’ve never had it slip off.
The packaging is good and you get plenty a bag for your stakes, poles, and one large that holds everything. The organization is good and high-quality. You also get some draw cords that you would presumably use to add extra security to the rain fly, though I didn’t see a use for them.
My only concern is the rainfly; it drizzled lightly overnight and when I woke up, I was glad to be dry but noticed some condensation on the underside of the rainfly. I kept the vent on the rain fly open and I will note that it was pretty warm that night, so warm in fact that I left my sleeping bag all the way open and slept comfortably, so I suspect the moisture on the underside of the rain fly was from seepage. Sure, I know it happens, but I’d like to see some more water-proofness. On the plus side, the poles kept the rain fly from coming into contact with the main tent, which was mostly mesh and would have definitely caused some drippage.
Conclusion:
Overall, I’m very satisfied with my Sierra Designs Zeta 3 tent and foot print. I would have liked to see the foot print included, but oh well, basically every manufacturer sells it separately anyways. The quality is very good and the design is thoughtful and novel. The features are very nice and make setting up the tent pretty easy once you understand the pole configuration. Final rating – 8/10
Design: three-season three-person freestanding tent
Sleeps: 3
Ease of Setup: Fair, easier once you get used to it
Price Paid: $250
 Reviewed by
yooperman
+4
 April 3, 2011
we love her. lots of room. my wife and i like to keep our gear inside and this tent is fantastic. two large vestibules, tent is very sturdy when guyed out. been in several hi wind thunderstorms lots of rain she worked like a charm.
Price Paid: $138
Your Review
You May Like
Specs
| Price |
Historic Range: $149.94-$249.95 Reviewers Paid: $138.00-$250.00 |
| Trail Weight |
6 lb 9 oz |
| Packed Weight |
7 lb 3 oz |
| Number of Doors |
2 |
| Interior Area |
43 sq ft |
| Vestibule Area |
18.5 + 8 sq ft |
| Peak Height |
46 in |
| Floor Material |
75D Polyester, 3000 mm |
| Body Material |
68D Polyester, Dye-Free White |
| Fly Material |
75D Polyester, 1500 mm |
| Poles |
DAC Press Fit |