Gear Aid Seam Grip+SIL


 Reviewed by
StoicFabian
+2,982
 May 30, 2022
Specially formulated to be easily applied to silicone-coated nylon and poly fabrics to seal tarps, backpacks, tent floors, liquid silicone has many other uses for outdoor enthusiasts. I took some pictures while doing it, so I decided to turn this test into a mini-tutorial for seam-sealing a tarp.
Pros
- Easy to apply
- Has many uses
- Clear
- Dries relatively fast
- Comes ready with a brush
- Inexpensive
Cons
- Leaves a sticky film, but every similar sealing solutions does too.
- Not really a con, it’s a simple product that just plain works.
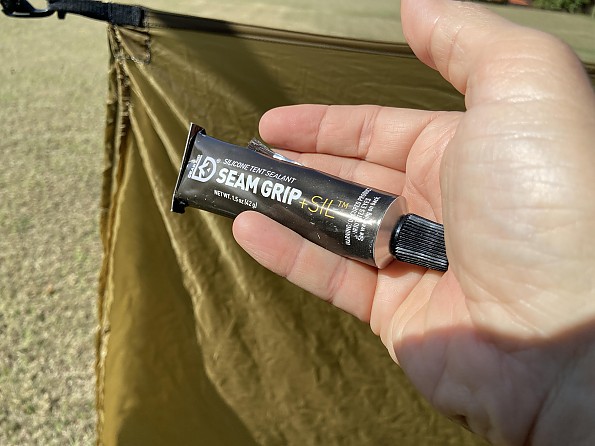
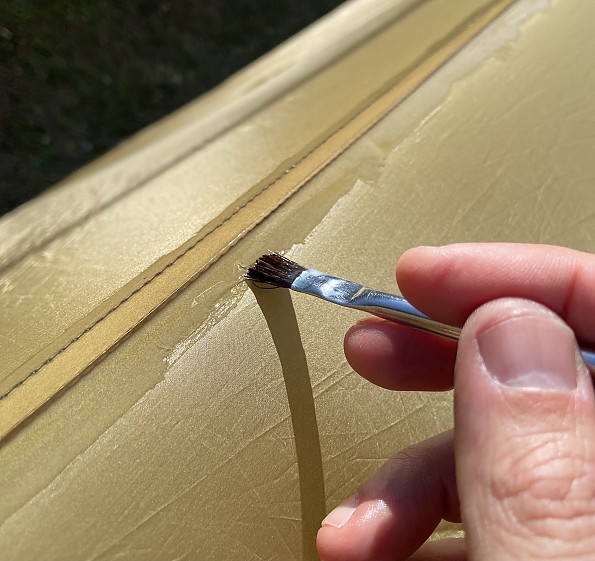
The tube came with the Hummingbird Pelican (shown in the images of this review) to be applied to the tarp‘s ridgeline seam.
It comes unsealed from the manufacturer, which is not an uncommon practice among specialist makers. Dutch and others also sells some of their stuff with seam sealing as an extra, or optional.
Prior to trying Seam Grip Sil, I‘d seal my gear with a mix of silicone and some spirit, to turn it finer so as to be brushed onto the fabric. Recently, I had to do just that to one of my backyard camping tarps that started showing tiny pinholes on the ridgeline seams.
I’ve used other Gear Aid products before, such as the Tenacious Tape and some of their gear cleaners, and have always been satisfied with the performance and quality. Seam Grip Sil was previously known as SilNet, long time users might know it for that name.
The product comes in a 1.5oz./42g aluminum tube, and is said to be good for sealing up to 24ft of seams.
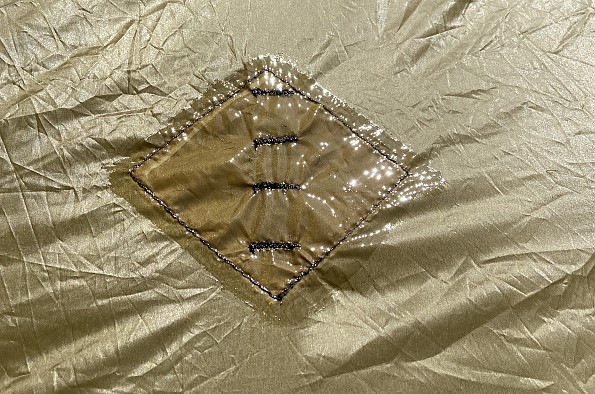
I’ve used about 1/2 tube to seal the 11.4ft. of the Pelican, plus all four side panel pull-outs—so those figures look about right. I wasn’t going to seal the pull-outs, but they have lots of stitching on them so I thought why not, since was there anyway.
It won’t bond well to non-silicone coated fabrics. I’ve tried sealing non-coated fabrics before, and while it may stick at first, after a short time it will start to peel off, especially with the fabric moving and bending.
But when applied to sil nylon or poly, it creates a thin, nice film that will stay permanently bonded to the fabric once dry. It’s very flexible and is touted to resist heat, cold, stretch, and chemicals.
How to seam seam a tarp ridgeline:
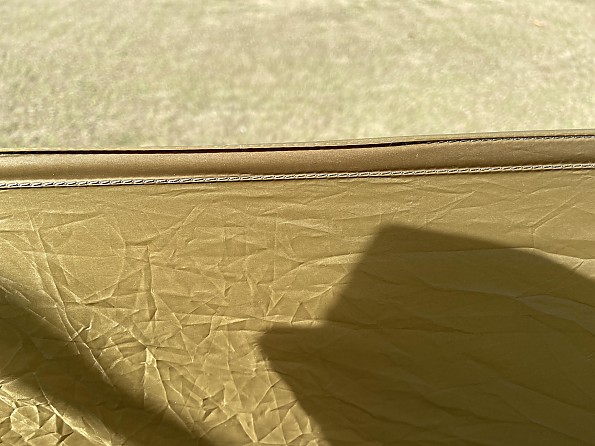
it should be applied to the interior of the piece, in this case the lower, inner seam of the ridgeline. A thin coat will do, no need to splatter gobs of it.
Some people prefer to spread the tarp on a table and slowly apply the silicone in sections. This allows a very deliberate application, which usually renders clean seals throughout.
But it’s very time consuming, because unless you have a really long table (tarp ridgelines usually measure between 10 and 13ft.), it means waiting each short section drying before applying to the next one. I’ve done that and sealing one tarp took an entire weekend.
My favorite method is pitching the tarp top-down (inverted), staking it and then doing the job in one shot. Then, just let it dry and it’s ready to use. If the weather is good (as it was when I received the Pelican), I’ll pitch it outdoors. Otherwise, it may be best to do indoors.
This spreads the fabric and the seam taut, which in my modest option makes it much easier for application, and also affords a much more uniform coating. Some say this helps spreading the stitching as well, to allow for a better penetration of the silicone. I have no way to confirm that, but I do find it more convenient.
There are also two ways to apply the silicone:
One is to run the tube along a stretch of the seam while dispensing the product, then use the brush to spread it as desired. I’ve found this easier with plastic tubes than with aluminum ones, as too much or too little product can get dispensed.
With practice, this gets lessened, but I’ve had drops running down the panels a couple of times before doing this with aluminum tubes. .
Now I prefer to apply a drop onto the brush tip and then coat the seam, working a smaller part each time but ensuring a cleaner, more even job (not that I can achieve that level but I keep trying).
A tip from experience: keep the fabric taut and well staked, because if parts of the fabric fold over and touch the silicon, it will get imprinted definitely. It’s not a big deal, as the silicon is clear, but it will be visible and may bother the more perfectionist. This is critical if you’re doing the job outdoors and it’s windy.
It’s OK to leave the tarp pitched until it’s dry. In my case, temps were mild, it was windy, and the sun was nice, not too hot (it was late summer/early autumn). I went for a bike ride, and when I returned three hours later it was already dry. I left it for a couple more hours just to cure a bit more.
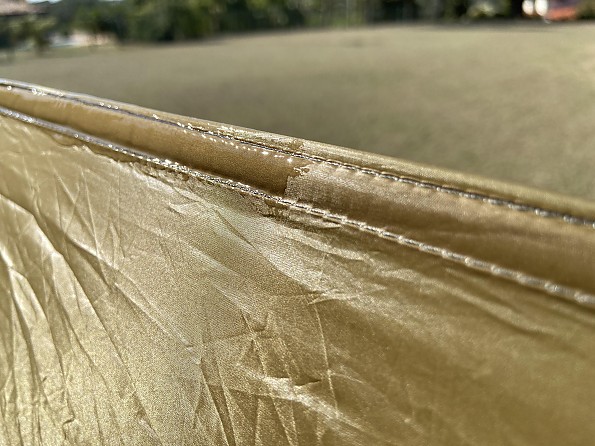
When it’s ready, it’ll still feel sticky to the touch. That’s normal, liquid silicone is like that. The liquid look may take a while to go away, but doesn’t interfere with performance. You may want a little longer to put it back into the stuff sack (or use), but once it’s cured, it’s definitely bonded to the fabric and won’t glue to other parts.
Some experts recommend applying talcum (not baby powder), but I just leave it as it is and with use the stickiness of the surface go away. Mine’s already fine after a coupe dozen nights of use.
It’s a good idea to test the job with a hose, or in the rain, before taking it to a trip.
I haven’t tested the seam “dry” in a real situation (i.e. without the sealing), so I can’t comment on how well it would hold on its own. But I tested it in my backyard before taking it for my first trip, to look for holes in the sealing.
A good visual inspection should be able to find missing spots, but water is water and the the best time to find and correct mistakes is before, not with a leak dripping over our sleeping bag during a storm in the middle of a cold night.
Bonus tip:
Use it to improvise anti-slippers on sil-coated fabrics and other piece of gear. The post-cure stickiness is perfect for that. For instance, I tend to move a lot during sleep, so I “painted” a few thin strips to the tent floor to keep the pad from slipping in less-that-ideal surfaces.
Background
Hummingbird is very strict about the quality of the materials used on their gear, so I figured providing the Seam Grip Sil is sort of an approval stamp.
Based on my experience with the Seam Grip Sil, I decided to drop my homemade seam sealing mix for the ready-made solutions for convenience. Since the price comes out about the same, it’s well worth keeping a tube in stock just in case.
Source: received it as a sample, freebie, or prize (Came with the tarp purchased from Hummingbird )
![]() Reviewed by
Reviewed by
jcreamer
+36
 October 26, 2010
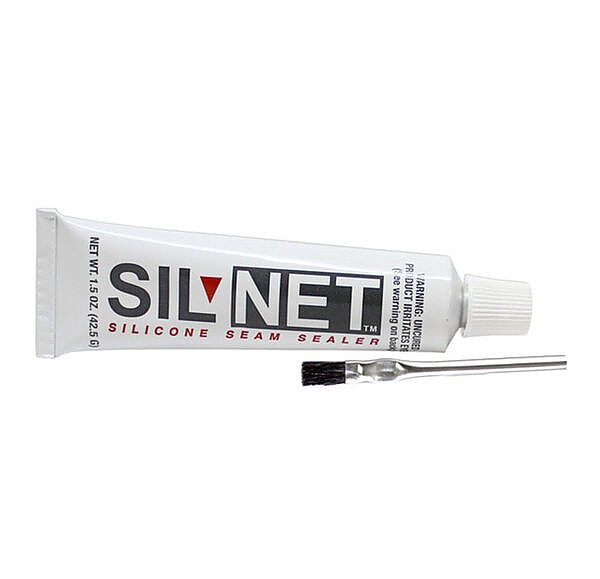
Sil Net is a silicone seam sealer made by McNett outdoors in Bellingham, Washington. The tube I have is 1.5 oz and comes in a squeeze tube similar to toothpaste.
I first used SilNet to seal the seam on the tarp I use for my hammock. The product comes with a brush that is used to lightly apply the product to the seam. It seems easy enough. However, more is not better! I quickly learned that a little of this product goes a long way. That's good because one tube will last you a long time.
Applying the product very sparsely is the secret and giving it time to cure (about 8 hours in warm weather - longer is better) will provide you with a quality, durable seal. It dries clear and remains soft and pliable to the touch.
I have tried several other seam sealers. Most notably the Coleman product that is readily available in the local Wal Mart. SilNet is FAR superior to these other products - especially if you are working with silicone ripstop nylon fabric.
So far, the SilNet has lasted at least two years for me. Most of my camping is in the southeast where it is very hot and humid. The tarp is many times a source of shade as well as shelter from the rain. This means it is in direct sun on days when the temps are near 100 degrees. In other words, it's semi abuse of the product.
I try to take good care of my gear and fold it up nicely when not in use. But, let's face it, when you're in the woods, sometimes time and weather don't allow you to use the most care.
Despite that, this product has performed very well for me and I would highly recommend its use. It is the only seam sealer I will use.
Usage: seam sealer
Ease of Use: easy
Price Paid: $7.95
Your Review
Where to Buy
You May Like
Specs
| Price |
MSRP: $8.95 Current Retail: $9.95-$10.95 Historic Range: $5.99-$10.95 Reviewers Paid: $7.95 |
| Material |
silicone rubber |
| Size |
1.5 oz |
| Color |
clear |
| Adheres To |
silicone treated fabrics |
| Coverage |
288 x 0.25 in (24' of seams) |
| Cure Time |
3-6 hours |
| Cure Method |
humidity |
| Application Temperature |
60° to 100°F |
| Use Temperature |
-20° to 180°F |
| Storage |
Store in cool, dry place |
| Origin |
Made in USA |