Grand Shelters IceBox Igloo Tool


![]() Reviewed by
Reviewed by
Martin
+47
 January 16, 2020 (original Jan 9, 2020)
I've been building with this each winter, 1-2 per season, since 2012 in Banff National Park. Great tool once you've learned the fine details!
Pros
- Well, you get igloos out of this! Everyone is happy inside an igloo. Kids love it as well as childish adults. It is an iconic winter experience. Sturdy and reliable, and geometrically pleasing.
Cons
- There are skills to be developed here, and the end panel would be better if it had a built-in torpedo level for the first level of blocks.
Ideally you'd build this with three people—a form packer, form loader, and snow supplier/conditioner. I've done it solo, but of course it takes much longer and requires some innovation.
Most important notes I have to offer users of this:
- Build the 7-foot model for your first attempt.
- You can ELIMINATE snow condition issues by making piles of snow and packing them with snowshoes before build day, and then breaking up this snow (removing all clumps fist-sized or larger) to build with. Makes for easy packing and a very dense/durable igloo.
- Tape a torpedo level to the outside of the panel for level 1, regardless if a group build or solo. This is simply the best method to get it right. If you get this level wrong, all is lost. You don't have to be exact; even being a bit off-bubble is far better and quicker than eyeballing it. A plumb-bob can also work, but not for a solo build and requires stabilizing to check.
- Build the pad for the igloo and pack with snowshoes before build day. Aim to get 2 feet-plus deep for easy entry to the igloo later. Build for the top of the pad to be 3 feet greater than the size you've chosen. Best to pack pad between layers vs. once or it won't be packed well at bottom, causing igloo to sink into pad later, ruining its geometry.
- The form packer should wear kneepads for level 1 to insulate from the snow temperature.
- Build in a shaded area for best longevity. The season will end when the sun gets too strong.
- Read through the instructions and discussion forum before starting to be well trained.
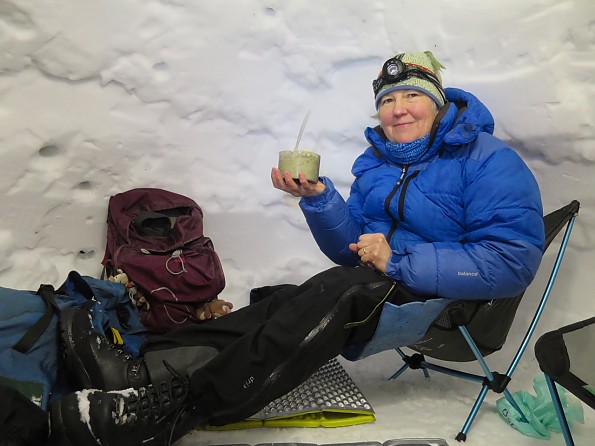
- For camping within, have extra layers under your sleeping bag for insulation. Dress in water-wicking thermal layers with a hat.
Enjoy!
Edit 1: After reading BigRed's review in detail I felt I should add another thing I do differently: the gear comes with a second pivot ball unit that has four screw points on its flat base, vs. being mounted on a stake. I have screwed this unit to a 14" square of plywood. Underneath I've attached a pair of medium-sized soup cans by poking a hole in the bottom and (while wearing gloves) using a short screw to attach the cans to the plywood without poking through the top.
I've done this as I knew I'd be jerking or knocking the pivot stake out of position, and didn't want to seal with the results. This way if there's a jolt the pole simply pops off the ball. After the igloo is done I lever the plywood/can setup out of the floor. Hasn't failed me yet!
Edit 2:
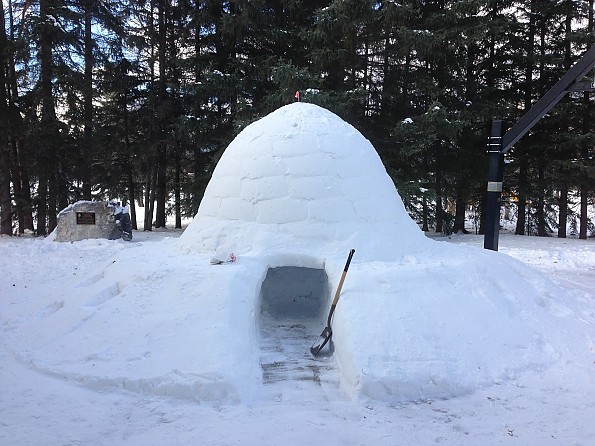
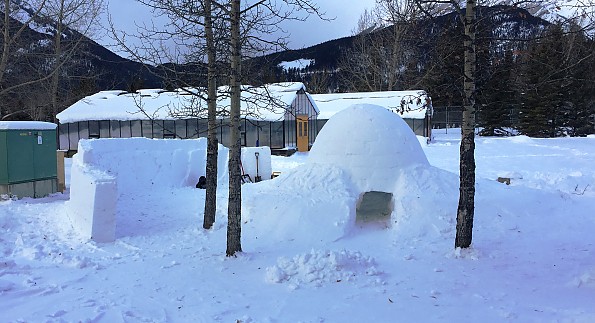
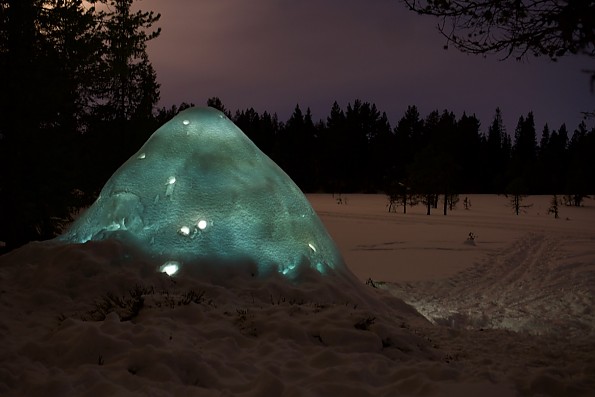
As the above-pictured igloo with wind wall and "cold scarf" was built on Jan 1 and I plan to lead the annual igloo building event on the company campus on the 25th and am reviewing everything for a smooth event with first-timers, more details come to mind. =)
- If doing the 9- or 11-foot models, bring a pair of milk crates for the last two levels. I place one to either side of my plywood square so I've a wide base to stand on. I'm 6' tall, and standing on these gives much better ergonomics for packing the snow.
- Packing the base is important; if it is soft the igloo will sink into it, and the bottom level will buckle outwards. This fails the geometry, and the igloo's weight will collapse the bottom level. If you've doubts about your base or are expecting warm weather and want the igloo to last longer, you can add snow to the outside covering the bottom two levels and snowshoe pack it to prevent the outwards buckling and also insulate the most important levels of the igloo. I call this a "cold scarf."
- Also to aid the lifespan of an igloo, you can either select a spot that is protected from winds out of the west, or build a wind wall. In the above picture I made a form out of plywood to get a 4-foot high, 20-inch wide wall, then also added an igloo block layer to get more height.
- For the final level of a 9-footer, the form loader can't really help the form packer from outside. It is easier for the loader to come within the igloo to give snow to the packer. A shovel won't fit the task at this point; cut off the bottom of a 4L milk jug, seal the cap in place, and use it for this stage. The loader should scavenge "fallen" loose snow from the floor at this point—it is good packing material and you want a flat floor anyway!
Background
I've been using this each season since 2012. Failed my first one due to wrong angle, which is typical.
Source: received it as a personal gift
 Reviewed by
BigRed
TOP 10 REVIEWER
REVIEW CORPS
+9,174
 February 16, 2019
An ingenious system that can be used to build igloos for up to five happy campers. Works as advertised, but using it efficiently requires a lot of experience, especially with difficult snow.
Pros
- Well thought-out design, with a few improvements over the years
- Thorough and honest user's manual
- Customer service
Cons
- It's still a challenge to build an igloo
- Hard to maintain the right shape
- Requires practice and experience to work efficiently
I don’t recall when I first heard about the Icebox, but I do recall being pretty interested when an engineering-minded neighbor back in Vermont bought one. He built one igloo up in the fields behind his house, then promptly stashed the Icebox in his garage and more or less forgot about it. When he heard we were moving to Norway, he pulled it out and generously gave it to us as a going away present, figuring we’d have more use for it than he ever would.
That was almost 17 years ago, and in all that time I’ve completed four igloos with a couple-three more incomplete efforts, mostly up in Estenstadmarka, the city forest out my back door. I finished one a little more than a week ago, but the one before that was way back in 2010. I’ll admit that winter camping isn’t really my thing, especially here in Norway where huts, often little used in winter, offer creature comfort. But in concept igloos are definitely appealing, there’s a lot of satisfaction in finally capping it off and crawling inside to experience the relative warmth and diffuse, muted light. And they sure make for cool night photos!
The Icebox promises to reduce the skill level needed to build an igloo and offers the possibility of building with any kind of snow. But that doesn’t mean that it is completely unskilled, or easy, and it doesn’t change the fact that some kinds of snow are much easier to build with than others.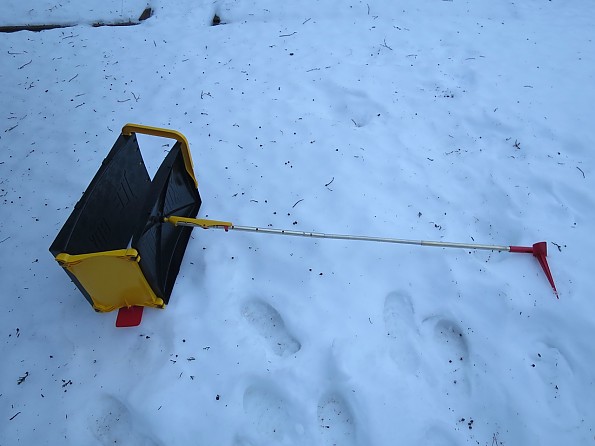
How it Works
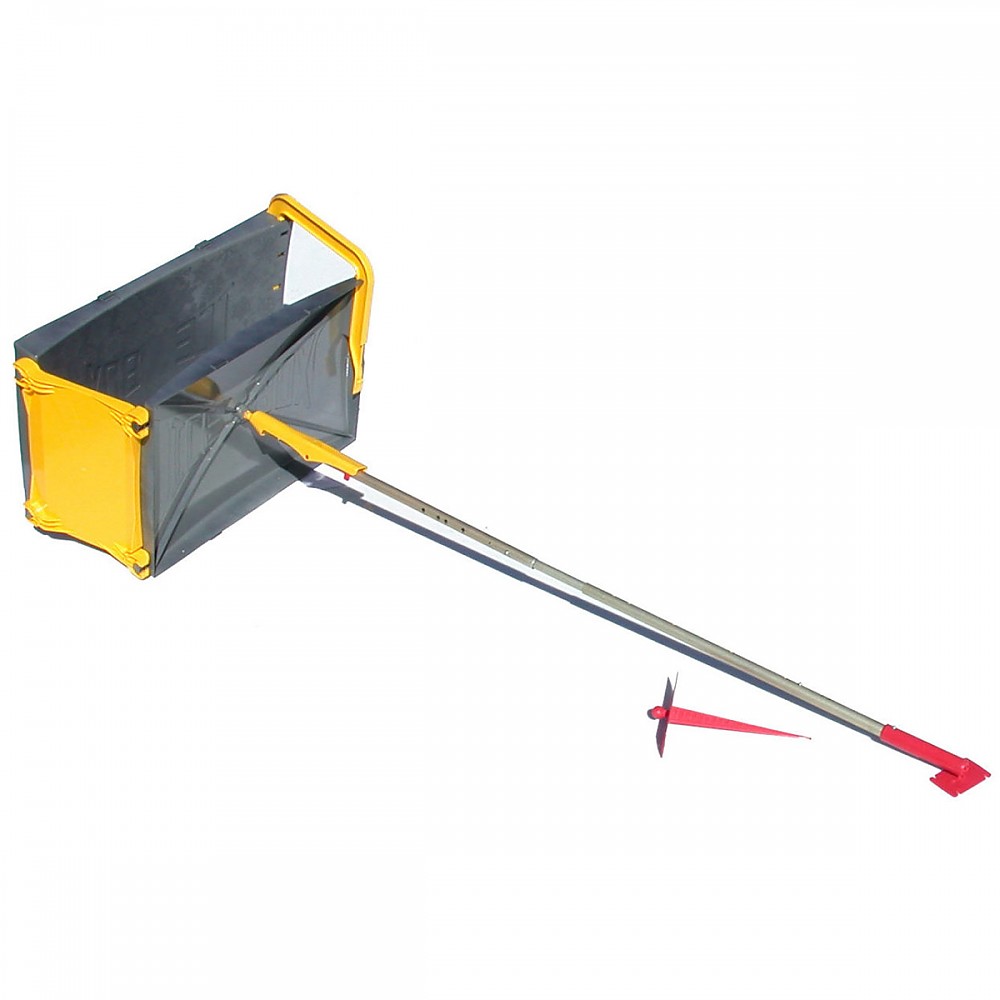
It’s basically a movable mold or form that you pack with snow to form rectangular block, curved to follow the curve of the igloo wall and open on bottom and top and one end so that each block can be packed against the previous one. It is guided by a three-part telescoping pole that attaches via ball and socket joints on the inside of the form on one end and a stake anchored in the center of the igloo floor on the other.
The length of the pole is adjusted for each level of the igloo so that it takes a calibrated, parabolic shape as you work upwards. Different combinations of pole lengths allow for building igloos with diameters ranging from 7 to 11 feet, in one-foot increments, accommodating from one to five people. I have built all 8-or 9-footers and attempted one 10-footer.

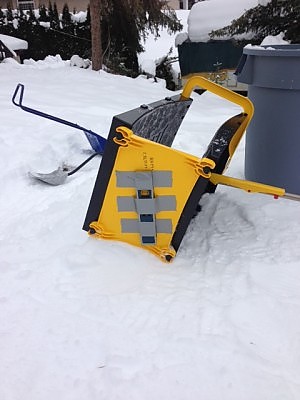
A stiff U-bracket (yellow in the photos) keeps the open end from opening up and slides up so that, in combination with a lever on the end of the pole (yellow and red), the form can be partially opened up to release each block. The red shoe on the closed end helps slide the from into position for each block. Ingenious, but not necessarily easy-peasy.
Weight and Dimensions
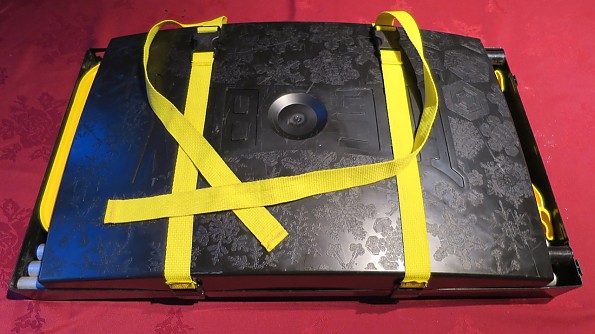
The complete system weighs in at 5.2 lb (2360 g) and fold downs to a 25 x 14 inch (65x 36 cm) package, held together by four fast clips and two straps that can be used to anchor it to a pack. That puts at the lighter end of the weight range of a winter tent, but there may be "some accessories required" for comfortable living in an igloo, such as a ground cloth or the igloo door sold by Grand Shelters. The poles are aluminum with steel spring buttons, the rest a tough plastic that has held up well, excepting the injury noted below.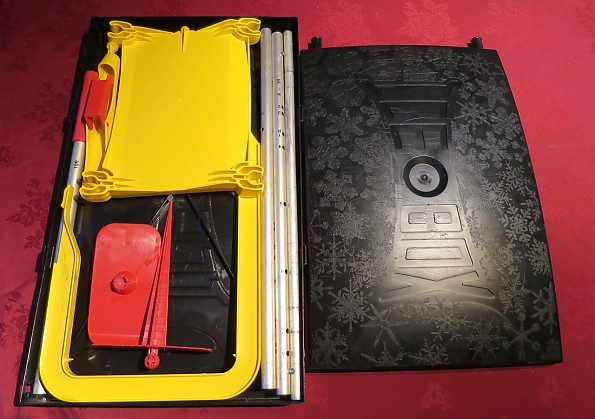
The Hard Part
Igloo success depends on two things: the snow and the user’s ability to maintain the right shape.
Fresh snow at temperatures just below freezing packs well, but as it gets older the snow becomes more sugary and at colder temps it is less sticky, both making it harder to get the snow to sinter into a firm block. I haven’t worked at above freezing temperatures, when the snow might be nice and sticky, but I’m not sure how well it would hold together in the long run.
The instruction manual comes with a full page of tips on working with difficult snow—it’s all about feeling out the right amount of pressure to get the snow to stick together without overdoing it. Maybe due to the Norwegian snow climate, I’ve done a lot more building with less-than ideal snow rather than the primo stuff, and the main lesson is that it just takes more time and patience, to pack the snow, sometimes to wait for it to set up, and to deal with the occasional cracked or collapsed block.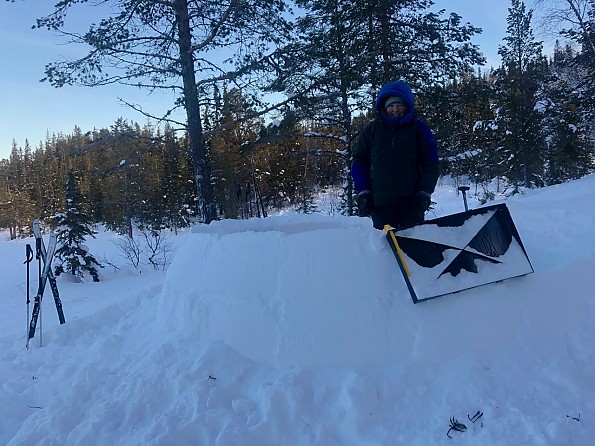
Maintaining shape begins with getting the angle of the first course right. The mold has to be canted inward, and it’s all too easy to lose the angle as you work around the circle. The first course begins with a three-block ramp, and as you work up you change the pole length, on some courses by as much as 4 inches, in the middle of the ramp. On my older model Icebox you do this in one step, but newer models now have intermediate positions to make this more gradual. The pivot stake can also pull out of the ground as you are positioning the form. And the form is curved more for the bigger diameter base of the igloo, so that it doesn’t match the diameter up closer to the top.
All this means that you can wander off the ideal angle so that you end up struggling to get the form in a good position for your next block, often with gaps on the inside that have to be filled before you can really start packing. As the blocks lean in more toward the top, you take off the outside panel so that you can pack from the outside, but it's more critical than every the the block is set up and bonded to the previous one.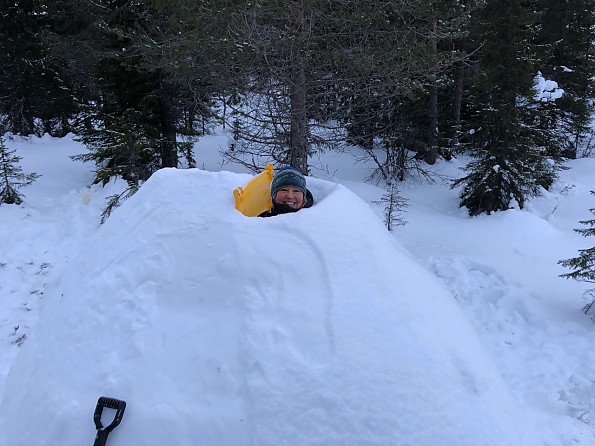
When you finally fill in the last block, the result is bomber—I've been able to stand on top of every igloo that I have finished. 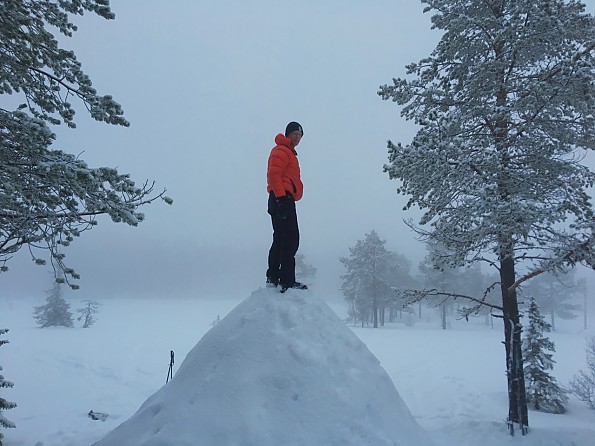
No Substitute for Experience
I’m sure all of this gets better with experience, but unless conditions are ideal I wouldn’t count on moving into your first (or maybe second or third) igloo on your first night out, at least unless packing conditions are ideal. In my case I’ve mostly had to build solo, which also takes extra time, and I have spread the process out over a couple of days to over a week in the most recent effort. I’m sure two hard-working, experienced builders should be able to finish in some reasonable amount of time, depending very much on the snow, but I’m not there yet.
Somewhere along the line, I broke off a corner of the inner panel so that it doesn’t hold and guide the U-bracket properly. 
That made building this last igloo even more difficult, with a somewhat misshapen result. 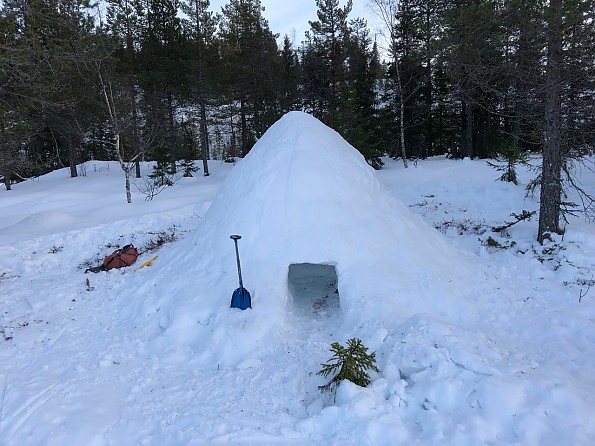
Igloo Ed at Grand Shelters attributes this to an old-style U-bracket—the design has been changed to prevent this from happening. I just ordered a new inner panel for a mere $20 (but not including $hipping to Norway) and Igloo Ed said he would add in a new U-bracket for free. Grand Shelters gets an A+ for customer service and keeping prices on replacement parts reasonable.
I have slept a night or two in most of the igloos I have built, usually with my wife, but as with building I haven’t accumulated the needed experience to optimize the comfort level. With a below floor level entrance you end up feeling pretty well sealed off from the outside, for both better (wind) and worse (what’s going on out there?), and the walls can get damp or even downright wet as it warms up inside.
The Last Word
The Icebox Igloo tool works as advertised. It is possible, but not easy, to put up an igloo using just about any kind of snow, and the builder’s manual isn’t shy about informing you about some of the difficulties you might encounter along the way. A more dedicated user than myself should, with some practice, get good enough with it to reliably build a base camp, but I don’t see it ever being practical for one-night stands.
After this most recent effort I’ve put it on my agenda to recruit a friend or two to help me build a 10- or 11-footer somewhere up in Trollheimen, our nearest mountains, in early winter so that we can use it as a backcountry skiing base for the rest of the winter. Then maybe all this practice will finally pay off.
Background
Four completed 8- and 9-foot igloos over 17 years, plus a few incomplete, one or two nights in each completed igloo, at outside temperatures down to single digits F.
Source: received it as a personal gift
Your Review
Where to Buy
You May Like
Specs
| Price |
MSRP: $189.95 Historic Range: $179.95 |
| Weight |
5 lbs 2 oz |