Belleville Mini-Mil TR102


 Reviewed by
Meeotch
+129
 December 17, 2014 (original Nov 26, 2014)
This "military" boot is a minimal boot designed to give the user enhanced ground feel and flexibility, while providing enough protection to keep the foot injury free in harsh environments and/or rough terrain.
Its durable leather upper combined with a custom Vibram sole makes it an exceptional boot, perhaps the first of its kind to achieve such high performance.
Pros
- Extremely durable leather upper
- Custom Vibram sole offers a perfect blend of sensitivity and strength
- At less than 2lbs/pair, they are ultralight for a leather boot
Cons
- Problems with the sole delaminating
- Snow travel is problematic
- Lacing is subpar
Minimal Boots and the Belleville Mini-Mil TR102:
The Ultimate Review
(The original review can be found on my blog: chasingyourmind.blogspot.com)
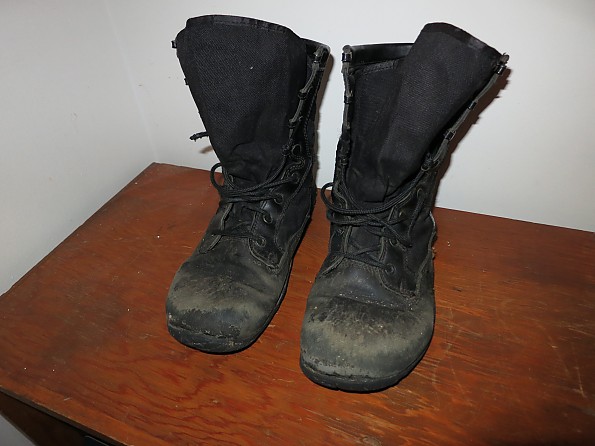
Mini-Mils after 500+ miles of abuse.
This is the review all you minimal junkies have been waiting for. You can find all kinds of reviews on these Belleville boots, but every single one of them is completely incomplete. In my opinion, the best gear review revolves around using a piece of gear extensively until either failure occurs or it reaches a point where further use can’t contribute an iota more to the reviewer’s conclusions.
And that’s what I have to offer you. None of this “yeah I hiked in them a couple times and they worked great” or even “yeah I have them on order and I’m sure they will be awesome!” I hardly ever write gear reviews, but I feel absolutely compelled to share with you what I have discovered.
With the fairly recent uprising of the minimal footwear revolution, many people have found solace in what the market has to offer. Whether you’re stoked on the most minimal of the Five Fingers lineup or you just want a zero drop shoe that still retains all the cushion (Altra for example), the whole spectrum is pretty much covered…or is it?
There are a lot of minimal running shoe options out there, and plenty to choose from for casual wear. But what about those times when you want the protection of a boot? Maybe you’re off trail with a heavy pack, shwacking along through downed trees and treacherous talus fields. You could pull it off in some Vivobarefoots but I guarantee they’d be trashed by the end of your trip. You could rock some FiveFingers or some huarache sandals but what happens when that boulder shifts and lands on top of your foot? Or maybe you are a professional whose job requires leather boots, and furthermore you need the protection of leather to stay safe on the job.
In the past, many minimal aficionados who just straight up needed a boot in certain situations would have no choice but to drag their heavy ass hiking boots out of the closet and suffer through another trip. Well, I’m telling you this is a thing of the past. Belleville has answered with their “Mini-Mil” line of military boots.
This spring I found myself in this exact situation. Not only was I longing for a minimal shoe that would actually hold up to the abuse that I tend to put my shoes through, but would also meet the requirements of my job as a Wilderness Ranger.
I’m an avid rock climber and also need an approach shoe that won’t tear when I stuff it into a crack (The Altra Superior had become my go-to approach shoe, but really there is just too much cushion and not enough durability in that model, as is the case with most synthetic options).
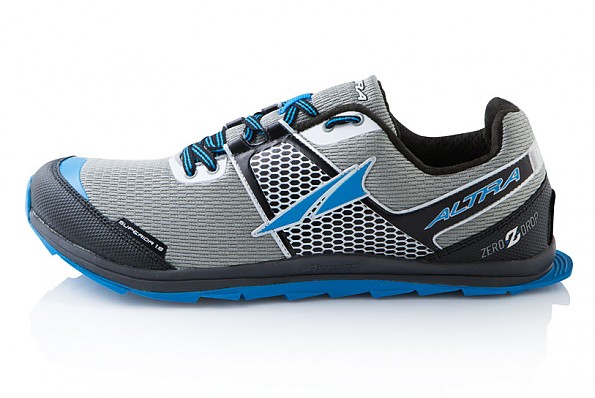
The Altra Superior 1.5 - a worthy all-around trail runner that can barely hang as an approach shoe. Its deficits in durability and stickiness combined with substantial cushioning make it less than ideal for abusive pursuits, or for users preferring a more minimal experience.
I scoured the internet and the retail shops for “minimal boots” but either that category didn’t exist, or the options available did not truly cater to the minimalist user. So let’s get some things straight while we’re on the subject: what makes a shoe/boot MINIMAL?
First of all, it needs to have zero drop from heel to toe. Second it needs to be anatomically shaped like a naturally aligned human foot. This means WIDE toe boxes that are widest at the tips of the toes, not at the metatarsal heads. Third it needs to be FLAT on the inside with no built-in arch support. Fourth it needs to avoid toe spring (a rise in the sole from the metatarsal heads forward). Fifth it needs to be flexible and light. The sole should be easily manipulated and able to bend in all directions, and it should be thin to allow for maximum proprioception.
I considered the Lems Boulder Boot as it is leather, but it’s definitely designed as a casual boot and would get totally shredded. The Vivobarefoot Offroad Hi was close but the toe box is too narrow. (C’mon Vivo, widen your freakin' toe boxes already!!) The FeeImax Kuuva looked OK, but I read about issues with the sole wearing through prematurely. I feared I would return to my ranger job back in my old boots and suffer through another 500 miles of elevated heels and tapering toe boxes…and terrible plantar fasciosis.
Lems Boulder Boot - A fine casual option.

Vivobarefoot Off-Road Hi - Looks like a nice boot, but I read reports of the sole delaminating. Also the toe box is quite narrow.
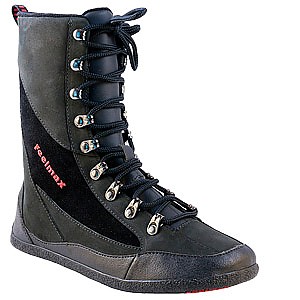
Feelmax Kuuva 2 - This boot just looks like it would get shredded.
That’s when I discovered the Belleville Mini-Mil online and I just about shat my pants.
From their website: “A true minimalist boot featuring a 2mm "drop" between the heel & forefoot, the MINI-MiL® is designed specifically for the conditioned warrior athlete currently training in minimalist athletic footwear. This quick-drying unlined boot is not only highly breathable, but lightweight too - weighing less than 2 lbs a pair.”
I had to check these out, so I placed an order for 3 different sizes, as apparently these boots ran small. Within these sizes I also tried the normal and wide lasts.
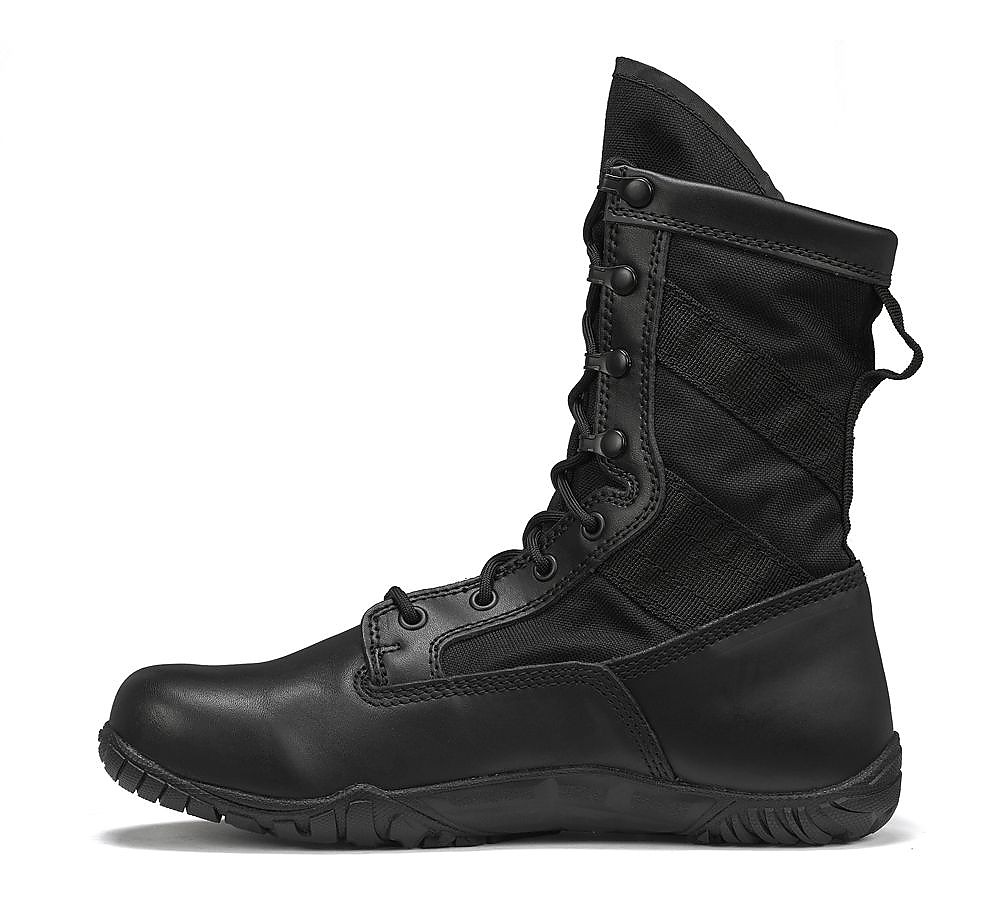
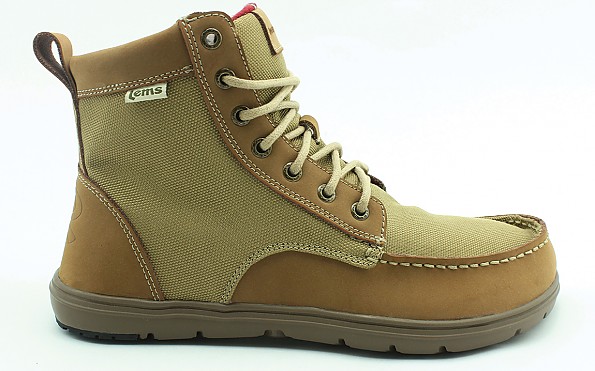
Behold the Belleville Mini-Mil TR102 - an undisputed modern classic!
After the boots arrived, I spent a significant amount of time walking around the house trying to get a feel for them and what size I would be. I will tell you right now that these boots have a few quirks regarding size and fit.
First, they run at least a half size small. Second, they are quite high volume for their length. Third, the heel cup is problematic. Let me explain. Length: most people will go up a half size to fit correctly in the Mini-Mil. However if you are transitioning to barefoot activities and/or minimal shoes, be prepared for your feet to splay in width and length, perhaps significantly.
Personally, I used to be a street shoe US 10.5, then I started wearing toe spreaders and doing the barefoot “thang”…they turned into a street shoe US 11. I ended up buying the US 11.5 Wide Mini-Mil, just to give you some perspective.
Now the volume of the boot is a bit strange as well. To be honest, I would have preferred a US 12 for length, but at that length the boot’s volume was just enormous. With the 11.5 Wide, I had the laces pretty much snugged all the way to get my foot to stay put inside the boot, and I had just enough length to give my toes some space. The 11.5 normal width was a slightly better fit in volume, but did not have enough width at the tips of the toes.
Unless your foot is very narrow and/or you are female (there is not a woman’s version at this time), I think you will appreciate the extra width found in the wide last. On the flip side, if you have very wide feet you face a tricky situation, because you will be forced to go up further in size, thus increasing the volume even more.
OK, so the heel cup is the last issue. Belleville has incorporated a stiff heel counter into the Mini-Mil, and the ridge that it creates in the heel cup is problematic for some, especially due to the angle that the counter projects forward. Some users have recommended removing the heel counter, and I will provide detailed instructions on how to do that later in the review. For the time being, the heel counter was satisfactory for me so I decided I would at least try it.
I also noticed some irritation on the side of the heel (at the lateral malleolus) and found a seam that is problematic. Some users have reported problems with blisters on both the medial and lateral malleolus. In fact after wearing them around the house for a while, I was worried this would be a major issue. At that point I prayed it would break in with time. So all things considered, I decided to go with the US 11.5 Wide and hope that break-in time and tweaks would render them functional and acceptable.
I’d like to mention one more thing about fit here. I mentioned that I wear toe spreaders to help with my plantar fasciosis, and I have been able to wear Correct Toes INSIDE the Mini-Mil! In order to make this work, I cut off the outer two posts leaving the two medial posts to spread my first and second toes.
My sock system includes an Injinji Liner Toe Sock, modified Correct Toes, and then a thick wool sock over the top of everything. This combination helped take up some volume in the boot, but honestly was not enough to keep my foot secure. In addition to the stock footbed, I used an SVST 1/16” insole shim and a “Stoneguard” shim from my Altra Superiors to take up additional volume. Now you may be thinking that would decrease proprioception, and you’re right, but very minimally and I will touch on this later.
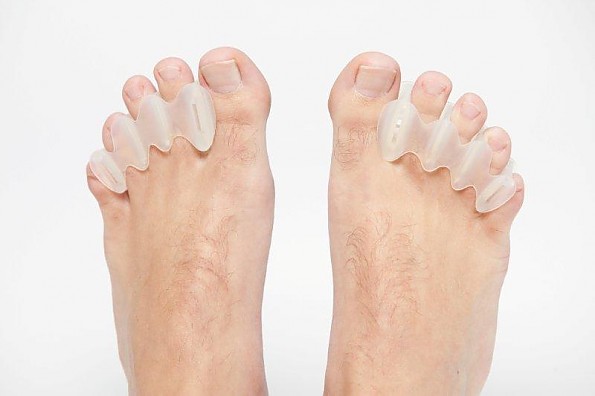
Correct toes with all four posts.
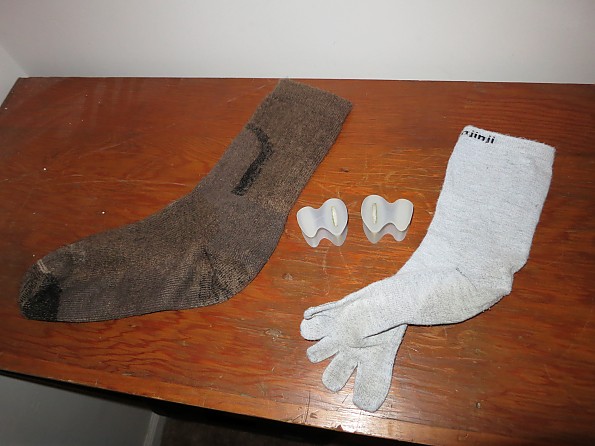
My sock system with modified correct toes.
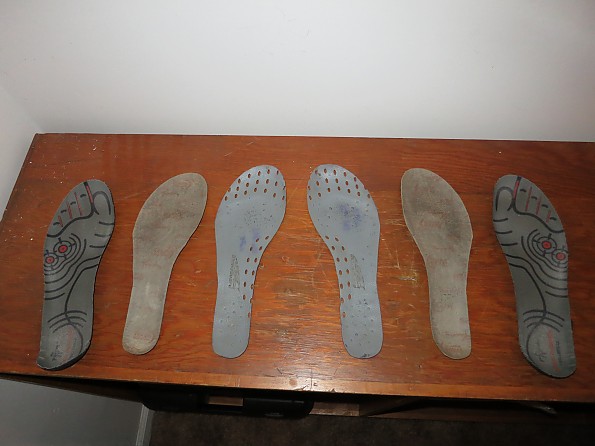
Altra stone guards (middle), SVST shims (tan), and the stock footbeds (outsides). This combination helped take up some volume, as well as take the edge off of long days with a heavy pack.
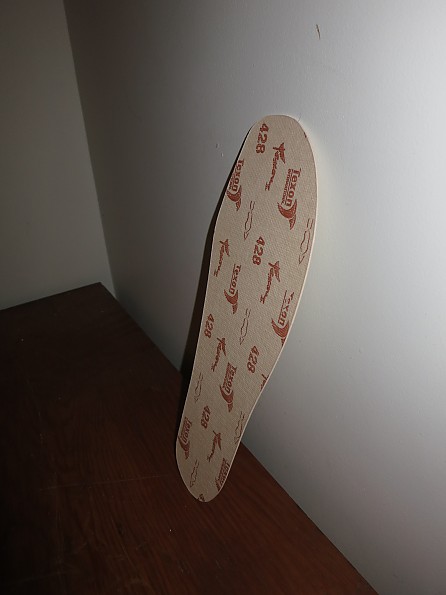
A new SVST shim.
Moving on to the meat of the review, I’ll talk about how these boots perform. Again, I am very hard on my boots. As a Wilderness Ranger, I hike an average of 20-30 miles a week with a pack weighing between 25 to 50 pounds. On top of the hiking, I do quite a bit of manual labor digging holes, cutting timber, and hauling heavy objects. I use my footwear as tools at times to move earth or smaller objects. I travel on all types of terrain from smooth trails to talus and slabs to snow and ice.
Now 20-30 miles a week isn’t a ton, but looking at the big picture, my boots take a beating! In fact, I witnessed members of my crew completely chew through heavy, full leather backpacking boots made by Mammut and Asolo over the course of the season and have to replace them. I had told myself early on “If I can get through the season on two pairs of Mini-Mils I’ll be happy.”
Early season in the mountains involved some significant snow travel, and immediately exposed the boot’s biggest weaknesses. Kicking steps with the Mini-Mil is cumbersome and inefficient, as you might expect from a very flexible boot. There is little edging power for steeper slopes, and the tread on the outsole is quite shallow. I found myself slipping excessively in the beginning, and even after improving my techniques I still found them to be lacking in performance.
On a couple trips I resorted back to my Salewa Mountain Trainer Mids to have the security of a stiffer boot with a lugged sole, in exchange for decreased sensitivity and anatomically awkward locomotion. The Mini-Mil is also far from waterproof and got soaked almost instantly in the snow. These boots are unlined so they do dry out faster than a Gore-Tex boot, but I wouldn't say their dry time is necessarily fast. The thin sole made it hard to stay warm while standing, but generally I was able to stay warm while moving (I credit my sock system for this).
Overall, the rigid, waterproof boot truly provided safer travel and I feel this experience exposed the necessity for a quiver of boots for the well-rounded mountain enthusiast, and certainly for any technical climbing requiring crampons and/or insulation.
As the weather warmed and the snow started to melt, the Mini-Mils really began to shine. Despite my feet being completely soaked most of June, I was just coming out of my skin in satisfaction. I had never dreamed of finding such a perfect blend of sensitivity and protection. As my feet grew stronger, the level of comfort increased. The heel counter and the seam at the malleolus broke in and I never had a problem.
Initially I was skeptical about hiking on rocky trails with a heavy pack, but to my surprise I remained balanced and pain free. After longer days of around 10 miles, my feet would be tired but they wouldn’t ache like they used to. I’m sure most of you have experienced that feeling when you finally get back to your car or to camp and you just can’t wait to get your boots off…well, that’s just not the case with footwear of this nature.
The somewhat loose, roomy fit combined with maximum flexibility and sensitivity leave your feet at the mercy of their own intrinsic strength, and once this strength settles in, your feet just exist in their natural state. I could put my boots on at 6am and take them off at 9pm and never feel the need to take them off. It’s simply as close as you’ll get to barefoot in a durable leather boot.
As my strength and comfort increased, I began the process that I like to call transfiguration. The experience became far more than just enjoying a light, sensitive boot. I was beginning to connect with my primordial locomotive tendencies. It was like being reborn. I realize this can sound cheesy or cliché, but I don’t hesitate to describe how life changing this summer was for me. It was like my feet had been in a cast their whole life and I was finally taking it off.
My previous pursuits with barefoot running had a similar effect on me, but due to the nature of the travel and the terrain I was engaging, I was spellbound in a more profound way. Let me just put it this way: People, your feet want to feel the ground. Your brain wants your feet to feel the ground. Your brain uses the sensations coming from your feet to increase performance and efficiency within your nature of travel. When you add a bunch of foam between your feet and the ground, or screw with the position or angle of the foot, it throws everything off. Your reaction is slower and it can also cause injury. Ever notice how scary it is when you step wrong and you almost twist your ankle but your body reverses the action just in time? Has that ever happened to you barefoot? I highly doubt it. It has not happened to me yet while wearing these boots, whereas I would say it happens to me occasionally in beefier footwear.
I watched one girl on my crew consistently “almost” sprain her ankle on trips throughout the season, and when I would suggest the boot could be the problem, her response was “No, I need as much support as I can get”. Well the problem is that with all the cushion and support, you are decreasing proprioception and therefore increasing the body’s response time to deal with ankle twisting action, amongst other things. Ok, I’ll step down from my pedestal…
So yes, the performance of these boots is outstanding. I’ll start with the outsole. Belleville uses a custom Vibram sole on the Mini-Mil, and it is an exceptional blend of stickiness and durability. Compared to the Vibram soles found on more traditional hiking boots, I would describe the rubber as being equally sticky, but overall traction with the Mini-Mil is more of a mixed bag.
On rock slabs, the flexible sole of the Mini-Mil allows greater conformity and thus contact with a greater surface area. This makes it feel stickier than a traditional hiking boot. I have scrambled on terrain up to 5.6 in these and felt secure enough, though I would certainly prefer true sticky rubber, my favorite being Stealth. On loose or muddy terrain, the Mini-Mil is inferior in traction to the lugged rubber outsoles of modern hiking boots…though I will point out that the Mini-Mil’s sole has a bit of depth to the tread which helps, and the design improves sensitivity compared to taller lugs.
Ultimately, the sole makes some sacrifices in the traction department to improve the overall minimal experience. As far as durability of the outsole goes, I was flabbergasted! After approximately 500 miles, I would describe the sole as having 20% life left. How can this be?? How can such a thin sole be so durable yet remain sticky? I have no idea, Kudos to Vibram!
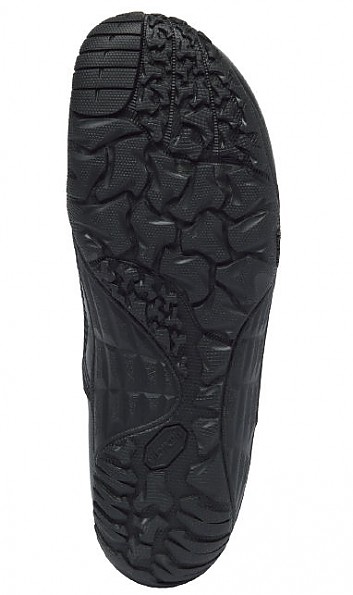
The Vibram Tarsus sole found on the Mini-Mil.
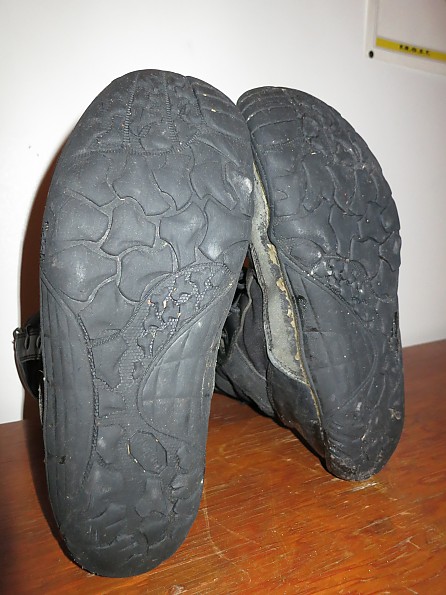
After 500+ miles, still looking pretty decent!
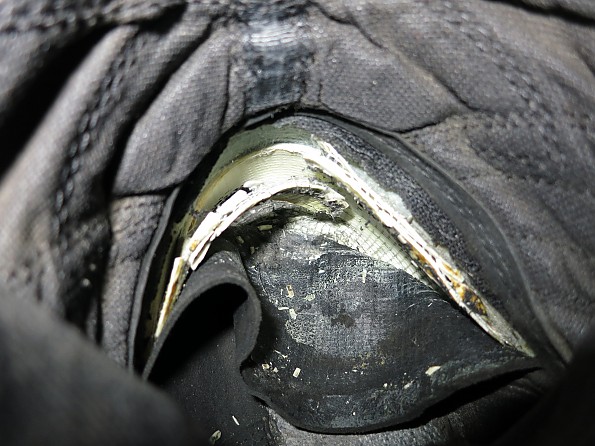
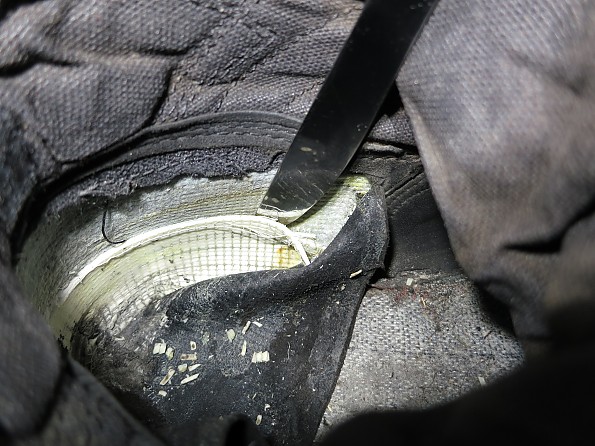
Moving up from the sole we immediately encounter a major problem, and in my opinion the “Achilles heel” of this boot: the attachment of the outsole to the boot proper. I don’t know what kind of glue Belleville was sniffing when they put these boots together, but maybe they should have used it instead of the shwanky adhesive that ended up in production.
After 50 miles, the toe of the boot began separating, and soon after the sides of the toe box and the heel followed suit. I ended up re-gluing the sole back to the boot a total of 3 times in its lifespan. All things considered, this problem wasn’t a deal breaker for me ONLY because I was able to keep these issues at bay with a tube of Freesole. Just realize that this separation will almost surely happen and you best have some glue around to fix it.
One detail I wanted to mention that may not be obvious is that these boots have no midsole! This is pretty common in minimal footwear but for a boot it is pretty much unheard of. Thank you Belleville for upholding the spirit of minimal design. In this case, less truly is more!
The uppers of this boot are about half leather half synthetic. The entire toe box is wrapped in one-piece leather which is my preferred design. The lack of a rubber toe rand did not end up being an issue, as the leather on this boot is extremely durable. A narrow strip of leather bridges the toe box to the heel cup, where another piece of leather wraps all the way around.
Note that the TR102 which I purchased (black in color) does NOT have the drain hole on the medial strip of leather bridging the toe box to heel cup, whereas the other two colors do. (I couldn’t find any mention of this on the Belleville website). I treated the leather with Nikwax once, and after I saw the soles separating I figured it was a lost cause since the boot was just going to fall apart anyways. But after 500 miles and a tube of glue, I wish I had taken better care of the leather.
The problem is that when leather gets dried out, not only does it weaken but it also SHRINKS! Yep, over the course of their life my boots have shrunk a bit…to the point where I have taken out the 1/16” shim and the toe box is even shorter (now my toes lightly brush the front when I walk). Not good. Treat the leather regularly to prevent problems like this.
Pulling it all together, the lacing on the Mini-Mil is subpar. At the very least, Belleville should have used lace locks like most boots do at the ankle junction. The problem is that with an 8-inch boot like the Mini-Mil, people with large calves prefer to keep the top of the cuff loose, but may still want the instep tight. You can’t achieve this without a lace lock. There are lacing techniques (ie surgeon’s knot) to help mitigate this problem but I did not find it to be adequate…instead I found a better solution.
Just cut the laces short so that your finishing knot is just above the ankle junction. This leaves the whole upper cuff without laces, but really that section doesn’t need any tension for the boot to fit properly. If you find it does, thread a second lace through it and finish with a second knot. The lacing stops quite short of the toes on the instep, negating the ability to fine tune the fit of the toe box. I found this to be annoying, and even though my shimming technique mostly fixed the volume issue, I would love to see Belleville extend the lacing on future versions.
Well, that about sums up the Belleville Mini-Mil. Skip ahead to the final paragraph for my conclusions if you wish. I will take this time to revisit the details of my personal fit and also describe surgery procedures for heel counter removal. My addition of Correct Toes in the boot is certainly optional, but I highly recommend it. Many people who experience “plantar fasciosis” or pain on the bottom of the foot, predominantly in the heel, are actually suffering from an issue with circulation, not inflammation. Dr. Ray McClanahan has an excellent explanation of this in his Correct Toes video found here:
My personal experience has been that removing traditional modern support from the foot without spreading the toes (especially the great toe) exacerbates plantar pain. Take a look at your foot and pay attention to your big toe in relation to everything else. Does it point straight ahead? Does it point inward and thus form a bunion at the metatarsal head?
If you have a bunion at your first metatarsal head, then I strongly recommend you wear a toe spreader with the Mini-Mil. I recommend Correct Toes because while they are expensive, the medical grade silicone is ridiculously durable. Mine look almost brand new after a whole year of abuse! (By the way, if you decide to go with Correct Toes and you are between sizes, definitely size up.)
The shims that I used in the boot to take up volume did indeed affect the overall experience. For the first 350-400 miles, I had both the SVST shim and the Stoneguard underneath the stock footbed. This took a small amount of ground feel away…how much? Well at the end of my season I decided to go for a 10 mile hike with only the stock footbed in place (which by this point has been stomped paper thin). The result was indeed a bit more sensitivity. After the hike my feet felt fine, but a bit more fatigued than normal. The Altra Stoneguard really does help take the edge off of all the sharp, pointy obstacles on the trail. I would say for hiking with a light pack, there is no need for the Stoneguard. But with packs of 30lbs+ it is a nice addition without sacrificing much sensitivity.
Taking the Mini-Mils to surgery is in my opinion a last resort. It is a fairly invasive procedure that is straight forward, but can be screwed up. Personally, I never experienced any pain from the heel counter. In fact, I have not had a single blister with this boot. The seam that was irritating my malleolus broke in just fine as well.
Still, others have not been as fortunate with the heel cup. The heel counter is fairly aggressive in its forward angle, and really has no place in a boot of this nature. After removing the heel counter and hiking 6 miles, I did not notice that it had been removed…which reaffirms my opinion that it is useless in this setup. All it does is stiffen up the heel cup and potentially cause problems. So here’s how to remove it (proceed at your own risk!):
Assemble the required tools: a headlamp or flashlight, needle nose pliers, sharp knife, dull knife (I used a butter knife), and a tube of glue (I prefer Freesole).
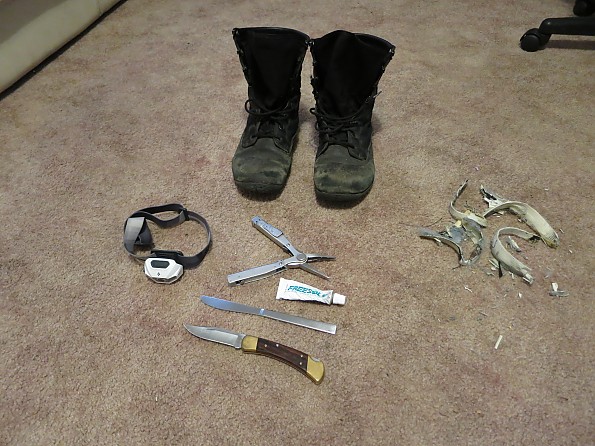
Helpful tools, with the removed heel counters in pieces on the right.
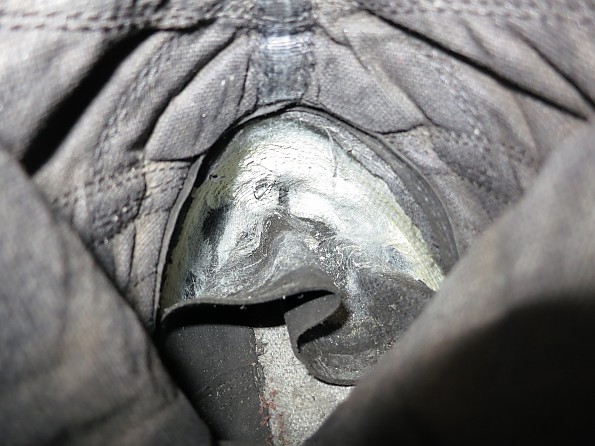
Begin by removing any footbeds or shims that may be in your boot. Locate the seam on the inside of the boot that spans the heel cup. I will call this the “heel cup seam”. This seam is horseshoe shaped when seen from above, and intersects with a diagonal seam on both the medial and lateral sides of the heel cup.
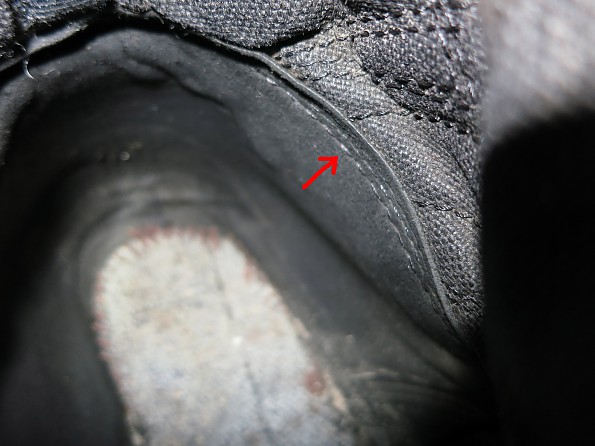
The "Heel Cup Seam"
Using your sharp knife, make an incision into the leather at the back of the heel a couple millimeters below the stitching of the heel cup seam (with a sharp knife this should not require much pressure…don’t go too deep!), and continue cutting clockwise along the seam staying just below the stitching until you reach the intersection with the diagonal seam.
Go back to your initial incision point and cut the opposite direction until you hit the intersection with the other diagonal seam. Now you have a horseshoe-shaped cut that parallels the heel cup seam and stops at the intersections with the medial and lateral diagonal seams.
Using your dull knife, pry the leather heel cup away from the heel of the boot, exposing the heel counter (white, hard plastic thing). The leather is glued to the heel counter but it comes off pretty easily. Be thorough when prying the leather away from the heel counter, especially down in the bottom corners.
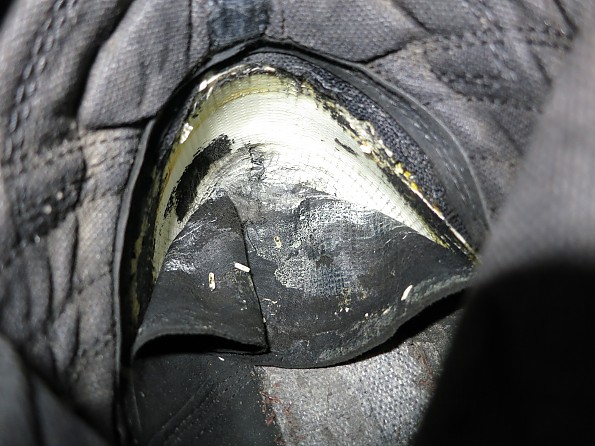
The leather heel cup has been peeled away, exposing the heel counter.
Now begin removing the heel counter. I found that the top half of the counter came out easier than the bottom half, as it essentially breaks in half upon removal (actually it breaks into a lot of different pieces and is a pain in the ass!) Feel free to use some force here to tear the counter from the boot, as the heel counter is glued in there…
BUT…if you find yourself really putting some muscle into it then STOP. You risk separating the sole of the boot from the boot proper. Instead, use your dull knife to wedge the heel counter off the heel of the boot.
Beginning heel counter removal.
Wedging the heel counter out.
Heel counter fully removed.
Once the heel counter is removed double check your work by inspecting for little pieces or chunks that you may have missed. Again, be thorough and use your pliers if you need to. Once you have double checked your work, prepare to glue the leather heel cup back to the boot proper. I used a pair of latex gloves to protect my fingers from the glue.
CAREFULLY put some glue on your finger and then spread it along the inside of the leather flap. If you’re good you can coat the entire inside of the flap with a thin layer of glue, but I just put it along the top inside rim. I also put a thin layer of glue along the back of the boot proper where the leather flap will adhere. A thin layer is key here…too much glue will cause bumps to form and you’ll have a new set of problems.
Once the glue has been applied, carefully fold the leather flap back into place, doing your best to match it back up with your original cut. I ran my finger along the entire cut a couple times to ensure the leather had indeed bonded to the back of the boot. Wipe away any excess glue with a cloth, and leave it to dry. I left mine 48 hours to be absolutely certain the bond was solid (I didn’t feel like dealing with that mess again!) And there you have it, no more heel counter!
In conclusion, I feel the Belleville Mini-Mil is groundbreaking. It is not totally zero drop, and the toe box is not completely accommodating of a naturally shaped foot. But even with its list of problems, its combination of durable leather uppers with a phenomenal outsole and exquisite “barefoot” feel set it apart from the rest. This synergy of form and function equals more than the sum of its parts, and ultimately allows the user to rediscover how nature intended us to travel on foot.
Our feet are our main connection with the earth, and wearing these boots has helped me understand this connection on a deeper level than I have ever experienced. They have replaced my approach shoes and hiking boots, and they are lighter AND more durable than either. They lasted an entire season, exceeding my expectations in durability, and even have 100 miles or so left in them by my estimation. Heck I have even gone on short runs in these successfully.
At $130 retail, these are a no-brainer. Thanks for reading!
Overall Score: 90/100
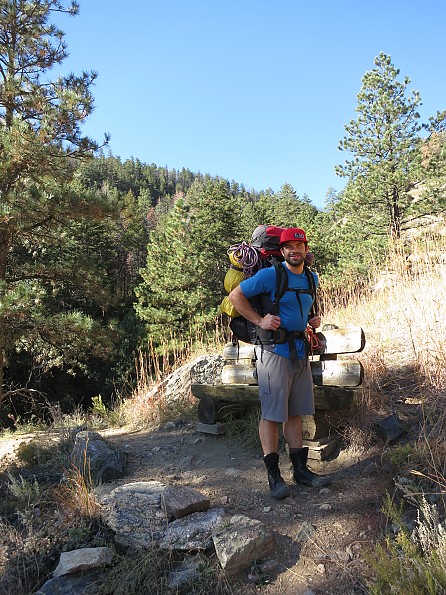
Rocking the Mini-Mils with a 60lb pack. They look goofy as hell with shorts but it doesn't matter cuz I'm on cloud 9 with these on my feet.
Source: bought it new
Price Paid: $130
![]() Reviewed by
Reviewed by
Richard
+45
 November 9, 2021
Good boot. Heel needs wearing in. Order one full US size larger to fit. Heel insert breaks up although can be removed.
Pros
- These boots are the only thing that comes close to a minimalist combat boot. Extremely hard wearing and after the longer than average break in period (of the heel), they are comfortable.
Cons
- You must order a complete US size larger for them to fit.
- The heel rubs, but once worn in, this isn't an issue.
- Heel cup issues


Ever since owning the boots, I have worn them every day and this includes in water and in mud. When I go hiking, which often includes walking down slow moving streams and swimming through rock pools dotted along these water courses, the boots get wet, then stay wet whilst worn.
Because of the saturated nature of the boot, and some excess movement of the heel up and down when wet, small areas of the stitching inside the boot between the horizontal inner sole at the heel area and the vertical leather inside the boot that retains the heel cup will wear. When the stitching wears, it creates an open area which allows small, broken down, white pieces of plastic from the stiffening plastic heel cup/insert to exit into the inside of the boot.
I assure you that this is not something I imagine. It is actually very annoying when you feel that you constantly have grit under your heel, when in actual fact it is small broken up pieces of white, square plastic. Micro plastic to be exact.
This heel insert is a piece of white plastic which is made of a material that eventually breaks up into many tiny plastic squares. Once a few plastic pieces come out under one's heel, then they keep coming out. The only way to stop it is to either rip out the insert which solves the problem, or use a glue to seal the open area created by the worn stitching which may also work. This problem is extremely annoying.
Background
Good
Source: bought it new
Price Paid: $180
![]() Reviewed by
Reviewed by
HFD
+33
 March 24, 2023
Almost perfect. Almost.
Pros
- The flat, flexible sole has enough flex to feel the ground, yet offers sufficient protection from stone bruises.
Cons
- Heel counter
- Small sizing
I've been wearing minimalist shoes (Xero) for three years now, and I've been looking for a general outdoor boot with the same qualities. Belleville almost nailed it.
The things they got right were sole flex and light weight. It's basically a lightweight stripped down 1960s Jungle Boot with a flat, thin, and flexible sole.
The heel counter is tall and stiff and it tilts forward, digging into the Achilles tendon. That isn't needed in a boot with such a flexible sole.
To make this boot perfect, delete the heel counter and toe box entirely (or make them out of cardboard so they won't stay rigid forever).
There is a bit of toe lift, that is the toe of the boot curls upwards. You don't want this with minimalist shoes since the objective is full natural foot contact with the ground.
A really robust closed metal loop holds the top four lace holes which makes putting them on or taking them off time-consuming. Speed hooks would be an improvement.
Sizing is a half size too small. Order up or you'll be returning them.
Background
Hiking, hunting, bowfishing, scampering generally.
Source: bought it new
Price Paid: $130
![]() Reviewed by
Reviewed by
tracker clayton
+188
 December 16, 2015
Since the Mini Mil's introduction they have addressed and improved the boot to even have several other boots to ease you into barefoot shoes.
Pros
- Rugged
- 3 color choices
- Light
- Great for stalking
- They help keep your balance
- Ankle support
- Very little break-in period
- Great traction
Cons
- None
These boots have had all the former issues taken care of. I can feel the ground below me and move silent.
Now the green and black take longer to break in due to the heavy dyes, but the desert tan ones are good-to-go from day 1. They dry quick and have great traction. Well worth the money.
Source: bought it new
Price Paid: $120
Your Review
Where to Buy
You May Like
Specs
| Price |
MSRP: $149.99 Reviewers Paid: $120.00-$1,800.00 |
| Height |
8 in |
| Heel Drop |
5 mm |