Six Moon Designs Gatewood Cape


 Reviewed by
LoneStranger
TOP 10 REVIEWER
REVIEW CORPS
+14,829
 November 22, 2022
The Gatewood Cape from Six Moon Designs is a minimalist's dream that can serve as rain gear, pack cover, and shelter, among a few other things. Others dealing with harsh conditions or preferring more comfort will find it useful in addition to their regular kit.
Pros
- Light to carry 11oz/310g
- Packs small into its own pocket
- Multi-functional
- Well-constructed
Cons
- Multi-use conflicts
- Dries slowly once soaked
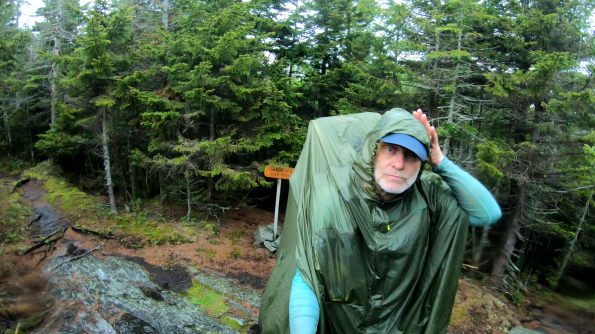
As part of my continuing search for an improved long-distance experience I am always trying out new things. This year I tried out a couple of things from Six Moon Designs that aren't new, but certainly improved my experience. They introduced their SilNylon Gatewood Cape in 2006 as a shelter that doubled as rain gear and pack cover. The name Gatewood is famous in Appalachian Trail lore as Grandma Gatewood was known for trekking the AT with her shower curtain shelter long before ultra lighting became a thing. The SMD Gatewood Cape has changed a little since its introduction, but still remains a simple to use, single-pole shelter that can be used to keep the rain off in motion as well. It can be paired with SMD's Serenity Net Tent, which I also tested this season and will be covering in a separate review.
The Gatewood Cape can be ordered from Six Moon Designs bundled along with optional seam sealing service, a set of six stakes and/or a dedicated 49" support pole.
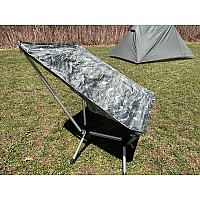
Packed:
Just a small, zippered pouch from the outside. Not even tightly packed, it can be crammed easily with other gear inside or jammed into an outside pocket for easy access.
Unpacked:
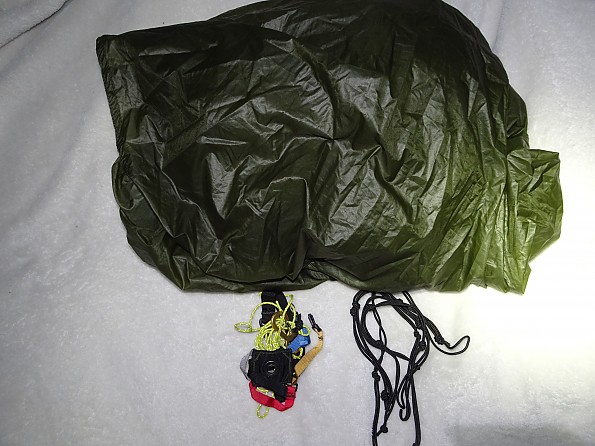
Opening the zipper lets you pull the cape out along with the tie out lines for stakes and the clip in harness for the support pole. These can be stored inside the zippered pocket while using the Gatewood Cape in either shelter or rain gear modes.
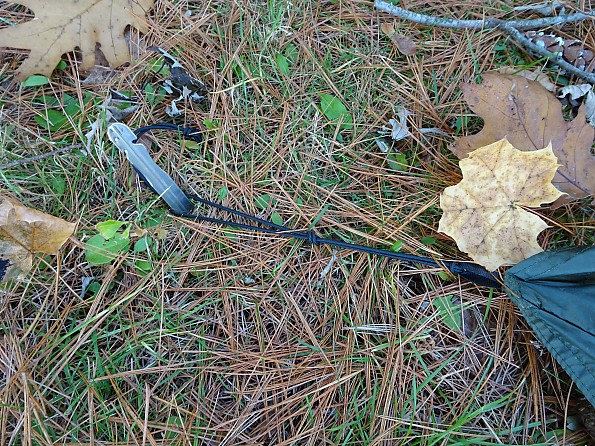
You will need to supply your own stakes for the six stake out points on the tarp plus two more and some line if you want to use the optional guy out points on the tarp. You'll also need an adjustable hiking pole or a dedicated 45"-49" pole.
Rain Gear/Pack Cover:
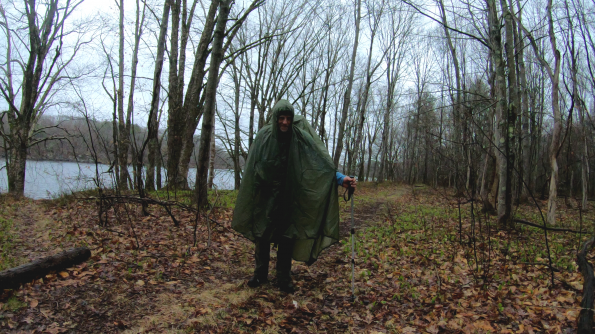
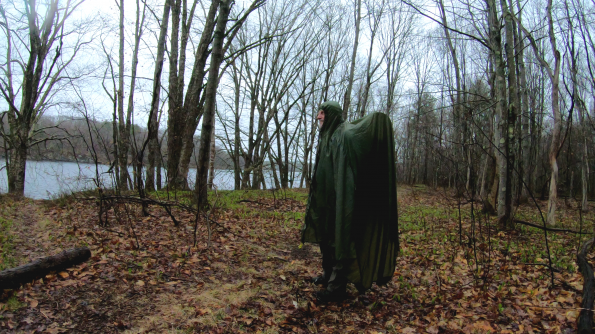
- Coverage
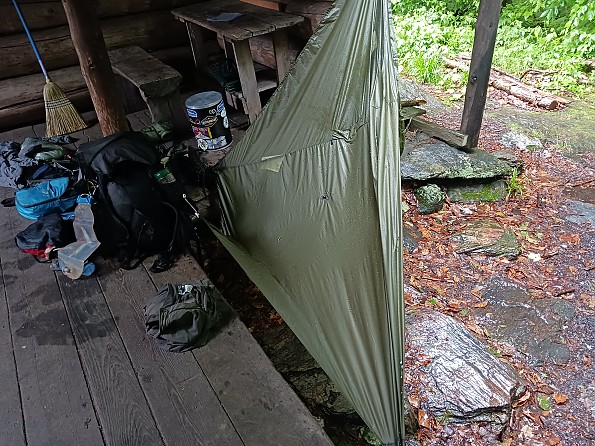
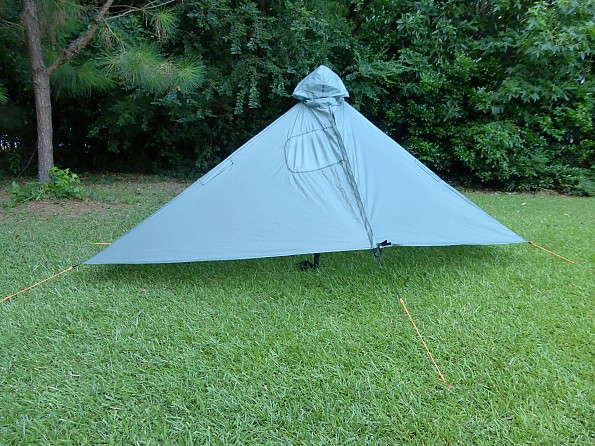
For many, this will be the primary reason they carry the Gatewood Cape, so let's start here. As seen above, left at full length the cape is large enough to cover both my body and pack with material hanging to about knee length on my 5'8" frame.
Steep or rough trail conditions and high wind can be dangerous with the full cape hanging down. In those times hooking the ends of the cape on the built-in snapped retaining straps is a good idea. It provides less protection this way so is better paired with rain pants or a skirt, but is much safer on trail.
Here you can see how well the cape covers a good-sized pack. In this pic I have my Wild Ideas Bearikade Blazer riding on top of my Six Moon Designs Minimalist V2. You can also see why the bottom needs to be raised in some conditions as there is a lot of material there. See the video later in the review for an example of what wind can do with that.
- Rain Protection
That full coverage is what allows most of the rain to just run down the cape. If using poles, the arms are exposed at least to the elbows and of course there is a face opening. In extended wet hiking I found that I was certainly wet inside the cape, but not soaked. The same was true for my pack; It was damp, but not soaked.
- Ventilation
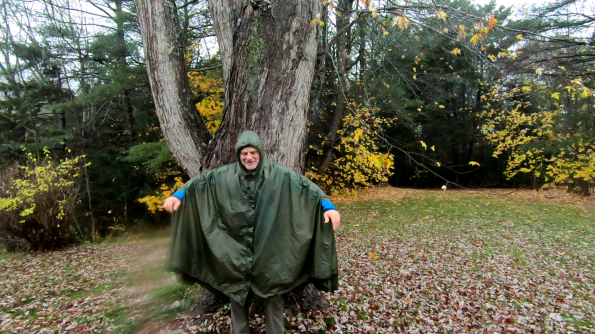
While hiking the garment doesn't naturally vent as the arm openings and hood all fit closely. Given that manual ventilation is so easy that isn't a problem. Just a quick flap of the bottom of the cape was all it took to exchange most of the trapped air. There is a double pull zipper running the full length of the front of the Gatewood Cape which could be used for ventilation in some conditions, but not really in heavy rain. Opening it to permit air movement let a lot of water in during full rain events.
Shelter:
- Room & Storage
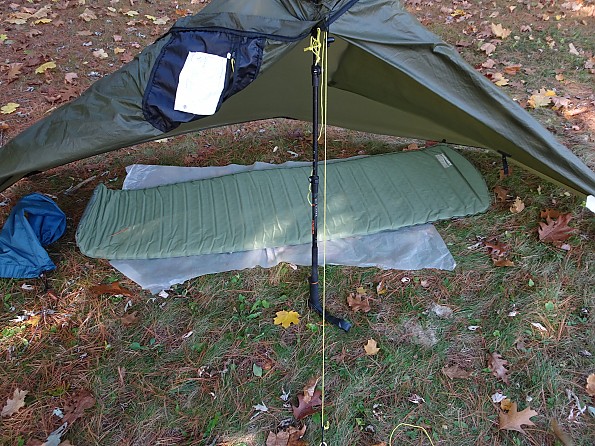
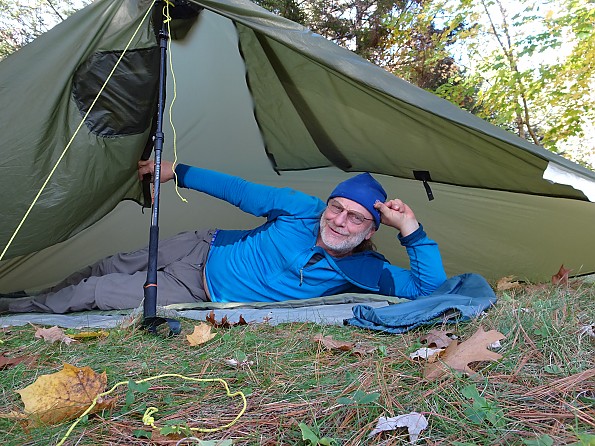
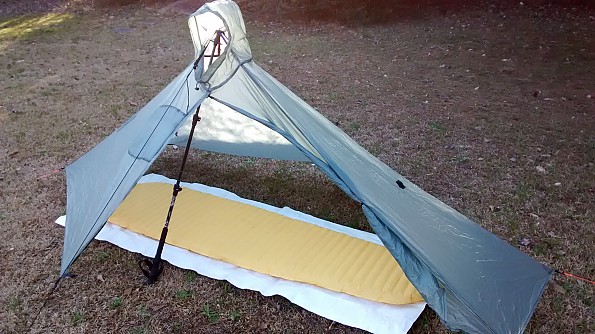
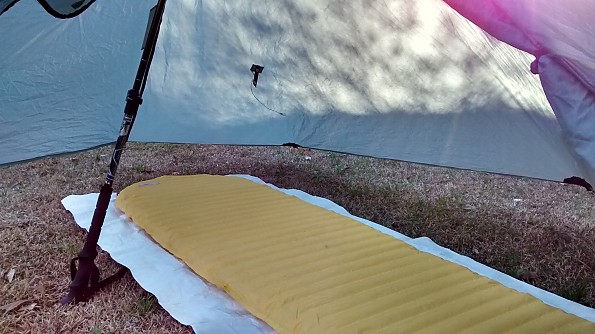
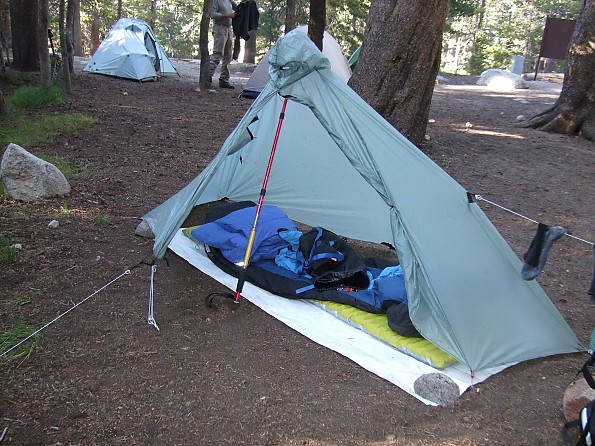
Measuring about 105" from end to end with about 84" of usable space under the roof there is ample room for a full-sized sleep pad. Those well over six feet in height may find their toeses and noses bumping up against the Gatewood Cape, but most other folks should have enough room to stretch out fully and roll from side to side.
Besides the small space around the body perimeter under the shelter there is also protected space in the front vestibule area. This isn't as well protected from rain due to the door panels not coming all the way to the ground, but pitching with wind direction in mind helps. In total there is about 35 square feet of coverage.
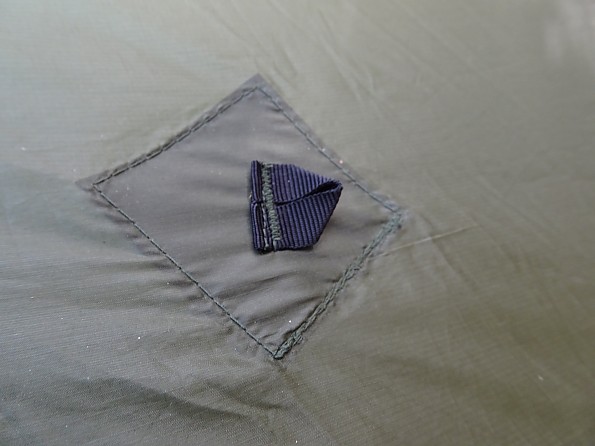
There also is the zippered pocket which can be used while in the shelter. It is a great place to stash a light, phone, or other small items.
- Setup
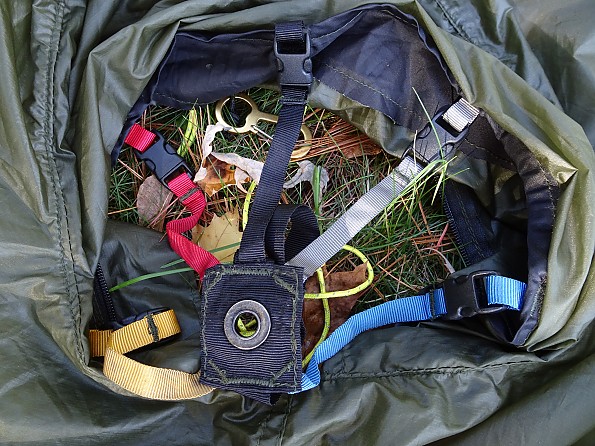
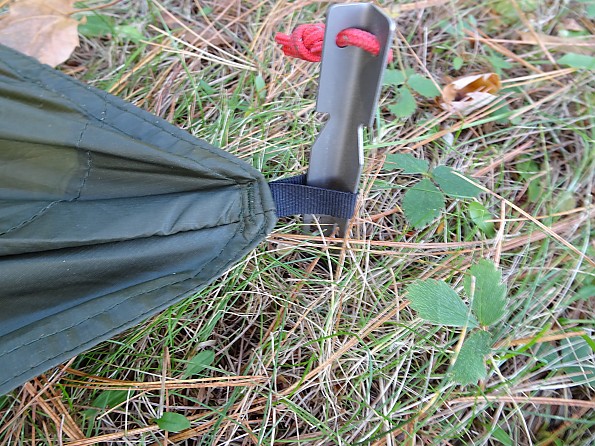
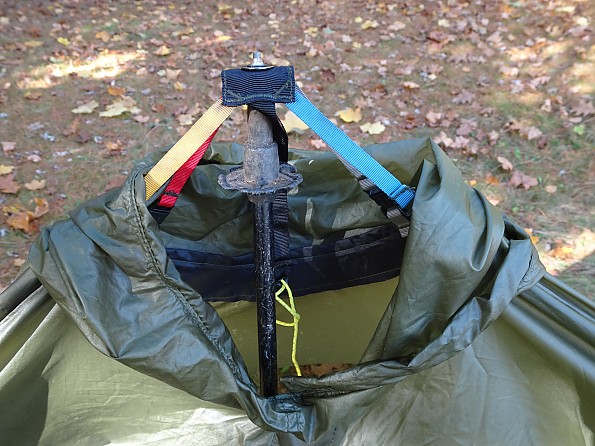
Putting the Gatewood Cape up in shelter mode is not really difficult at all, though you do need to at least attach the color-coded pole harness before starting and may want to attach the stake tie out lines to some or all of the guy out points.
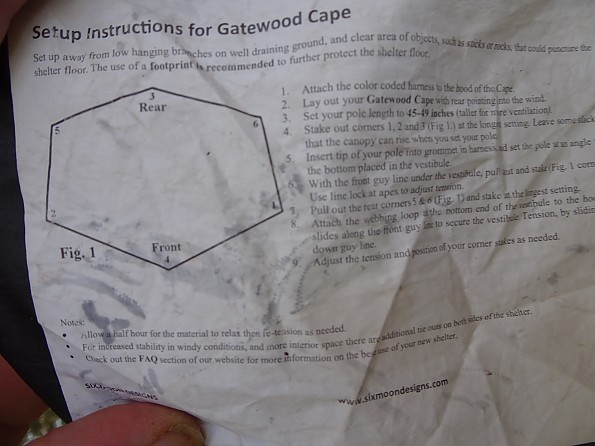
Once you are ready it takes just a couple stakes in front plus one in the rear before you are ready to insert the pole and raise the roof which gives you a place to stash your pack if it's raining. A couple more stakes and you are about ready to move in, though SMD recommends retensioning about half an hour later to accommodate material stretch.
- Stability & Weather Resistance
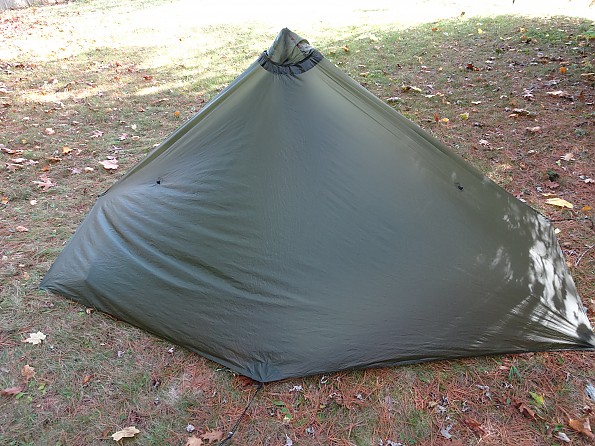
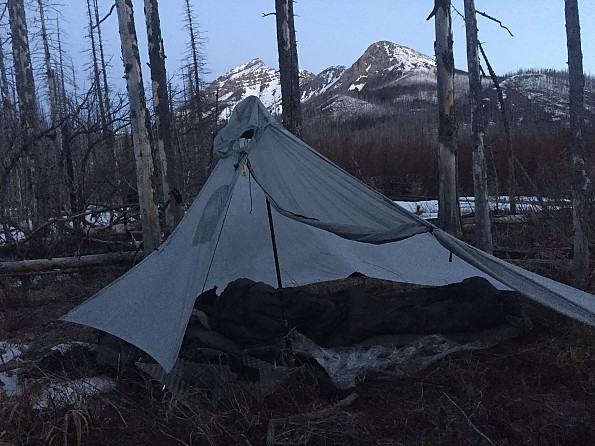
Pitched properly with the door to the lee side the Gatewood Cape is quite sturdy. The other side can be pitched very low to the ground sealing out wind and rain. While this shape sheds wind pretty well, there are also two guy out points that can be used for greater security and less billowing.
Rain is a challenge during setup, but held at bay quite well once the shelter is erected. The cape can be staked out low so for most of the perimeter rainwater runs off the tarp onto the ground. The exception is in the vestibule area where the door panels do not naturally meet the ground. This allows air to flow in for ventilation, but also creates a drip zone around the edge of the vestibule, making less area available to keep gear dry.
- Ventilation
One reason to attach the tie out lines for staking out the cape is that it allows you to pitch the entire shelter higher, leaving a gap all the way around for air flow. In wetter weather the gap under the vestibule allows for some air entry.
The hood of the cape acts as a roof vent if left open. This can create a chimney effect helping to circulate air as you sleep. Cinching the hood tighter kept rain out while still allowing some air movement.
- Features
Testing Conditions:

The Six Moon Designs Gatewood Cape was in my pack on every trip I took this year since it arrived back in May. Over the last six months I've covered hundreds of miles including a month on Vermont's Long Trail, a couple of week-long Baxter State Park trips in Maine, and shorter adventures and trail work outings. It saw more use as rain gear than shelter, but was tested for sleeping with and without the Serenity Net Tent.
Conclusions:
As you can tell from the 4 stars, I was pretty happy with what the Gatewood Cape could do for me on trail. I am not a minimalist or even much of an ultra-light backpacker, but in the right conditions I can see how a person could entirely rely on the cape to perform all of its functions without support. For my purposes, I see the cape as a tool to be used along with other gear, either shelter or rain protection. That resolves the issue of how you set up your shelter in the rain if you are wearing it as rain gear.
Since we are talking about that this is probably a good time to take a look at that video I mentioned. This will give you an overview of the Gatewood Cape in rain gear and shelter modes along with some insight as to how I used it.
I think that demo really shows the conflict involved with using the Gatewood Cape as both rain gear and shelter. Transitioning in the rain is going to be a wet event. It certainly can be done, but having a plan and being quick will help. Using the Veil wind jacket as short-term rain protection really helped.
Those of a minimalist bent could rely on the Gatewood Cape to handle all three jobs: rain gear, pack cover, and shelter in the right conditions. In the wrong conditions they could do the same, but requiring a bit more gumption heh. For many of the rest of us, I see the cape as having a lot of function when used along with other gear rather than fully replacing it.
I liked having the option to use it as a ground shelter in addition to my hammock and trail shelters. It could be set up in places my hammock couldn't be due to lack of trees and presented a very low profile in a stealth environment. On a long-distance hike this gives me the chance to do what works best to fit the challenges or joys of the moment.
As rain gear, I found it great for longer and heavier rain events. When hiking all day in the rain, especially in mountains, I expect to be wet no matter what I am wearing. What I want from my rain gear is to keep me from being soaked and to be able to maintain a comfortable, safe body temperature. The Gatewood Cape seemed really good at meeting those goals. It was easy to vent excess heat when things got steamy on a climb by just flapping the skirt. Having the cape draped over my pack meant the deluge that usually would run down my back and into my socks was directed away from me instead.

It seemed really important to hitch up the bottom of the cape when dealing with terrain or wind. Leaving it hanging down could be very dangerous, but the retention system available handles that well.
One other drawback I need to note is that once wet I found it challenging to dry the Gatewood Cape. This was especially annoying because carrying it in an outside pack pocket for easy access meant it got wet sometimes without being used. One time I found it still damp and a bit musty after this occurred without me noticing. It did recover just fine after airing out.

Overall, I was happy I decided to carry the Gatewood Cape this year. While I am not usually a minimalist, I can certainly see the appeal of using gear that serves multiple functions. I used the cape to collect water from a shelter roof one night on the Long Trail in addition to the designed functions. For me I see the cape as primarily rain gear with the added bonus of giving me a ground shelter to back up my hammock system. When combined with the Serenity Net Tent I have a lot of options on trail, which I really like.
Background
I have no prior experience with poncho shelters.
Source: received for testing via the Trailspace Review Corps
(Sample for testing and review provided by Six Moon Designs)
 Reviewed by
JRinGeorgia
+2,492
 February 28, 2016
The Gatewood Cape is a versatile and clever piece of gear that serves multiple functions so saves a lot of weight and packing volume both by using ultralight materials and by reducing your overall gear item count.
It takes the place of some of the larger and heavier items in your pack—your shelter, your rainwear, and your pack cover.
Pros
- Multi-use shelter and raingear in one item
- Ultra lightweight
- Good value for the money
Cons
- Small compromises for each function
This is a review of the Gatewood Cape from Six Moon Designs. SMD is a cottage gear company in Oregon that makes ultralight, high quality shelters and backpacks. I am not affiliated with Six Moon Designs in any way.
The Gatewood Cape is a versatile and clever piece of gear that serves multiple functions (“multi-use”), and so saves a lot of weight and packing volume both by using ultralight materials (30D silnylon) and by reducing your overall gear item count.
And it isn’t serving multiple purposes to replace smaller ditty items that don’t weigh much anyway, but rather it takes the place of some of the larger and heavier items in your pack. Specifically, it serves as your shelter with decent storm coverage, your rainwear, and your pack cover. And it weighs only 12.66 oz seam-sealed on my scale.
But because it is designed to do more than one thing it comes with some compromises, which means it doesn’t do any of these jobs as well as individual, single-purpose pieces of gear would. So as a shelter it would merit only about 3.5 stars and as raingear it would merit perhaps 3 stars, by doing both jobs fairly well and allowing you to eliminate at least one entire major piece of gear it would merit something higher than the 5-star scale allows. So taking everything into consideration I give it 4.5 stars.
As a shelter
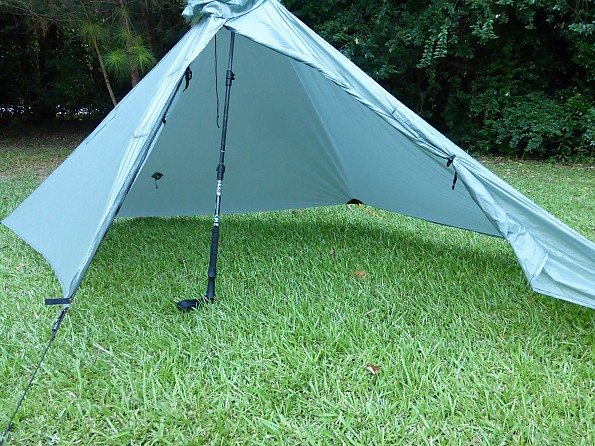
The Gatewood is a shaped tarp that is supported by one trekking pole or dedicated tent pole. Coverage is about 35 sq feet and center height is 44". It needs 6 stakes and 5 two-foot segments of cord to fully set up (the front guy line is built in as part of the tarp).
Inside there is enough room for someone up to about 5'10" to stretch out. The shelter has tie-outs on the walls above the head and legs to provide the option of a little more room for taller people to stretch out as well.
Unlike shelter mode of most other poncho/tarp combo pieces of gear, the Gatewood has decent storm coverage. The front has a zippered door that can be zipped down like a very low/deep beak, providing coverage against all but the heaviest rain splashing under the front edge. Or, one side or both can be rolled back.
Note that while some people say they can pitch the front down to the ground, in my experience, the experience of most other Gatewood users, and according to the manufacturer themselves, the front does not come all the way to the ground like the sides and rear do, instead it leaves a foot or so clearance and thus is more like an extended beak that still provides pretty good coverage.
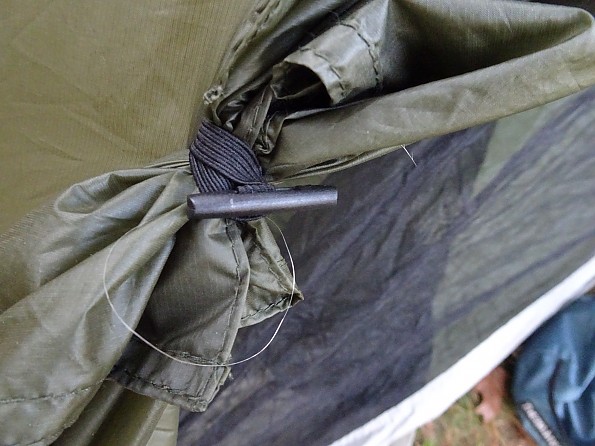
The shelter offers decent ventilation by using the cape’s hood as a large top vent that you can cinch down from inside to prevent rain from getting in. The pole attaches through a grommet that is suspended in the center of this hood area by an “octopus” of straps that attach around the hood hole.
The Gatewood has a multi-use pocket built in; when set up as a shelter the pocket is on the inside front wall, giving you a place to store things you want handy like eyeglasses and headlamp.
There is room on either side of you when lying down in the shelter to store your pack, shoes, and other items.
For complete coverage I use a 30x80 groundsheet of tyvek and a Sea2Summit nano mosquito net. Pretty much any solo inner designed to attach inside of a mid-shaped tarp should work with the Gatewood, so you can add an inner with a bathtub floor if you want. The Gatewood has a couple of snap-loops on the inside walls, one above the head area and one above the legs, for attaching an inner (and these snap-loops perform double-duty, described later).
Being a shaped tarp, the Gatewood can be a little tricky to get pitched just right, but with some fiddling you learn the subtle balances and tradeoffs to get a good pitch and from then on it’s pretty easy. Once pitched the fabric will relax after a while, so you may need to re-tighten.
Overall, as a shelter the Gatewood provides decent coverage, a little tight for taller people but with room to your sides for storage and plenty of headroom to sit up.
As raingear
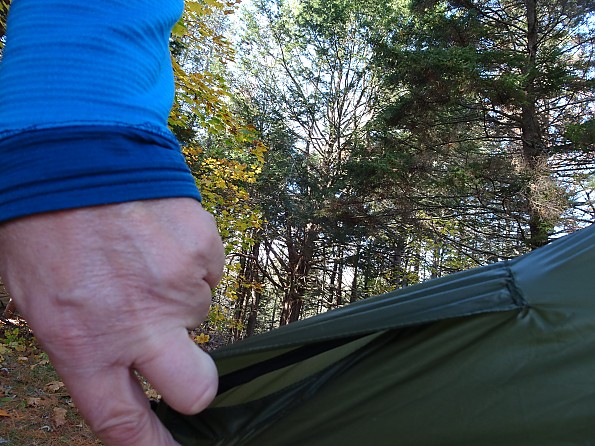
By design, this piece of gear is a cape rather than a poncho because a poncho has full openings on the sides for the arms to come through, whereas a cape is closed on the sides and provides more protection. The Gatewood has slit openings for your arms to go through (and, these arm holes are designed to not let rain in when in shelter mode).
The cape hangs down to about the knees on someone about 5'10" so provides pretty good coverage. It has a decent hood with a drawstring. The cape is bigger in the back, designed to fit entirely over both you and your backpack, eliminating the need for a pack cover. The double zipper runs down the front of the cape and allows a variety of ventilation options. The pocket of the Gatewood in cape mode is on the inside breast, perfect for keeping maps, snacks, etc.
The snap-loops that are on the inside for connecting an bug inner when in shelter mode also come in handy in cape mode. In order to get the size it has as a shelter, the Gatewood needs panels that are too large for wearing in cape mode, so it would hang down and could trip you or drag on the ground, but these long panels can be pulled up to the snap-loops to hold them up and curtail the length.
The Gatewood does have some shortcomings as raingear. It does not cover your arms from below your elbows on down. For rain that is brief, light, or warm this may not matter much, and for wetter conditions you could supplement with your wind shirt. The body of the cape can be pretty billowy, but it’s easy to use some cord around the waist to tame it a bit. And because it covers so well and is made from non-breathable silnylon the ventilation you can achieve with the front zipper is only fair.
Overall, as raingear the Gatewood certainly gets the job done, but it represents a bit more in compromises as rain gear than it does as a shelter. These compromises are fine for trips where you don’t expect a lot of rain but potentially could be enough that you can’t be without raingear. So if you want to thru-hike the JMT it could be a great choice, but if you want to explore the rainforests of the PNW maybe not.
Packing
To pack up the Gatewood, the pocket now assumes its third role of stuff sack — just stuff the shelter inside the inside-out pocket and zip it up. The pocket is big, so it’s easy to get the whole Gatewood pulled up into it with room to spare for your guy lines, disposable poncho, etc. It then can be stuffed pretty much anywhere in your pack, I suggest you carry the Gatewood considering it as your raingear, so near the top of the inside of your pack or in an outer pack pocket.
Other considerations
One potential drawback of using one piece of gear as both your shelter and your raingear is: what do you do when you need both functions at the same time? For example, you get to camp in the rain, how do you set up your shelter without getting soaked yourself? Or, what if you need to pee during the night and it’s raining?
The solution is to have other gear that can give you rain coverage in a pinch, for those brief moments that your Gatewood is busy being a shelter. The approach I use is my rain-resistant wind shirt (which I’m carrying anyway) for coverage in drizzle and light rain, and for heavier precipitation I carry a $1 disposable poncho that weighs only 0.38 oz on my scale. Finally, I often carry my LiteFlex umbrella, so then I really do have good coverage without the Gatewood if needed.
Another potential drawback is that I normally leave guy line attached to the tie-outs on my shelter, both to save time and to keep them organized. But, if rain suddenly rolls in I don’t want to have to deal with cord hanging off the raingear and dragging in the mud or tripping my feet, and I don’t want to have to untie it all as I’m getting soaked. On the other hand, I also don’t want to have to untie and re-tie the cord every morning and night just to be prepared for rain each day that may or may not happen.
To address this I leave each length of cord attached to an ultralight mini biner, each one weighing only 0.1 oz. That way I can leave the guy lines attached to the shelter and still quick-release the cord if a rainstorm pops up, for a small weight penalty.
All in, my total weight for all shelter and rain coverage is just over 18 ounces without the bug inner or 21 ounces with it. That includes my shelter, groundsheet, guy line, stakes, rain coverage, pack cover, mini biners, and disposable poncho. I’m not including the trekking pole, the wind shirt or the umbrella because usually I carry these anyway.
Shelter mode – pitched with the door open: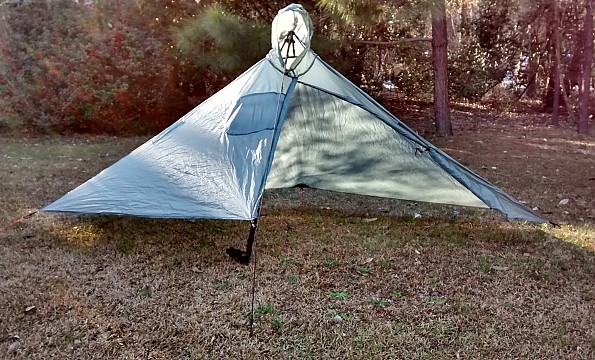
Shelter mode – storm pitch: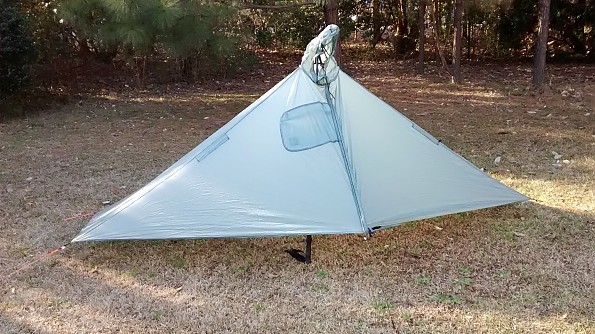
Shelter mode –rear: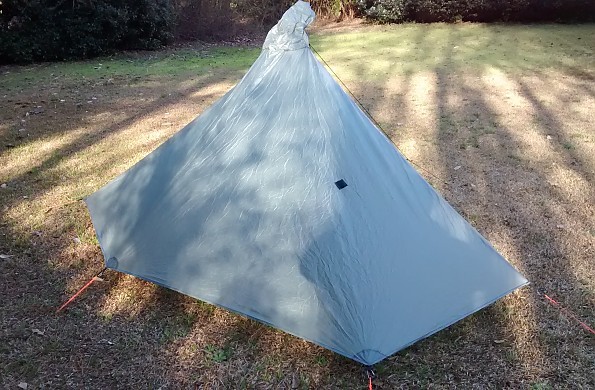
Shelter mode – top vent (which is the hood in poncho mode) can be opened or closed, from inside or outside of the shelter: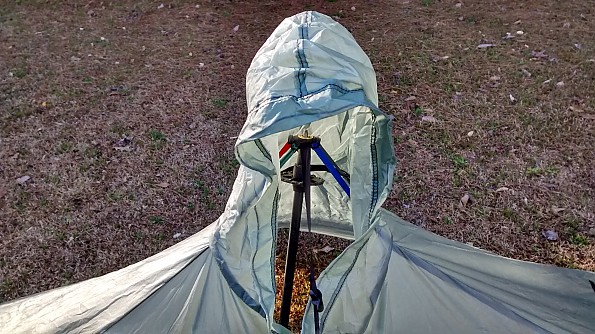
Shelter mode – clever pole support: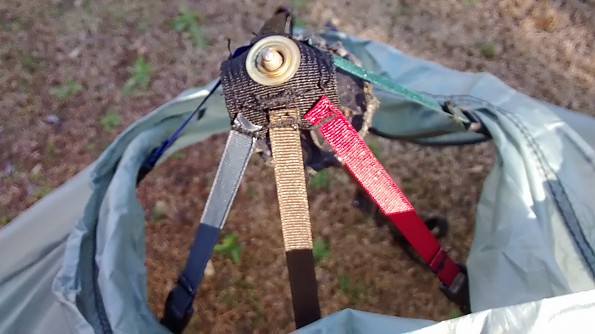
Shelter mode – tie-outs for extra head and/or foot room:
Shelter mode – interior space: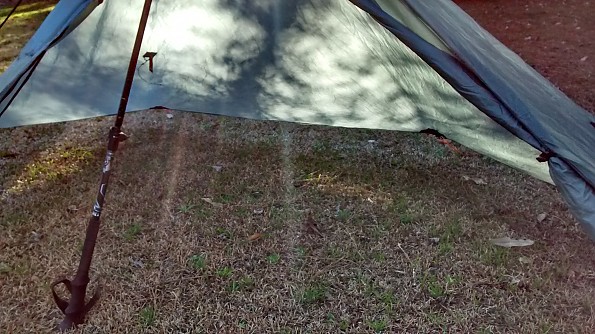
Shelter mode – vestibule: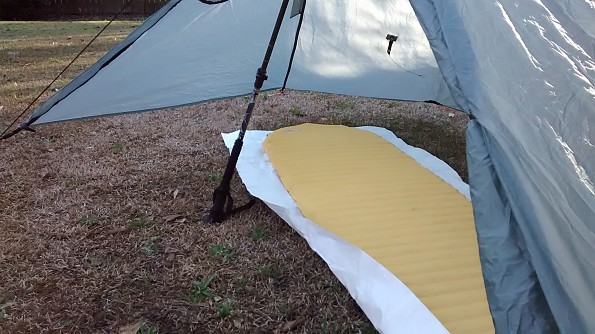
Shelter mode – pocket for eyeglasses and ditty stuff you need in your shelter: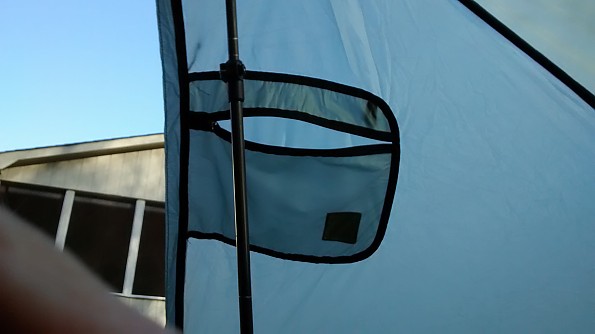
Shelter mode – snap-loops to hold up a bug inner or bivy top tie-out: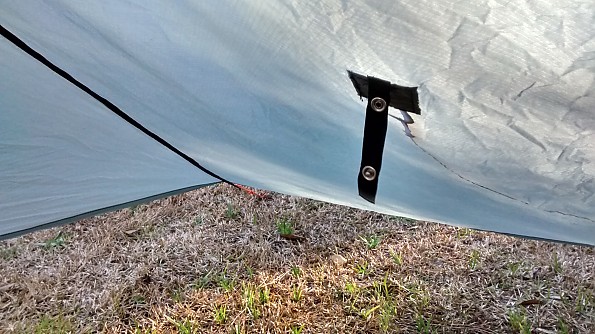
Cape mode. Note that arms are covered below the elbows but not all the way. Also note at the bottom on the sides you can see how the material is being pulled up to the inner snap loops so that the panels don't drag on the ground: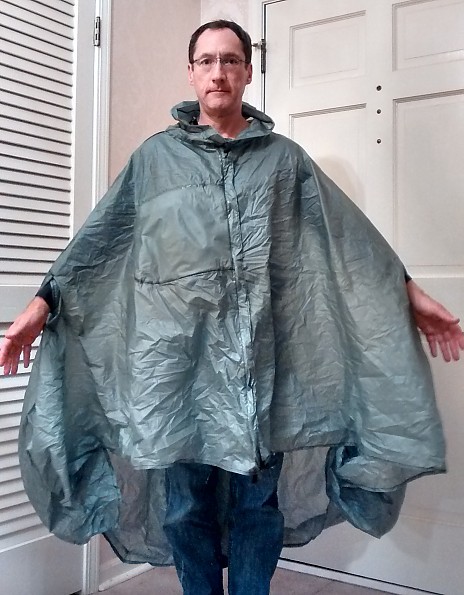
Cape mode – hood cinches down tight and can wrap around a hat brim:
Cape mode – acts as a pack cover: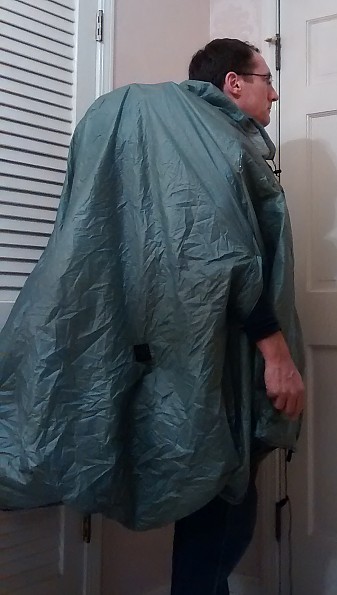
Cape mode – pocket is handy for maps, snacks, etc: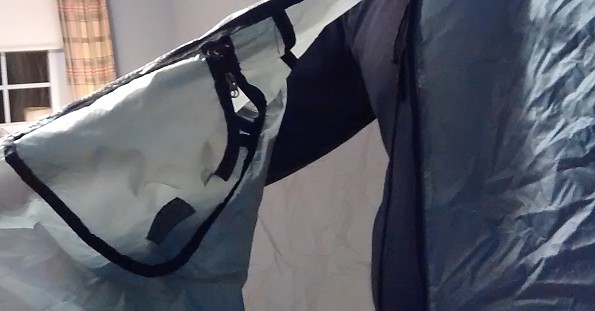
Cape mode – snap-loops hold extra length from dragging: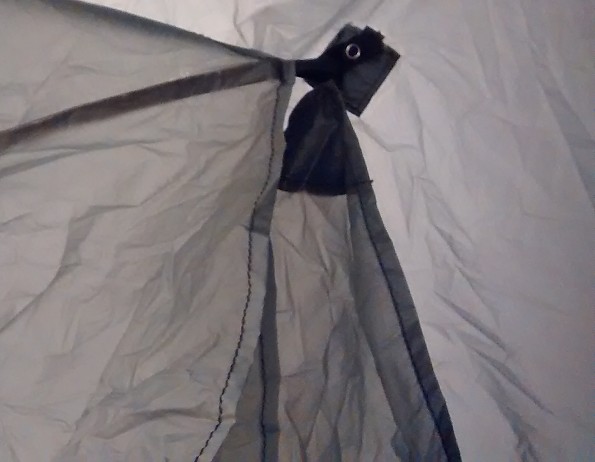
Pocket also acts as a stuff sack (that's a softball not a baseball shown for comparison):
Source: bought it used
Price Paid: $85 in great shape
 Reviewed by
Scott Etienne
+223
April 23, 2011
I purchased the Gatewood Cape Poncho-Tarp with the Serenity Net Tent interior screen-tent with bathtub floor. I love this concept, and in practice Six Moon Designs (SMD) nearly got it perfect. The Poncho-tarp weighs in at 11 ounces and the SNT weighs in at around 7 ounces. Talk about ultralight!
The Gatewood Cape is a poncho-tarp that is cut to be a pyramid-solo-shelter with a zipper in the middle--(where most would want it) and (of course) with the hood at the peak. There is what I call a 5-strap "spider" that clips into the neck-area of the hood with a grommet at the center of the spider for a pole. It is designed to be erected with a single walking stick, or SMD offers a 44-inch carbon-fiber pole sold separately. Worn as a poncho, there are arm-exit-slits exactly where I would want them with Velcro closures, and the tent-zipper is centered under the hood.
The Serenity Net Tent is a bug screen tent with a silicone-coated, nylon bathtub floor that is 20-inches wide at the foot and 24-inches wide at the head of the tent. It is designed to fit under the Gatewood Cape and is also pyramid-shaped with a clip-hook at the peak, and elastic loop-straps at each of the four corners for connecting to the stakes that anchor the tarp.
I used the combo on a couple of extended-weekend trips on the Ice Age Trail in Wisconsin and on the River-to-River trail in Shawnee National Forest in Illinois. I never needed to use it as a poncho on the Ice Age Trail, so only used it as a tent. Pitching a pyramid tarp is tricky--the spacing of the ground-stakes takes a fair amount of guess-work to get the walls equally-taught.
The tent inside without the net-tent feels somewhat roomy for a single-person tent (considering my 5'11" size). I wish the same could be said about the pre-2011 net-tent. The screen-pitch is hard to get taught--my best pitch droops a little. I can sit up straight in the tent, but with the net-screen touching my head which is barely tolerable. I generally only sleep and change clothes in my tent, and like most others I know, change my clothes lying down.
Once I felt caluserphobic because of a poor site-choice. Not being able to move around much in an uncomfortable spot was difficult. Next time I was sure to find a comfortable spot and a good pitch, so as to not feel claustrophobic. Also, the location and size of the door in the net-tent makes getting in and out a bit of a exercise in gymnastics. The size of the screen tent leaves a nice-sized vestibule that is just big enough to fit my backpack.
The Shawnee trip was 45 degrees Fahrenheit and rainy, and on that trip the poncho worked great, keeping me and my backpack dry while hiking. The arm-slits and zipper front gave me venting options with good air flow that helped keep me cool while hiking in the rain. It also kept my backpack dry.
My only other criticism of the Gatewood Cape, is that it does not come seam-sealed. It would be nice if SMD would factory-seam-seal the cape. The Serenity Net-Tent needs a bigger door, and would benefit from a slightly-higher floor, the half-inch or so it comes up, seems a bit miserly. And, the net tent could be redesigned to have more space if the side opposite the door, were matched to the Gatewood Cape's floor-lines. Most of these issues have been addressed in the 2011 version.
I imagine, if your much over 6', you would find it too cramped. I think SMD should offer a variation for larger people. I think if they offered an XL that was around six-inches longer all the way around, it would work well for 6'-6'5," of course with a similarly-sized net-tent.
So, I dinged this tent-combo a half-star mostly because of shortcomings of the net-tent, but only a half-star because I really love the light-weight and overall execution is superb.
Price Paid: $255
 Reviewed by
rambler
+90
 June 15, 2019
Why I no longer use this as rain gear: In wind it blows all over the place unless tied at the waist. Hand and arms are exposed. Maybe not an issue for some, but if you are using hiking poles, your arms will be constantly exposed and rain will most like seep further up into your clothing. Want to get something out of your pack while it is still raining? It is possible, but not convenient to get your pack on and off without getting wet.
Next, suppose it is still pouring rain when you want to put up your shelter. I suppose one can set up the shelter while still wearing it and not get wet, but you had better practice at home! In rain, I use rain gear, for shelter I use the model of the Gatewood Cape that is not a cape.
Pros
- Makes a nice shelter
Cons
- Exposed arms and a larger area of clothing especially when using hiking poles
- Ponchos can become sails if not tightly tied around the waist
- If it is raining while setting up as a shelter, how does it continue to work as rain gear?
- No mosquito netting
Easy to set up as a shelter, but be sure to read the directions, or you might be surprised. It is nice that it needs only one pole, especially since I broke a pole while hiking, so was down to only one for the remainder of a multi-day trip.
It is stable in a wind, but try not to have the pole side facing the wind. It can be turned around quickly, however. If the pole side is facing the wind, shorten the pole for more protection.
Condensation is not a problem. I even had the shelter covered with frost on a night below Mt. Whitney along Guitar Lake. I did not get wet.
It is nice to get pack and all gear under the shelter with the mini vestibule allowing enough space, and can easily get dressed from a sitting position.
I did sew in two extra tie-out points as mentioned above. This really helped to pull the side out and kept taut. (Sorry, I cannot locate photos.)
For pegs, I found that the needle like shapes work best in rocky soil. Carbon fiber stakes are light, but I have had them snap and become useless.
The non-cape version has become my go to shelter. I am 5'9", my son who is over 6' just fits, but just barely. Would not recommend it for his height.
Be sure to read about Granny Gatewood for whom this shelter is named!
The shelter I am referring to is the Wild Oasis, which is the same design as the Gatewood, without the rain gear features. The Oasis also has mosquito netting as a skirt which the Gatewood does not.
Background
I used for a week hiking the AT. Ditched after encountering high winds and rain. Used the same version of the cape that is not a cape, but just a shelter (Wild Oasis). A satisfactory shelter while thru-hiking the John Muir Trail (14 days). I did add a couple of more tie-out points and the bungee cord method of keeping the tie-outs taut. Also learned to put rain protection over the bottom of my sleeping bag, especially if the sleeping ground was not flat. My feet poked out one rainy night!
Source: bought it new
![]() Reviewed by
Reviewed by
Blisters
+140
September 27, 2010
Before my trip to Yosemite in early September I contemplated a rain weather gear choice. I knew it was dry in Sept. but also didn't want to go unprepared and also be burdened with heavy gear I would only carry.
The solution was to find something that could have multiple uses (something many backpackers do to shave ounces). Since I also had to carry a 40oz bear can, I needed to make a trade-off. The tent and rain gear were my choices.
I chose the Six Moons Design Gatewood Cape as this could be my tent, my poncho, and it was light enough that even if I didn't need it I wouldn't mind carrying it. The tarp/poncho tent-like system, weighing about 12ox after seem sealing (never did that before and the company will do it for you for a fee but I didn't have the time to wait) which was less than my tent and poncho by about 2 pounds or better.
I initially set-up the tarp in the yard as a trial run. The color-coded webbing make set-up simple and fast (still not exactly certain how the front guy-line is supposed to go but used my intuition to decide). My advice is to stake the back of the tarp, opposite of the door, then use your hiking pole, then stake the remainder.
I was set-up in about two minutes. This time was pretty much the same on the trail, sans time to find rocks to help support my stakes in the very loose, sandy soil in Yosemite. Tear down was about a minute which I really enjoyed being able to pack-up so quickly in the morning.
The tarp is not for very tall hikers. Those over 6ft might feel cramped in an already tight quarters. I am just under at 5'11" and still it felt tight. You have a decent amount of room on the sides if you stage the hiking stick at an angle, but you will be a little tight on headroom so just watch it when you initially sit up.
The fact that you can stake this down completely to the ground and zip up the fly makes it feel very much like a tent. The hood acts like a great vent system in dry weather.
I did have some condensation when I sealed everything up tight and subsequently either left the hood open, door open, or both. Unfortunately I cannot say how it would hold up to rain but it did well in high winds at 9600 feet; the material is very durable for its weight.
If you are still worried about creepy-crawlies then consider the netting option designed for this tarp/poncho set-up. For me this edged me closer to 'cowboy-camping' and hopefully doing away with a tent altogether, however I might still opt for netting in the wetter summer months.
For the weight, compactness, and simple pitch and tear-down I would give this a 4plus. It is a bit pricey, but I hope the gear will last to be worth it. For multi-use gear it is an excellent choice for longer trips where weight is a factor.
Improvements? Perhaps make it a bit longer, but I know those precious ounces count.
Design: Tarp/ponch tent
Sleeps: 1
Ease of Setup: very easy, in just a few minutes
Weight: 12oz with seam sealer.
Price Paid: $150
 Reviewed by
bigskyrunner
REVIEW CORPS
+1,950
June 5, 2019
Shelter AND rainwear in one svelte package!
Pros
- Lightweight
- Low volume
- Well designed
Cons
- it's a compromise—not a perfect shelter, not a perfect rain jacket
For those looking to shed serious weight, it's tough to beat a beat a shelter AND rainwear that weighs in at 13 ounces for both!
The new Gatewood Capes are made from a slightly lighter fabric and now weigh in at a very svelte 10 ounces (15% lighter than the previous version).
My entire setup consists of the Gatewood Cape, six lightweight stakes, guy lines and 5 mini biners for a total weight of 13 ounces. The biners are used to facilitate a quick change from shelter to raingear (and back), by allowing the guy lines to removed easily. It also packs up very small, talking roughly the size of a large paperback.
I've only used it as raingear a couple of times, but it does the trick. It gives fuller coverage than your typical rain jacket and breathes better due to the poncho design. The drawback is in very windy conditions when the poncho can get a little billowy. I use a length of shockcord to secure it around my waist, which helps in the wind. The hood has some adjustment, but best to combine with a billed cap so it doesn't come down over your face.
I was concerned about room after reading several reviews, but also read a few that talked about lengthening the guy lines to allow a slightly taller pitch—giving you more room and also better ventilation (reducing condensation).
It takes a little practice pitching it, like any shelter, but is relatively easy to pitch.
I've had mine out on several outings and am pleased with its performance as a shelter. A couple of nights of light rain, so can't say how it would fare in steady downpours, but my guess is good. I don't think I'd want to test it out in really high winds, as there simply aren't enough stake out points. But barring severe weather, this shelter will get the job done.
If you are very tall (I'm 6' and probably getting pretty close to the limit)—it's probably a shelter I'd pass on.
It's not a perfect shelter, it's not perfect raingear, but it's pretty darn good at covering both at a fraction of the weight for a typical solo shelter and rain jacket.
Background
I've had this shelter out on three different trips in Montana.
Source: bought it new
Price Paid: on sale for $110
Your Review
Where to Buy
You May Like
Accessories: Six Moon Designs Serenity Ultralight NetTent,
Specs
| Price |
MSRP: $155.00 Current Retail: $155.00 Historic Range: $95.00-$155.00 Reviewers Paid: $85.00-$255.00 |
| Weight |
11 oz / 310 g |
| Pack Size |
10 x 8 x 1.5 in |
| Coverage |
35 ft2 / 3.2 m2 |
| Canopy |
15D Silicone Coated Nylon / 1800mm Rating |
| Zipper |
#3 YKK |